
Today you will learn exactly how to start a blog or website step by step.
And it’s going to be the most complete guide on the internet.
In fact, this is the same guide that helped the world’s highest-paid bloggers get results in record time.
Here’s the proof.

(Source is in the first comment.)
So if you want to get paid like them, you’ll love the detailed strategies in today’s guide.
Let’s dive right in.
First, have a look at all the topics at a glance.
Breakdown of Each
Now, I’m going to break down each of these topics below in a comprehensive way.
Starting with chapter one.
Chapter One
What Is Blogging?
In this chapter,
you will learn
what blogging exactly is
and how it works.

The Definition of Blogging
Blogging is an effective way for individuals, businesses, or organizations to communicate their ideas, experiences, or knowledge on various topics through written content, including texts, images, or videos.
It is aimed at reaching out to the audience, creating a loyal fan base, and providing the latter with the necessary knowledge on various issues.
It is always wise to think of it in terms of an online diary or journal that has been shared in the public domain.
But the fun is that
You can make money blogging like him per month,
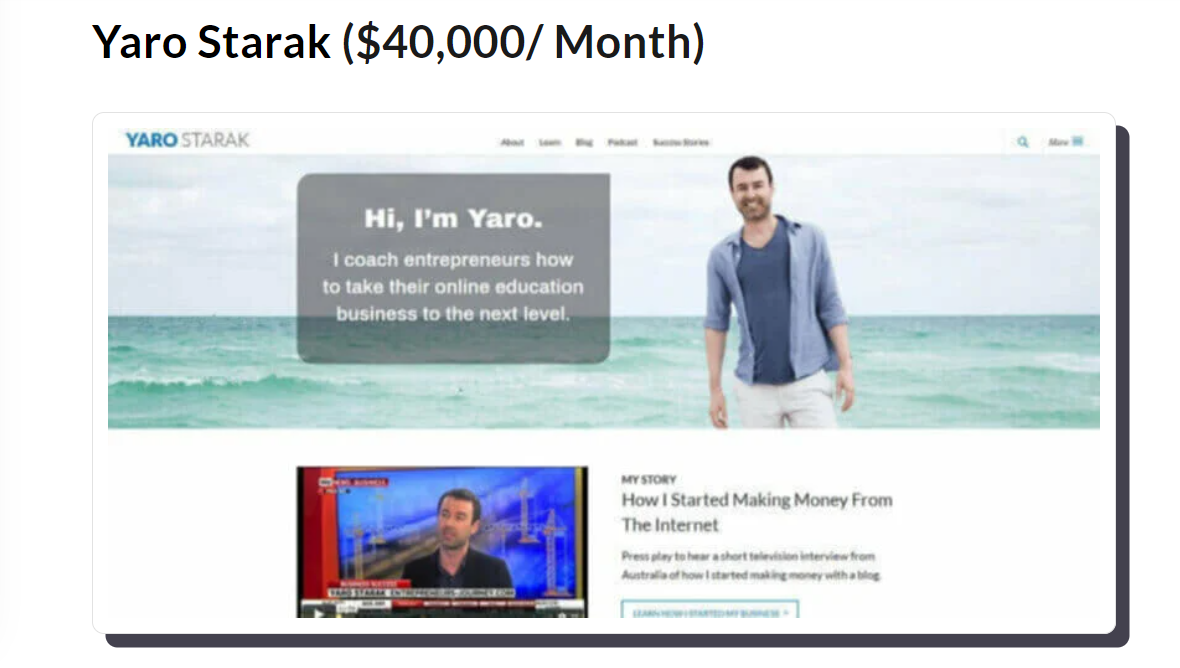
Lile him
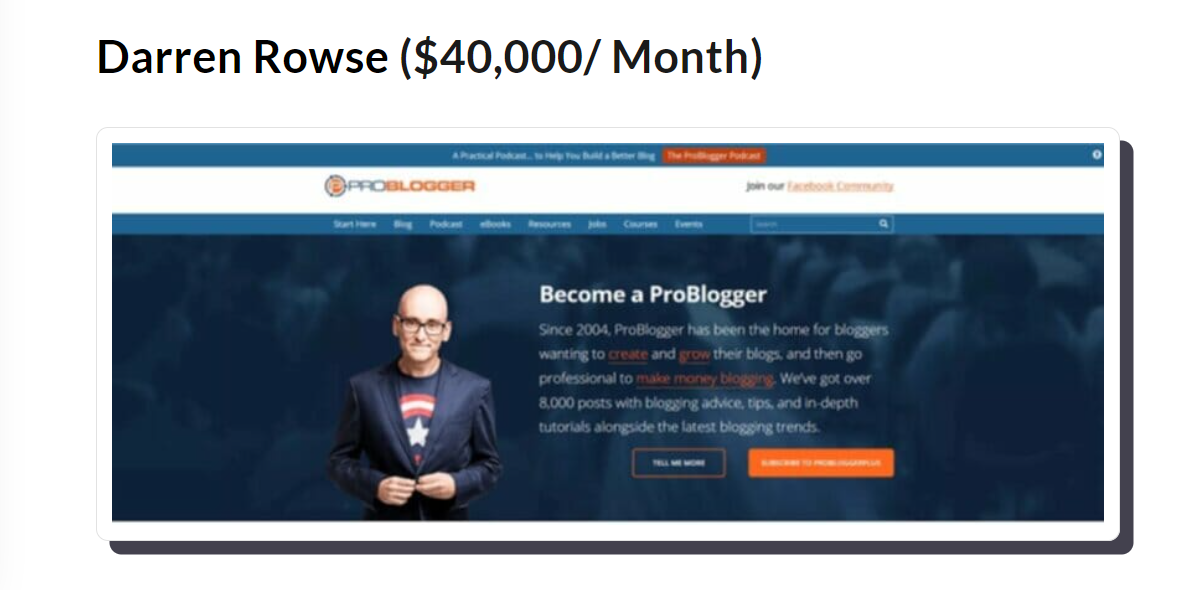
Lile him

Lile him

Cool.
I think you are telling me in your heart that
I don’t want to earn so much like 40,000, 100.000, and 1,000,000/month.
Just show me how I can start earning and make at least an amount of income so I can live with my family happily.
Ok, I will respect your feelings and your desires.
Just you need two things.
- Staying With Me.
- Keeping Your Patience Till the End.
Well,
Now that you know what blogging is, let’s work on selecting a niche.
With that…
Chapter Two
Select A (Profitable) Niche
A niche is a first and root pillar.
It shapes or breaks your content,
audience, and overall success.
Question: How do I select the right niche?
Answer: Choose a niche that
combines two strategies.
Here’s the deal.
Passion-Driven Niche
Interest-related blogs are those that are based on your passions, interests, or extracurricular activities.
Many of these blogs are written in a personal style and are quite effective at talent management, and once you get hooked, anything goes.
That is why it is much better to write about what you like—it makes the work on content creation more sustainable.

- Pros: It is cheap to create, is genuine, and does not fail to capture the audience’s attention.
- Cons: It may not bring a lot of traffic to the site or monetary profits.
For example
Niche: self-writing and narrative writing
Pros:
- It is real and fun, which makes people be able to share personal things and come up with whatever they want.
- It is easy to create as it uses everyday stories of the creator, his/her thoughts, and observations.
- Develops a good relationship with a loyal audience that is interested in realistic and emotionally driven content.
Cons:
- It may not gain popularity because it is very confined to detailing a certain niche or a certain type of thought.
- It may be difficult to appeal to numerous customers to invest in a niche that isn’t connected to high-value categories.
- It is a narrow niche; that’s why it can not reach a large number of audiences and can not generate a significant amount of income.
I hope you got it.
And you are not going to select this type of niche.
But if you want to work on it, you can start.
It depends on you.
Now’s the next one.
Profit-Driven Niche
Profit-driven blogs focus on niches with high demand and monetization potential.
These niches may not always align with your interests, but they can be financially rewarding.

- Pros: Higher potential for traffic and income.
- Cons: Must require more research and effort to maintain.
For example
Niche: Tech Product Reviews and Comparisons
Pros:
- As tech enthusiasts and consumers are always seeking reliable product reviews and comparisons, there is a large audience potential.
- High-income potential through affiliate marketing, sponsored content, and partnerships with tech brands.
- The content is evergreen, with opportunities to continuously update and compare new products as they are released.
Cons:
- Content creation can be demanding, requiring access to a variety of tech products and often necessitating a significant upfront investment.
- The niche is highly competitive, with many well-established blogs, YouTube channels, and review sites dominating the space.
- Maintaining authenticity can be challenging if the focus shifts too heavily toward monetization, potentially leading to biased reviews.
Also, got it?
Combinated Niche of Passion and Profit
Think about your goals and resources.
A balance between passion and profit can lead to a successful and fulfilling blog.
Because there you have passion as well as significant income opportunities.

Pros:
Authenticity: Get close to your audience and feel what they feel.
Sustainability: This will provide a sustainable positive attitude and motivation. Fulfillment: Get satisfaction of individual needs where one practices his/her profession.
Market Opportunity: Therefore, you can find high potential for making money out of your passion if this particular field is already popular; growing your business might lead to increased earnings.
Cons:
- Investment: involves start-up costs.
For example
Niche: Eco Products and Environmentally Friendly Lifestyle
Pros:
Balance of Passion and Profit: it also targets passionate consumers who have concern over the environment and an emerging market in environmentally friendly products.
Engaging Content: Chances to write articles on home improvement, product recommendations, how to live, and own experiences of practicing the ‘green way’.
Income Potential: Affiliate marketing, sponsored content, and marketing of green affiliate companies and businesses.
Cons:
Content Challenges: It may need continuous research and development to cover the area with new product lines according to sustainability.
Audience Growth: There is always a set of users, not necessarily numerous, and the demand is rising rapidly as the number of people discovering it is growing.
A Big Bonus of Chapter Two
Research The Selected Niche
The fourth step comes as follows:
Conduct a study on the identified and agreed areas of interest: passion, profit, and the combined specialty.
Thus, it assists you to be informed on whether you should start engaging in it or not.
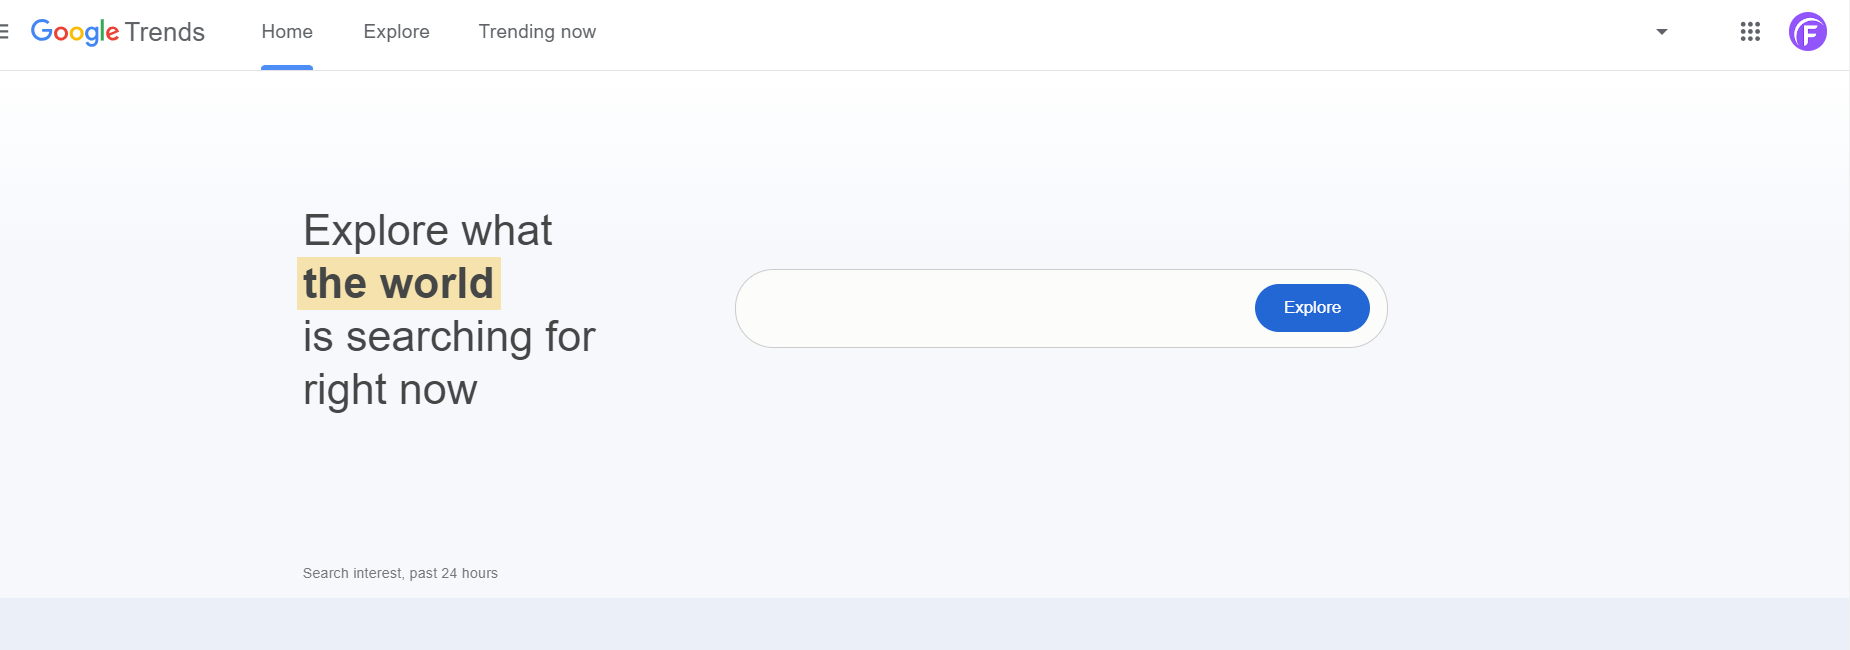
Start by using a tool like Google Trends to identify the niche potential.
Because it provides insights into search trends over time.
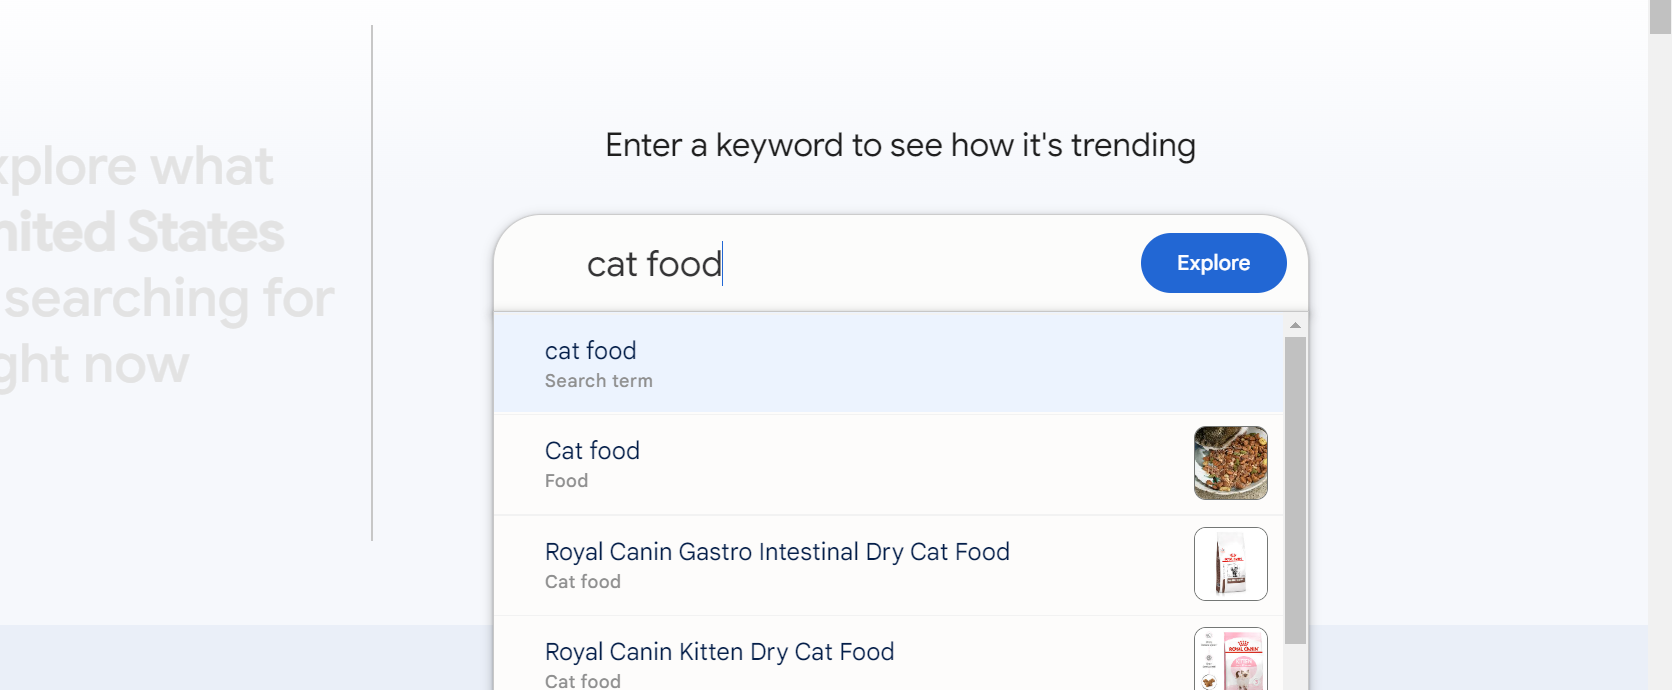
You want to see here the search trend.
Search your topic
For example
I’m searching for cat food.
Here’s the result for the previous 5 years.
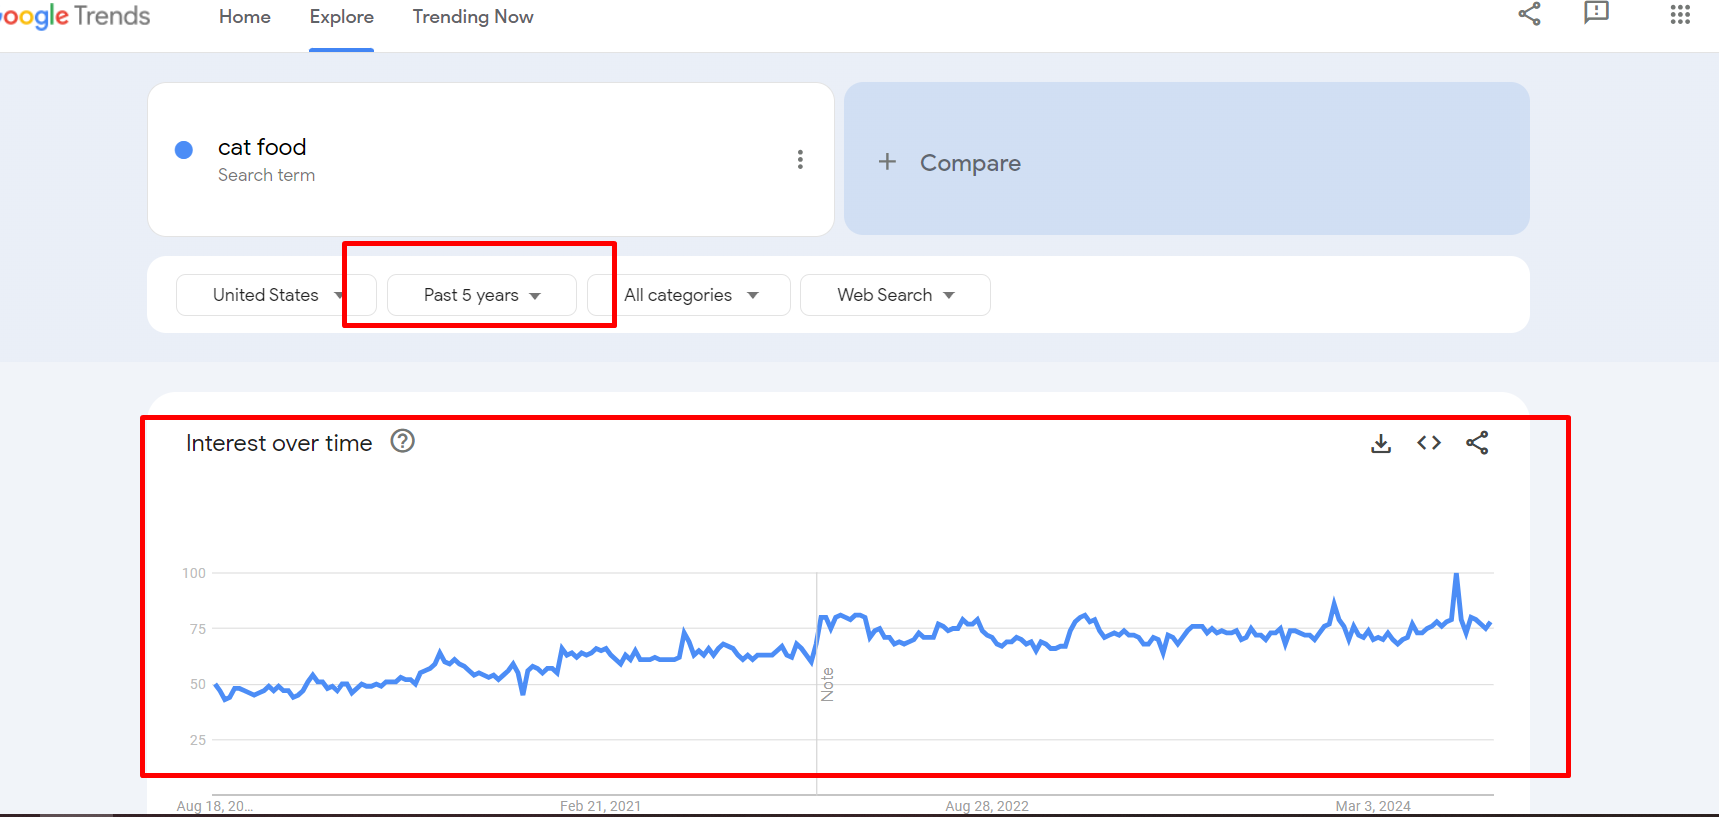
This is a good and awesome niche.
You can start working on this kind of niche.
Hey,
Here’s another result of another niche that you should not choose.

This is how you have to figure out a niche that is not only profitable but also popular over time.
Yes,
I hope you got it.
And could select a niche.
Now you have to select your blog name.
Moving step to…
Chapter Three
Select a Suitable Blog Name
Now I’m going to show you
How to choose a suitable blog
Name for your blog website.
Jump right in.
Your domain name is your blog’s address on the internet.
Choose a name that is:
- Short: Easy to remember and type.
- Unique: Stands out from the competition.
- Relevance: Choose a domain name that reflects your blog’s topic or niche.
- Simplicity: Keep it short, memorable, and easy to spell.
- Availability: Check if your desired domain is available.
- Extension: Consider using.com.
For example, fogbi.com, etc.
Here are some more tips for choosing a great domain name:
- Use keywords related to your blog’s topic.
- Avoid numbers and hyphens.
- Check availability on domain registration sites.
After choosing a domain, register it to secure your blog’s online identity.
A good domain name boosts your SEO and attracts more visitors.
But I will talk about registering a domain later in the domain and hosting discussion section.
Ok, you could select your niche and your blog name.
Now you need to select a platform where you can store everything you do on the internet.
Speaking of choosing the right blogging platform,
Chapter Four
Choose The Right Blogging Platform
Which platform should you use?
Choose the world’s most used platform
To start a blog or website.
WordPress has the 62.7% market share.
Choosing the right platform is critical for your blog’s success.
Here are some popular platforms:
- WordPress is highly customizable, with numerous plugins and themes.
- Blogger is user-friendly and ideal for absolute beginners. You cannot generate income.
- Medium: Great for writers focused on content without worrying about design.
- Wix: Drag-and-drop features make it easy to design.
WordPress is the most popular choice.
It offers both WordPress.com (hosted) and WordPress.org (self-hosted).
A self-hosted WordPress blog provides more control and flexibility.
Here’s a quick comparison:
Feature | WordPress.com | WordPress.org |
Customization | Limited | Extensive |
Cost | Free/Paid | Hosting costs |
Control | Less | Full |
WordPress is the most widely used content management system (CMS) globally, powering over 40% of all websites.
It’s renowned for its flexibility, ease of use, and extensive plugin and theme ecosystem, making it a popular choice for everything from personal blogs to complex business sites and online stores.
I highly recommend you consider WordPress.org.
Got It?
Yes,
Ok.
you have to secure those by registering.
now that you know about your niche, blog name, and platform.
Turning to the domain hosting registration platform…
Chapter Five
Buy Your Domain and Hosting
Now you will see the world’s best
And most reliable domain hosting
companies recommended by me.
You need three things to start a WordPress blog or website.
- Domain
- Hosting
- Your patience
Let’s see the domain registration platform.
Popular Domain Registrars
Register a domain with GoDaddy starting at $0.99 for the first year. Easy, affordable, and secure—get your online presence started today.
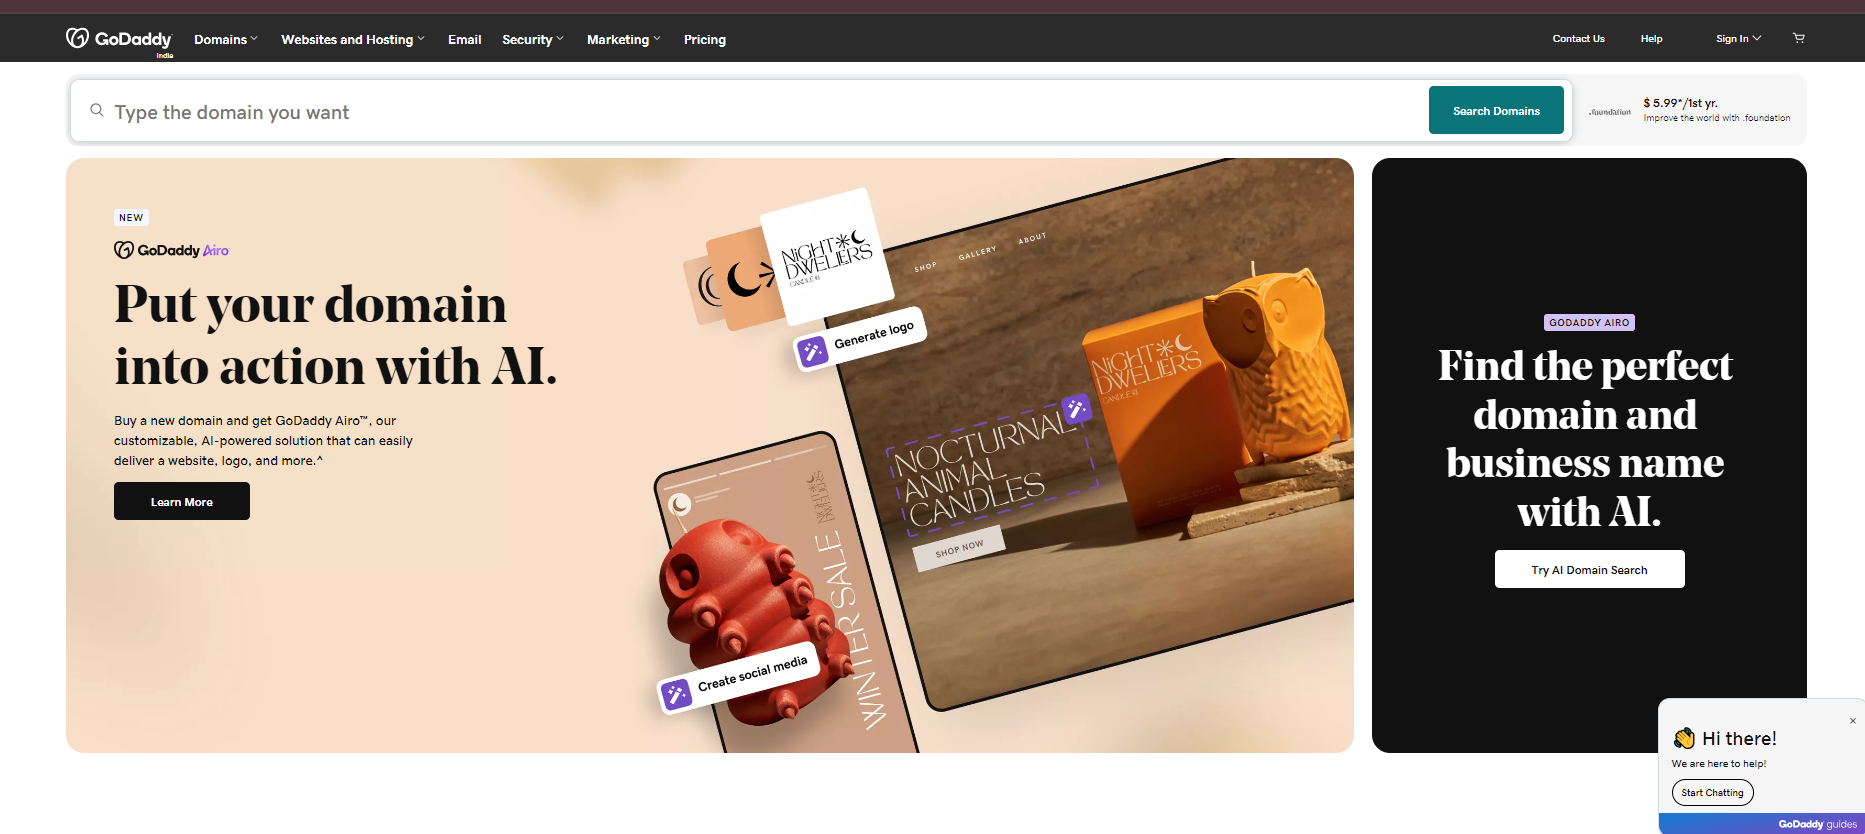
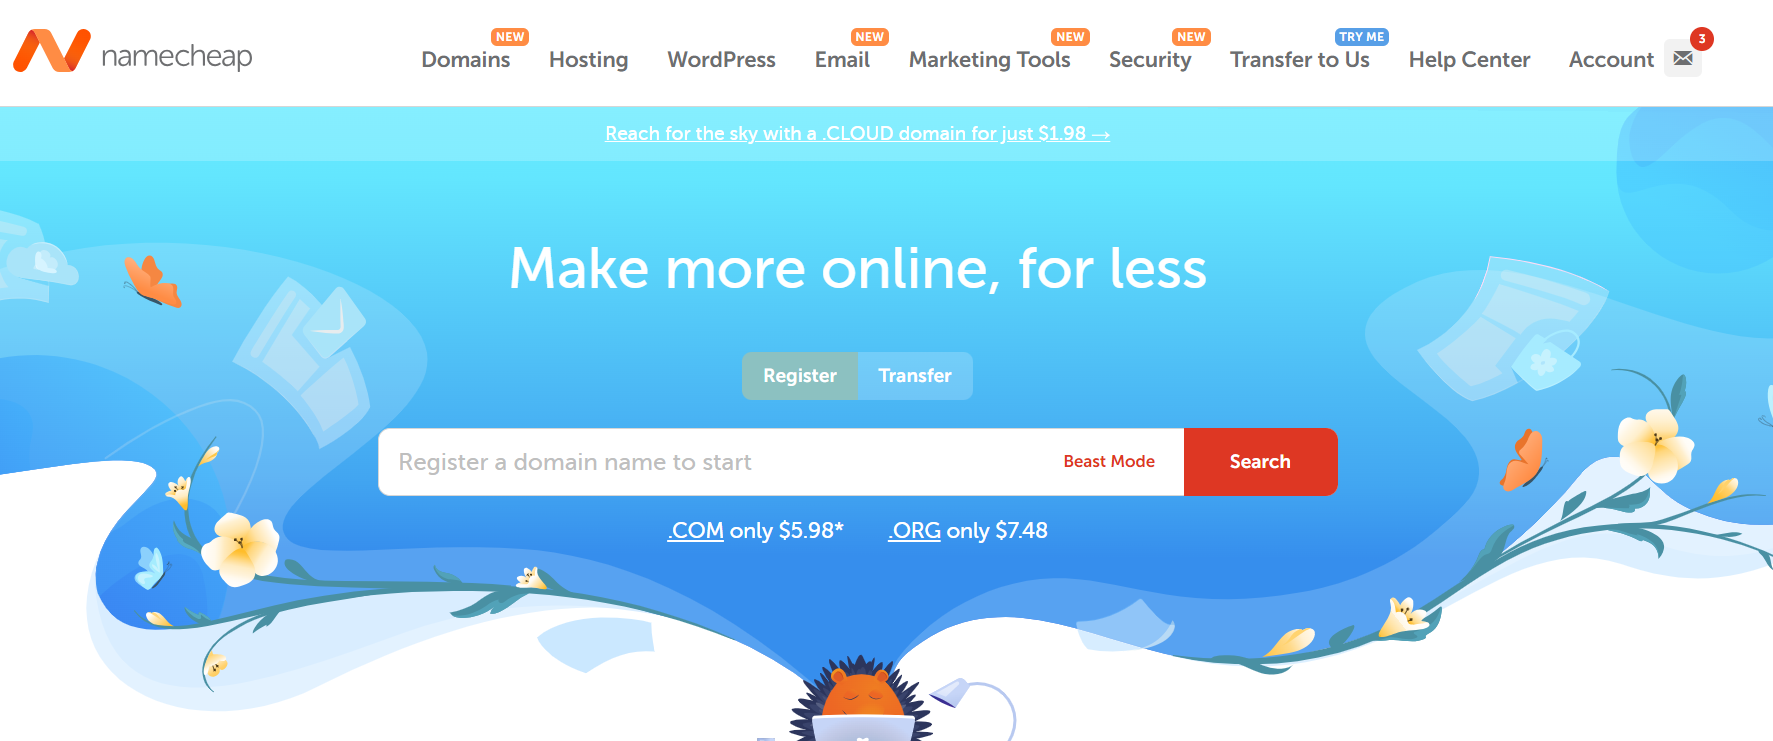
Register a domain with Namecheap starting at $0.98 for the first year. Affordable, straightforward, and secure—claim your online identity today.
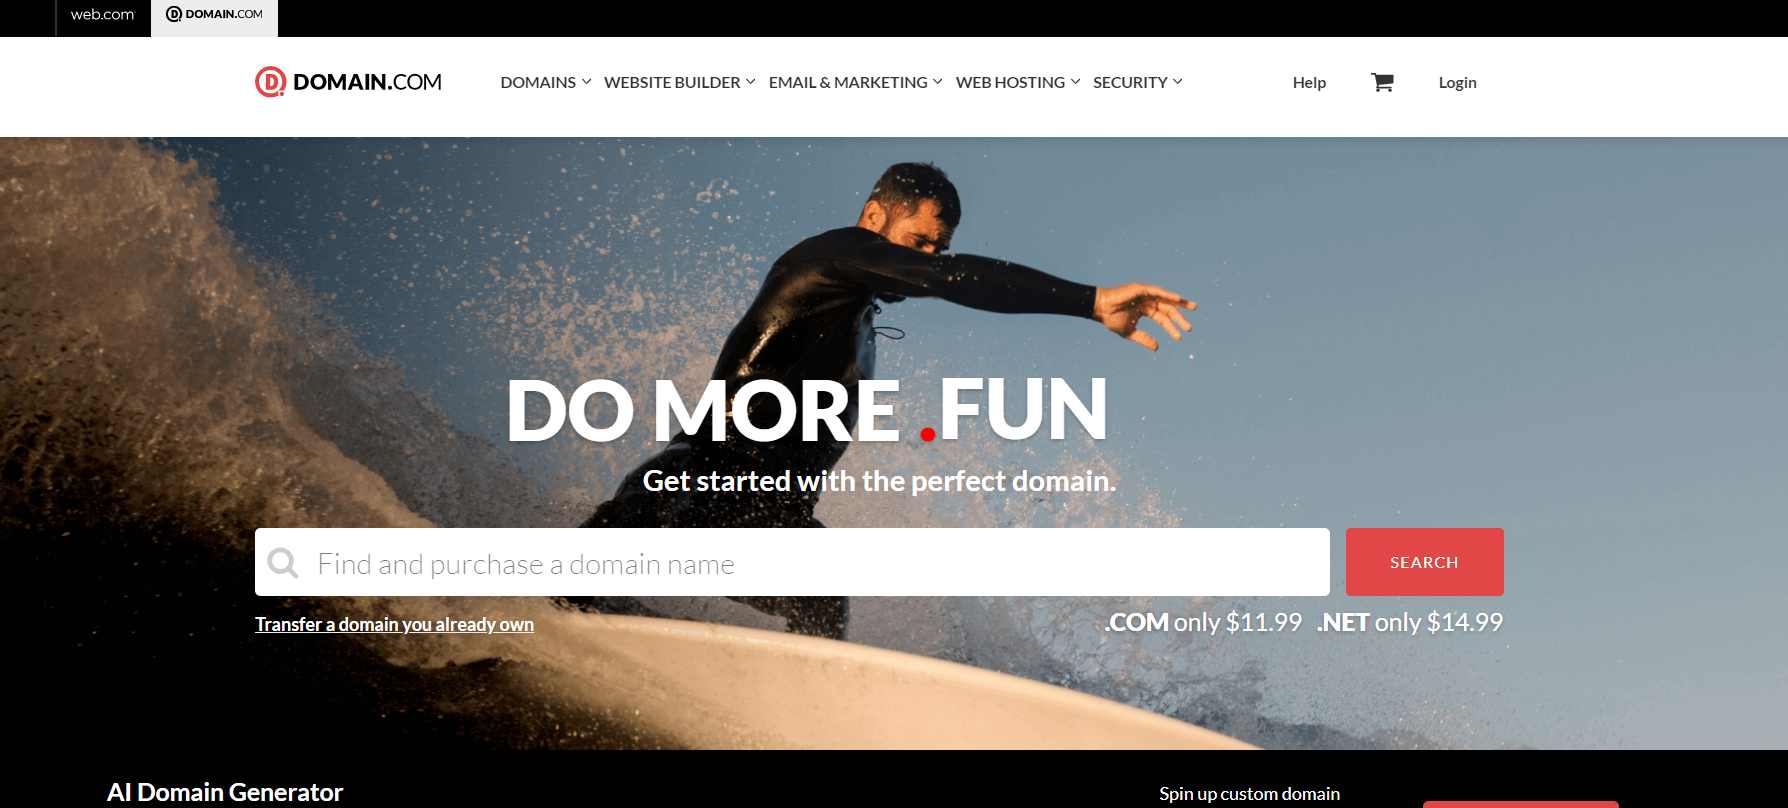
Secure a domain with Domain.com, starting at $1.99 for the first year. Simple, reliable, and cost-effective—launch your online presence effortlessly.
Purchased your dream domain?
Nice.
Now let’s see the hosting registration platform.
Hosting Platform
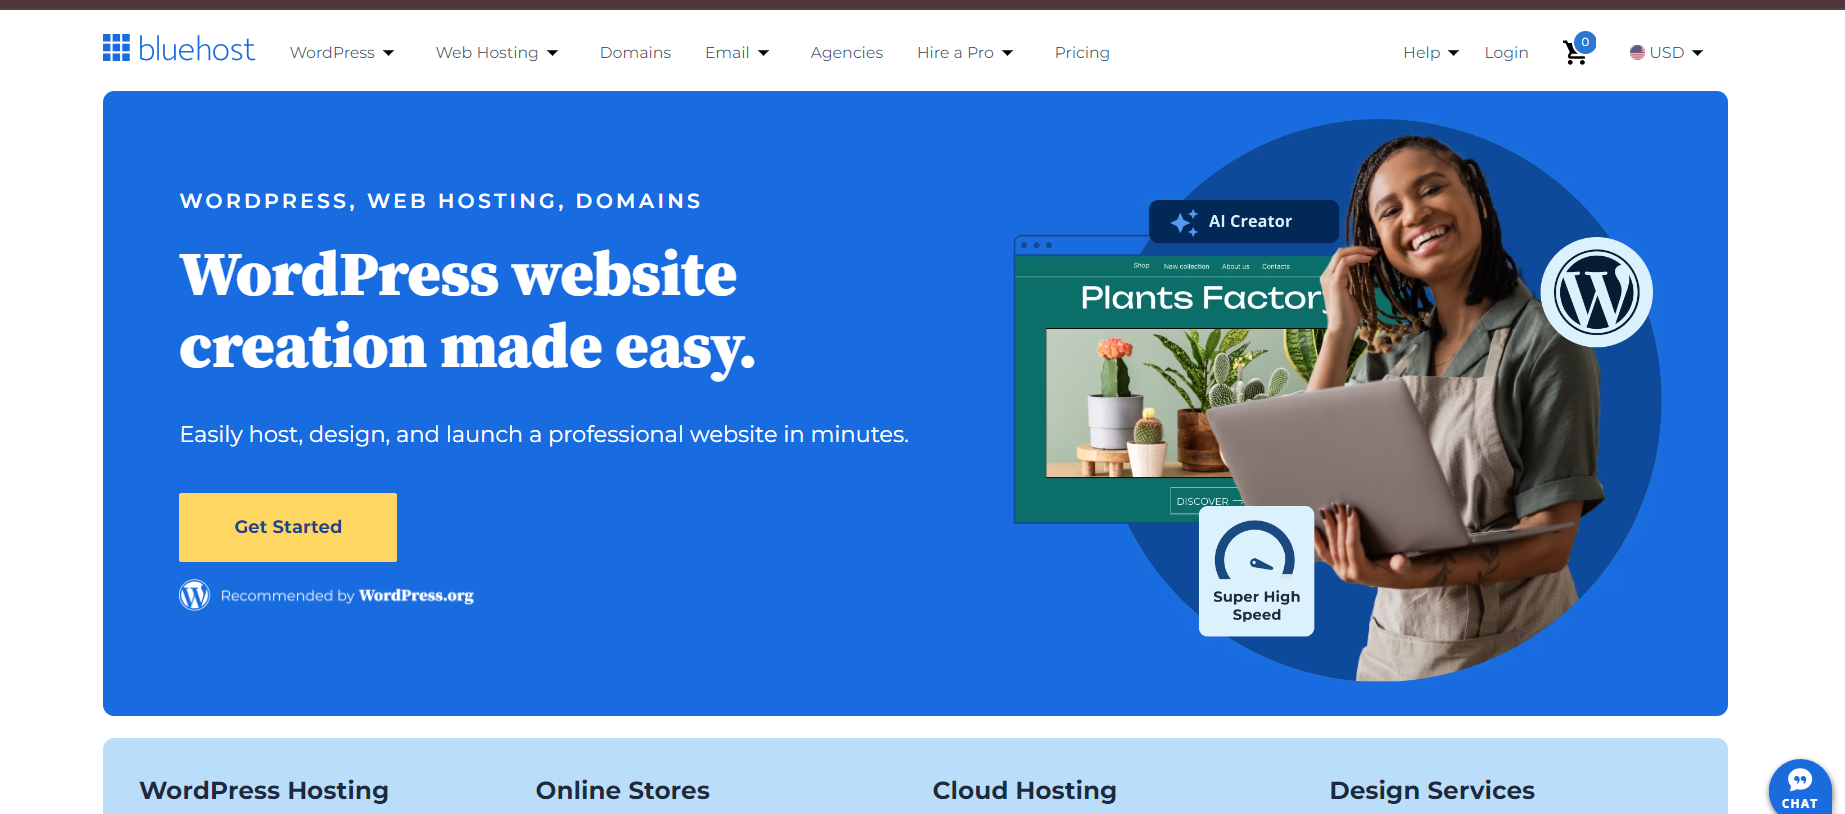
Start with Bluehost hosting at just $2.95/month. Enjoy reliable performance, a free domain, and 24/7 support for a seamless online experience.
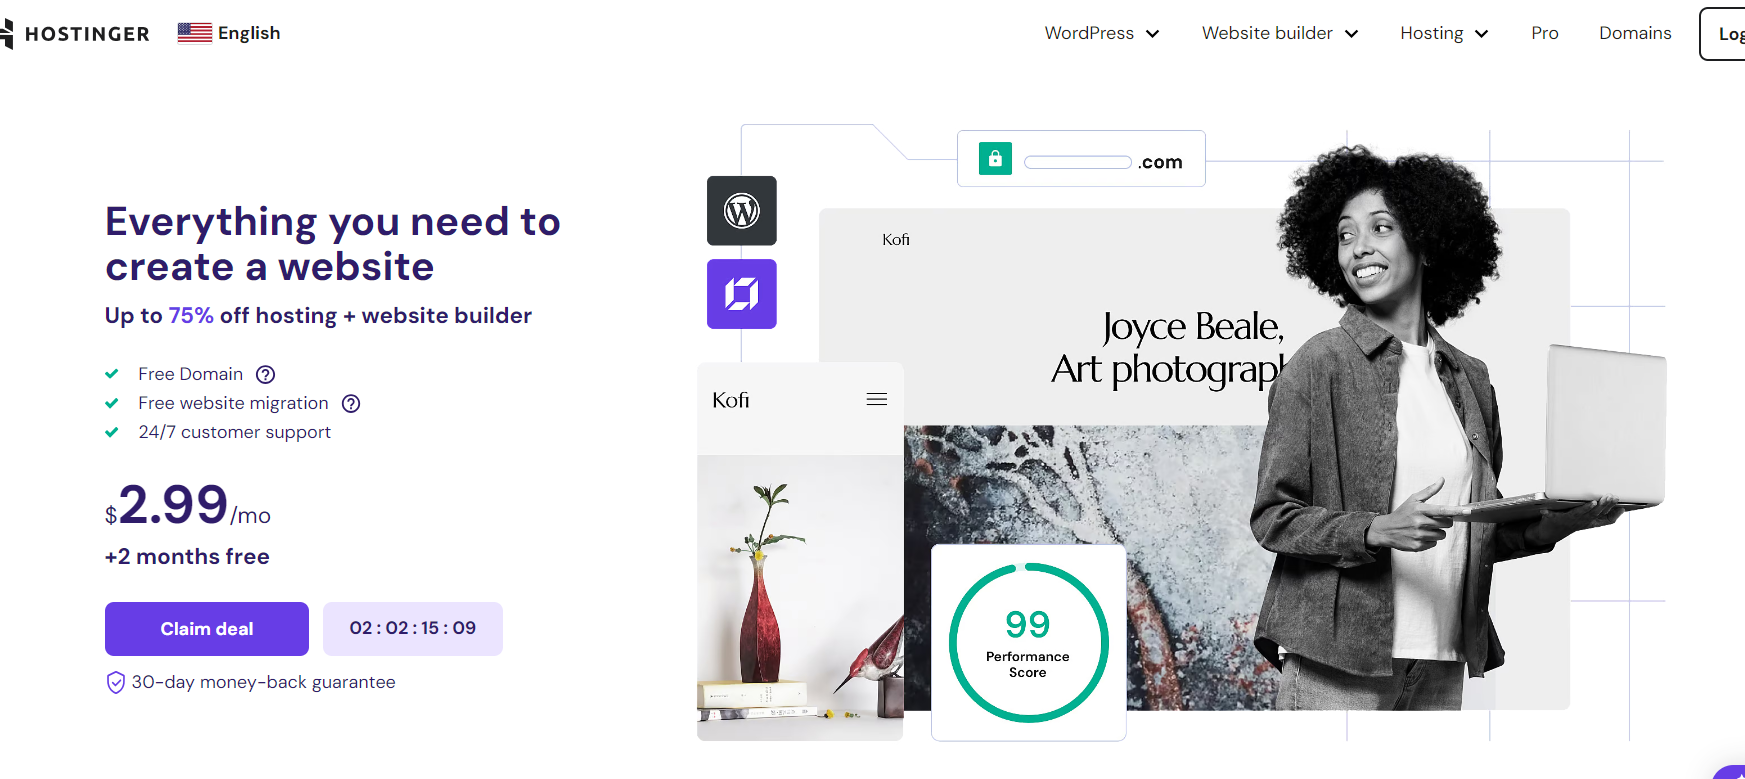
Host your website with Hostinger, starting at just $2.99/month. Enjoy a top-tier performance at an unbeatable price.
Get reliable hosting with SiteGround, starting at $3.99/month. Enjoy fast speeds, top security, and 24/7 support for your website.
Host your site with DreamHost, starting at $2.59/month. Enjoy reliable performance, robust security, and 24/7 expert support.
Get powerful hosting with InMotion Hosting, starting at $2.99/month. Enjoy fast speeds, free SSL, and 24/7 support to boost your online presence.
- Features: Consider factors like storage, bandwidth, email accounts, SSL certificates, and customer support.
- Performance: Look for reliable hosting with good uptime and fast loading speeds.
- Cost: Compare pricing plans and consider long-term costs.
- Budget: Determine how much you’re willing to spend on domains and hosting.
- Ease of Use: Choose a platform that aligns with your technical expertise.
- Scalability: Select a host that can accommodate your blog’s growth.
- Customer Support: Reliable support is essential for troubleshooting issues.
- Research: Read reviews and compare features before making a decision.
- Start small: For beginners, shared hosting is often sufficient.
- Consider SEO: Choose a hosting provider with good server speed and uptime.
- Type of Hosting:
- Shared Hosting: Best for beginners and small blogs.
- VPS Hosting: For growing blogs with higher traffic.
- Dedicated Hosting: For large-scale blogs or websites.
- Managed WordPress Hosting: Specifically optimized for WordPress blogs.
By carefully considering these factors, you can select the best domain and hosting platform to launch your successful blog.
I recommend Hostinger for hosting and Namecheap for domains.
Move on to…
Chapter Six
Set Up Your WordPress Blog
I’m going to show you the setup
part of the topic, how to start a
blog or website, with every single part
you need to start a blog.
Then why so late? Let’s jump

Install WordPress

After buying, the hosting provider will give you a link to log in to cPanel with a username and password that you can change later.
I hope
you can log in to your cPanel account.
After logging into cPanel, you can see this page or something similar to it.
Please remember that I’m showing this from Namecheap Hosting cPanel.
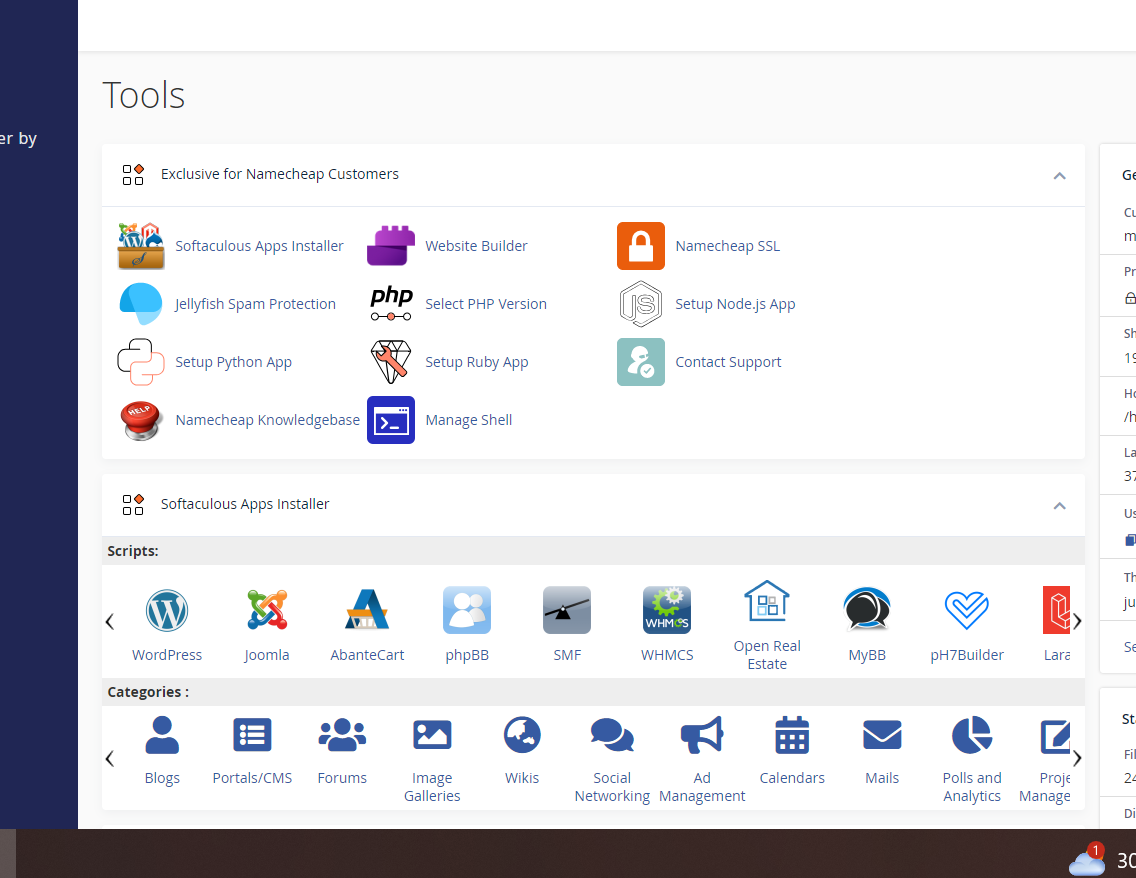
Here you see a WordPress menu like this:
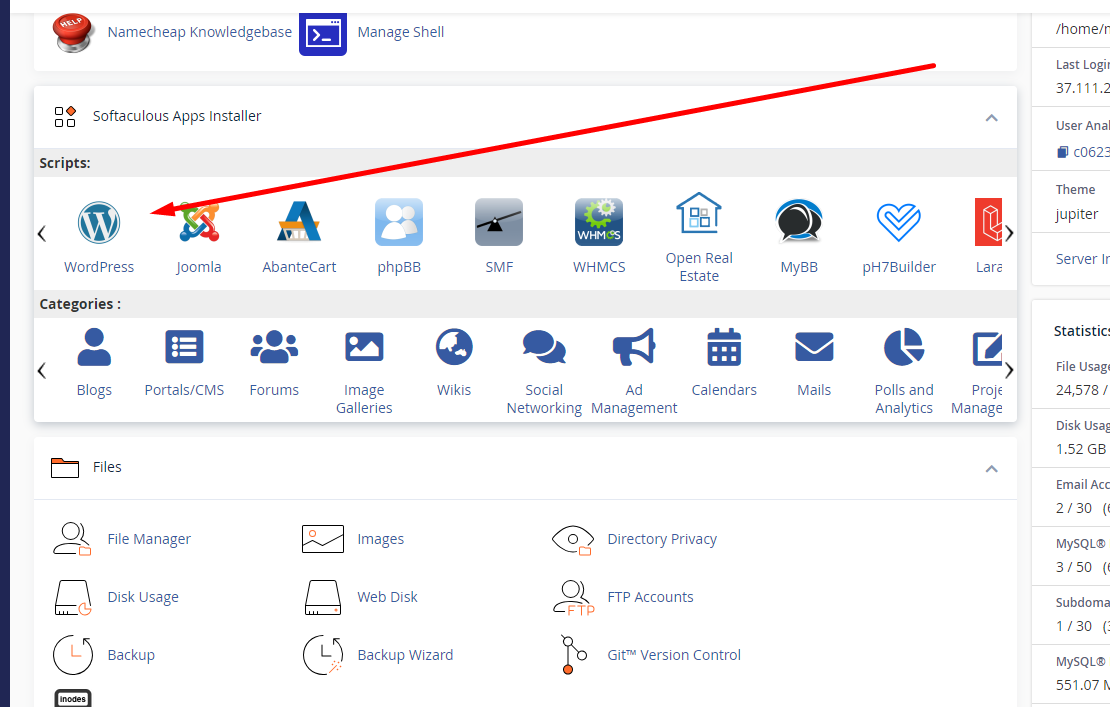
Just click on it.
If you cannot see it
No problem
Just search in the search bar and click on WordPress Manager by Softaculous.
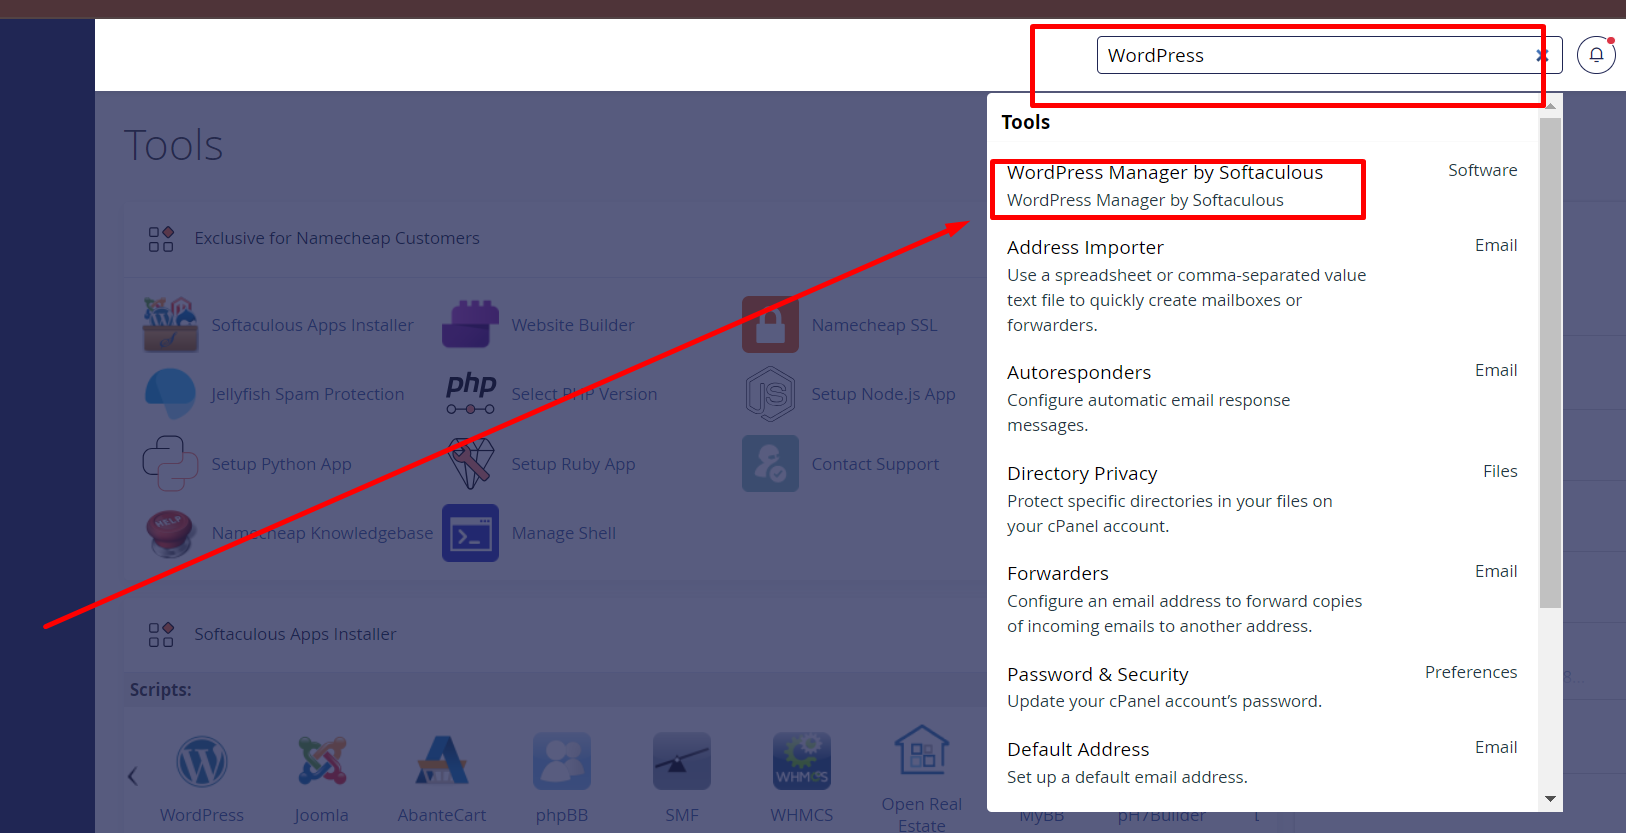
Boom, after clicking on that, you see this page like this:
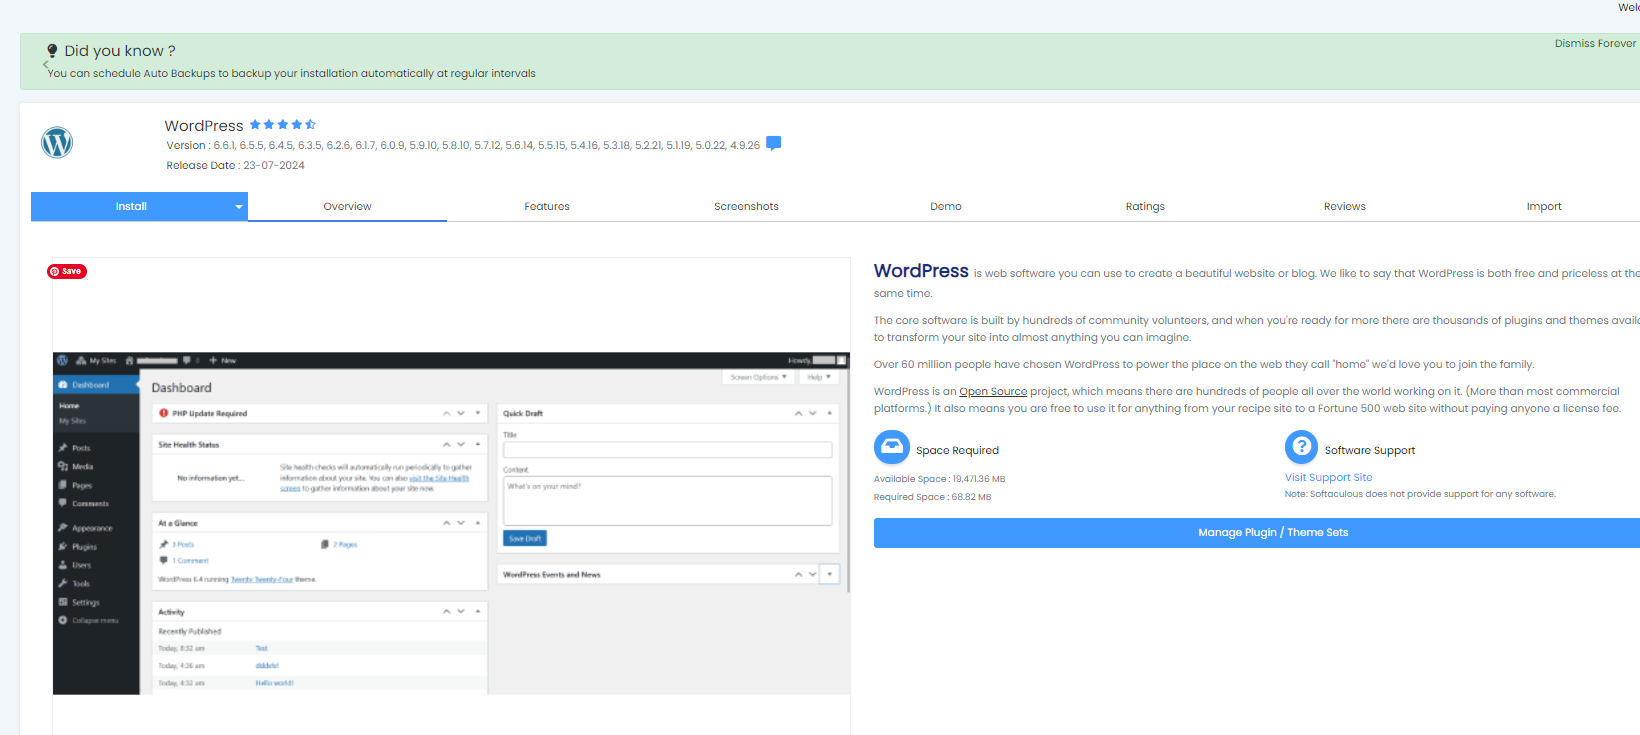
Just click on install, select HTTPS//, then select your domain, and next, choose the latest version of WordPress, like the below image
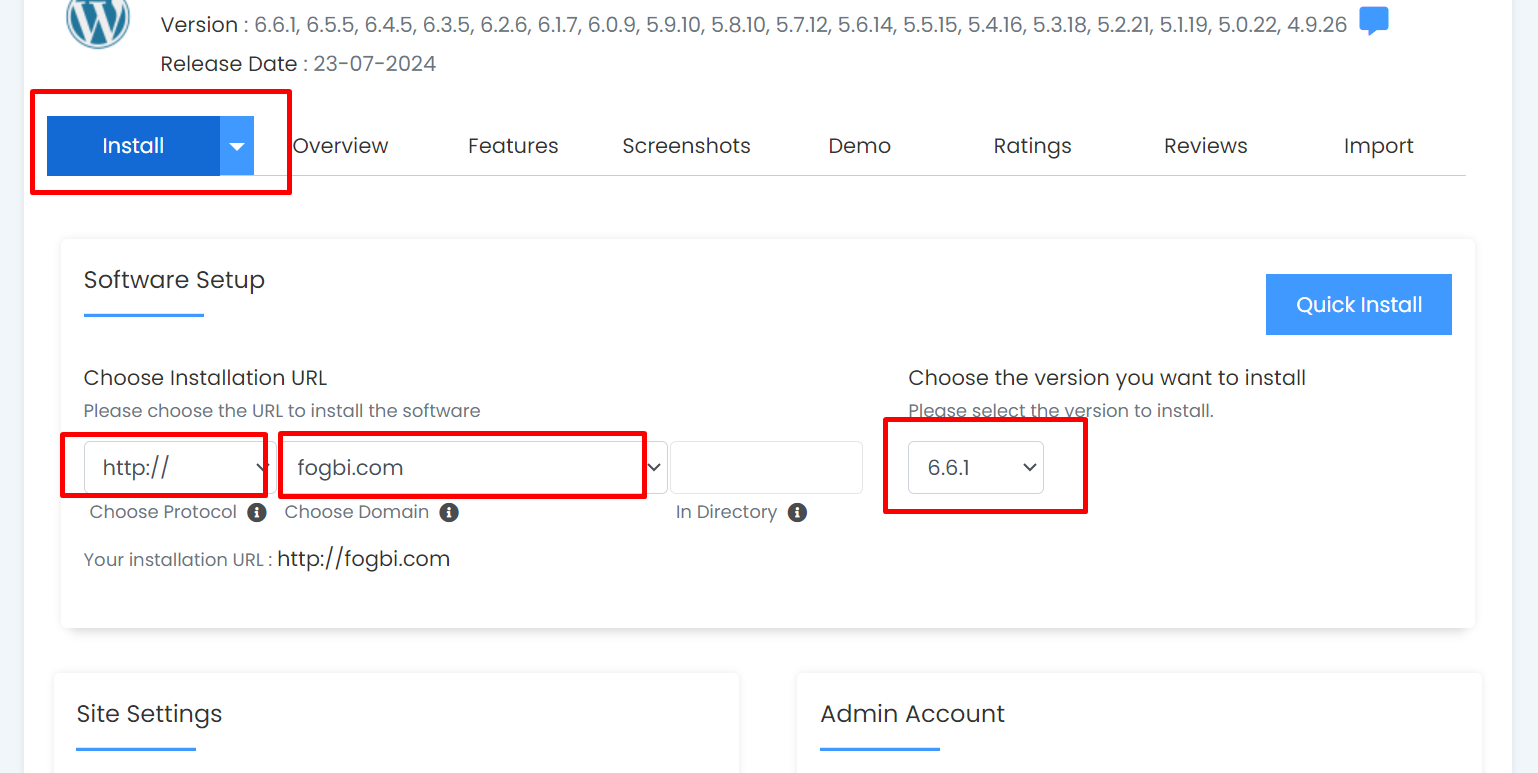
Afterward, scroll down a bit, then do as I did with the below image.
But don’t add what I added.
Just add what you want to add and keep this password and username remembered.
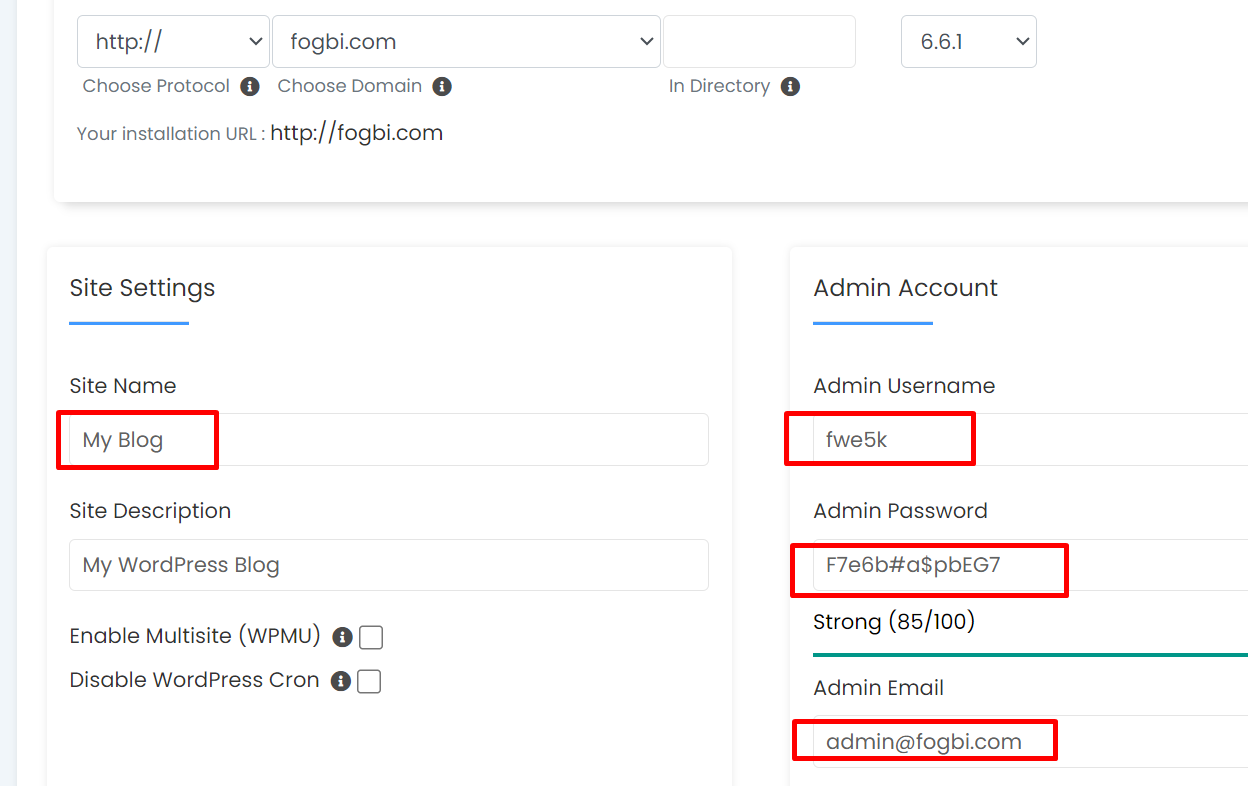
Finally, scroll down a bit, then click on the install button.
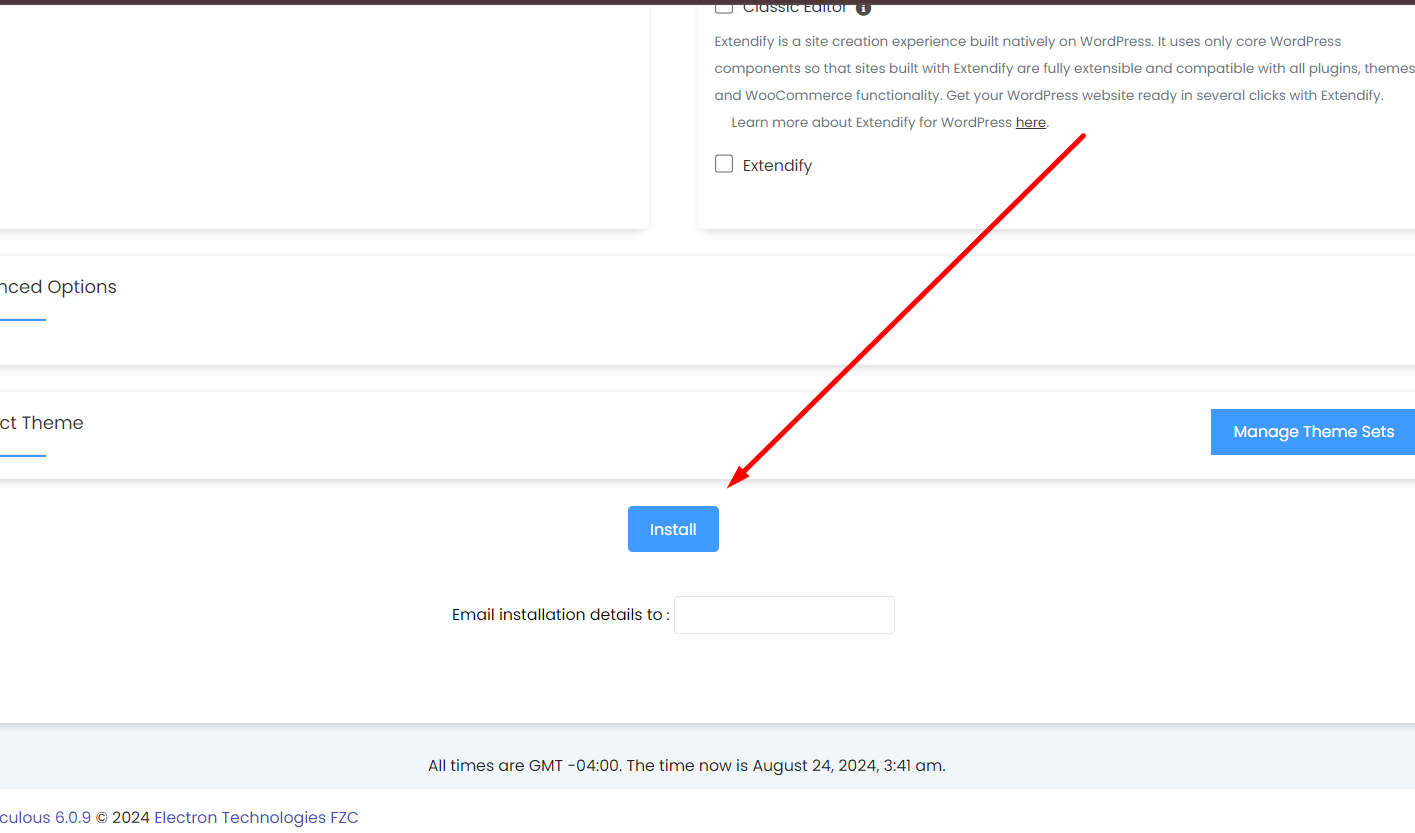
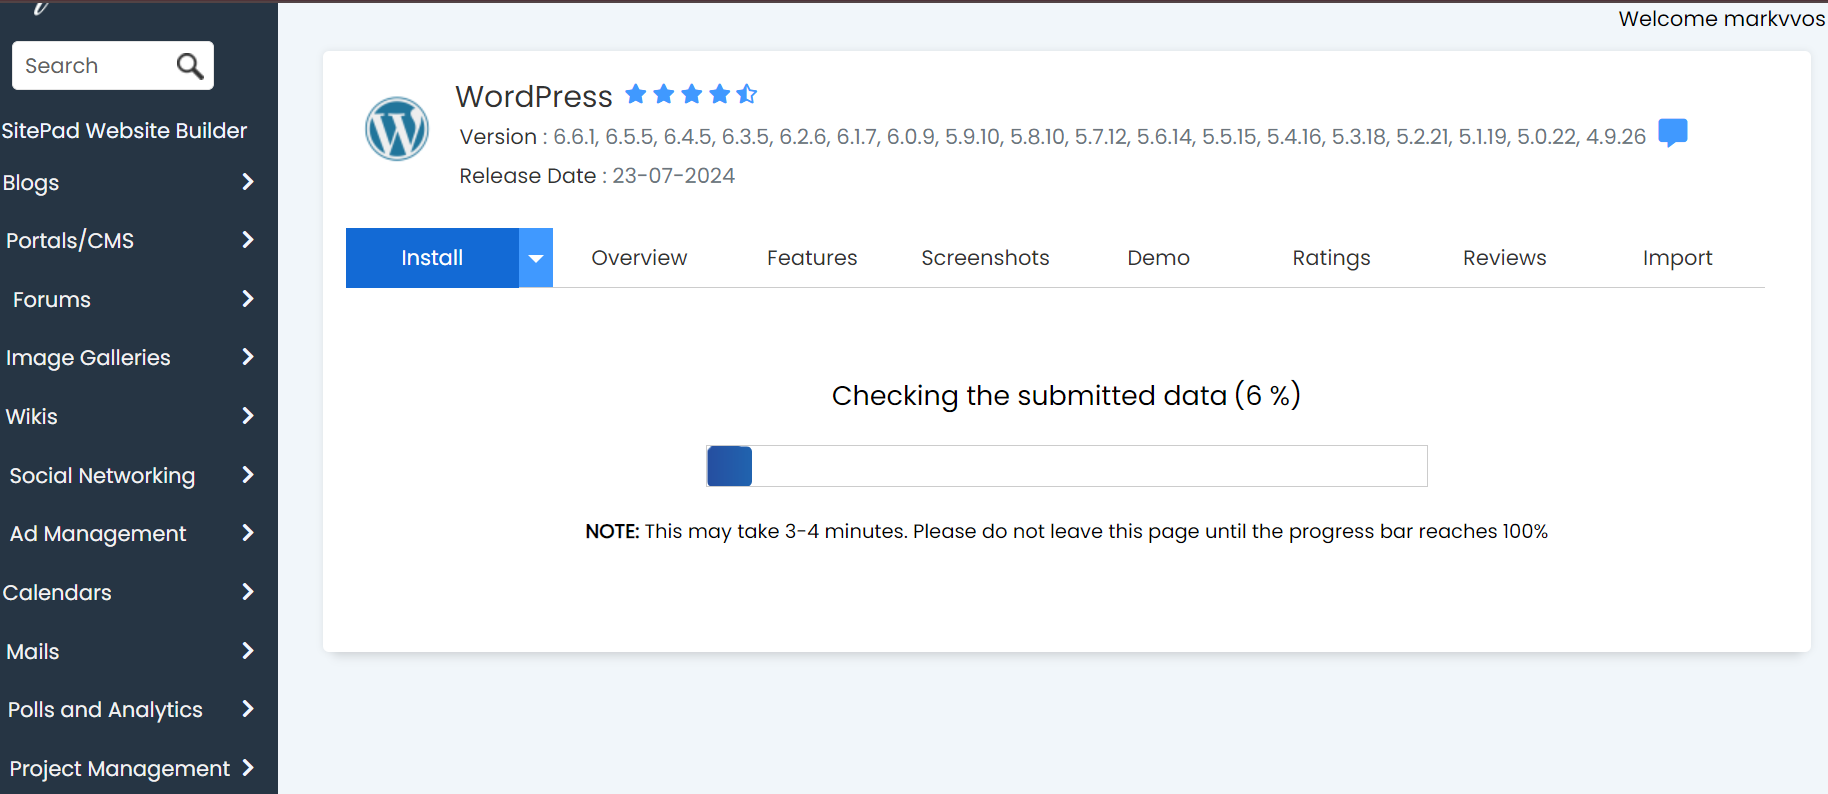
Please wait a little bit to install it.
That’s fine
You have installed WordPress successfully.
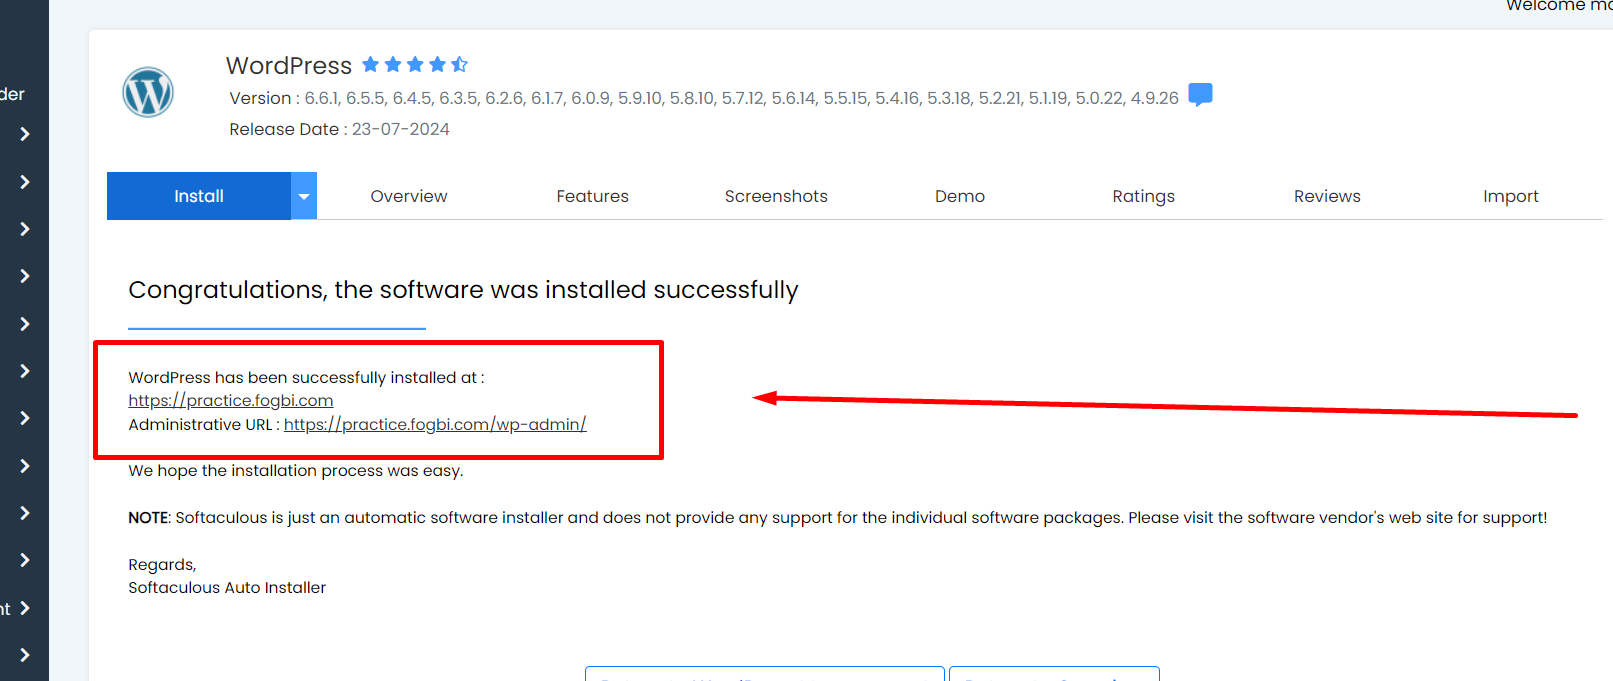
With that, it’s time to…
Log in To Your WordPress Blog Website

First, you want to log in to your WordPress site.
so type your blog domain name as well as wp-admin in your browser like this.
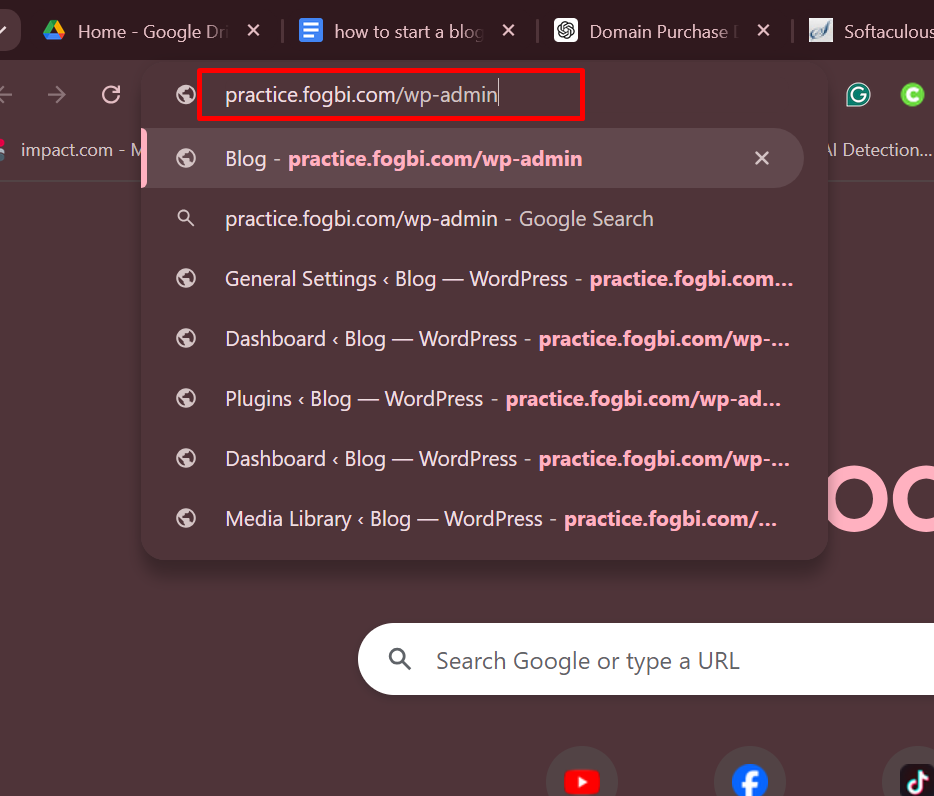
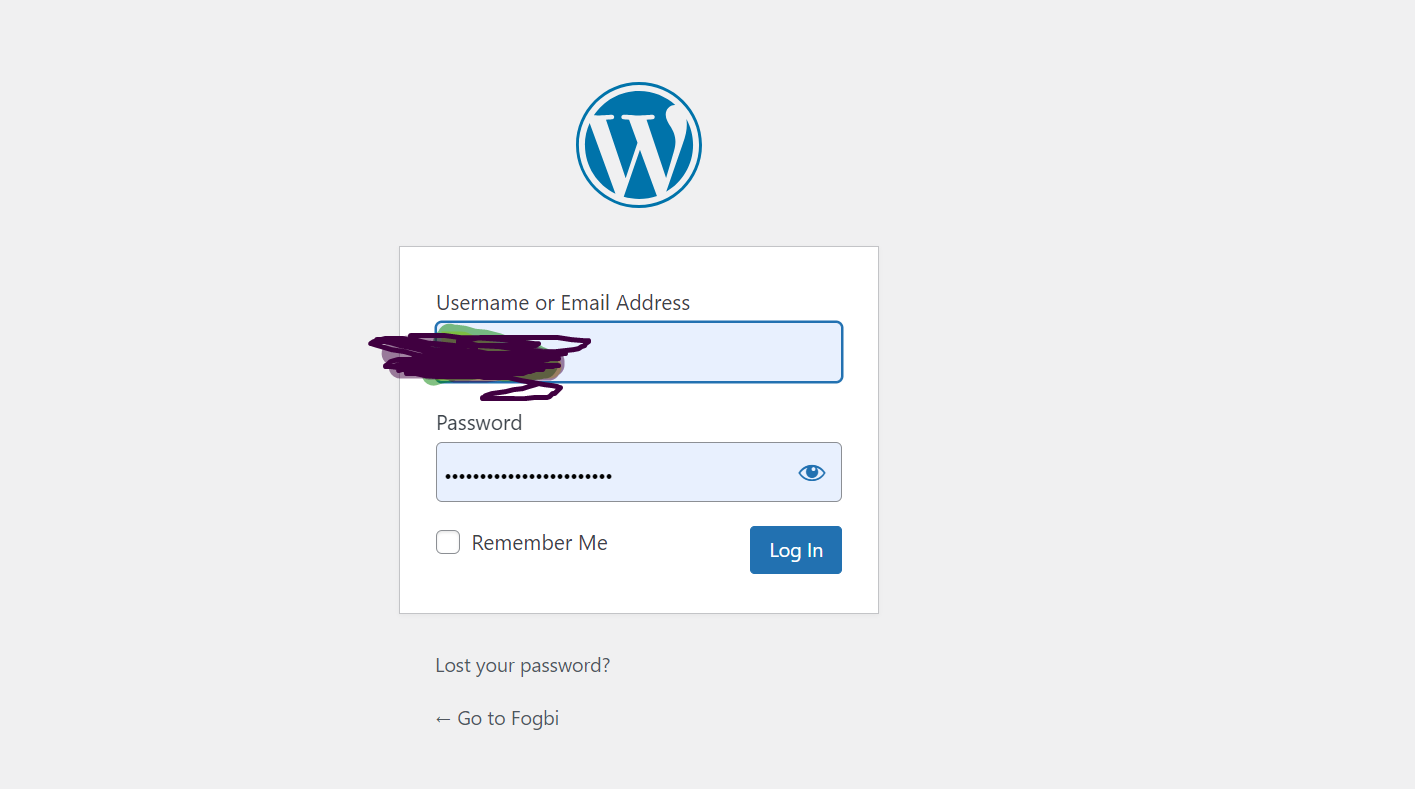
Now you can see the log-in dashboard page.
Here, fill in the blank with the username and password that you added when installing WordPress from cPanel, like this:
Ok,
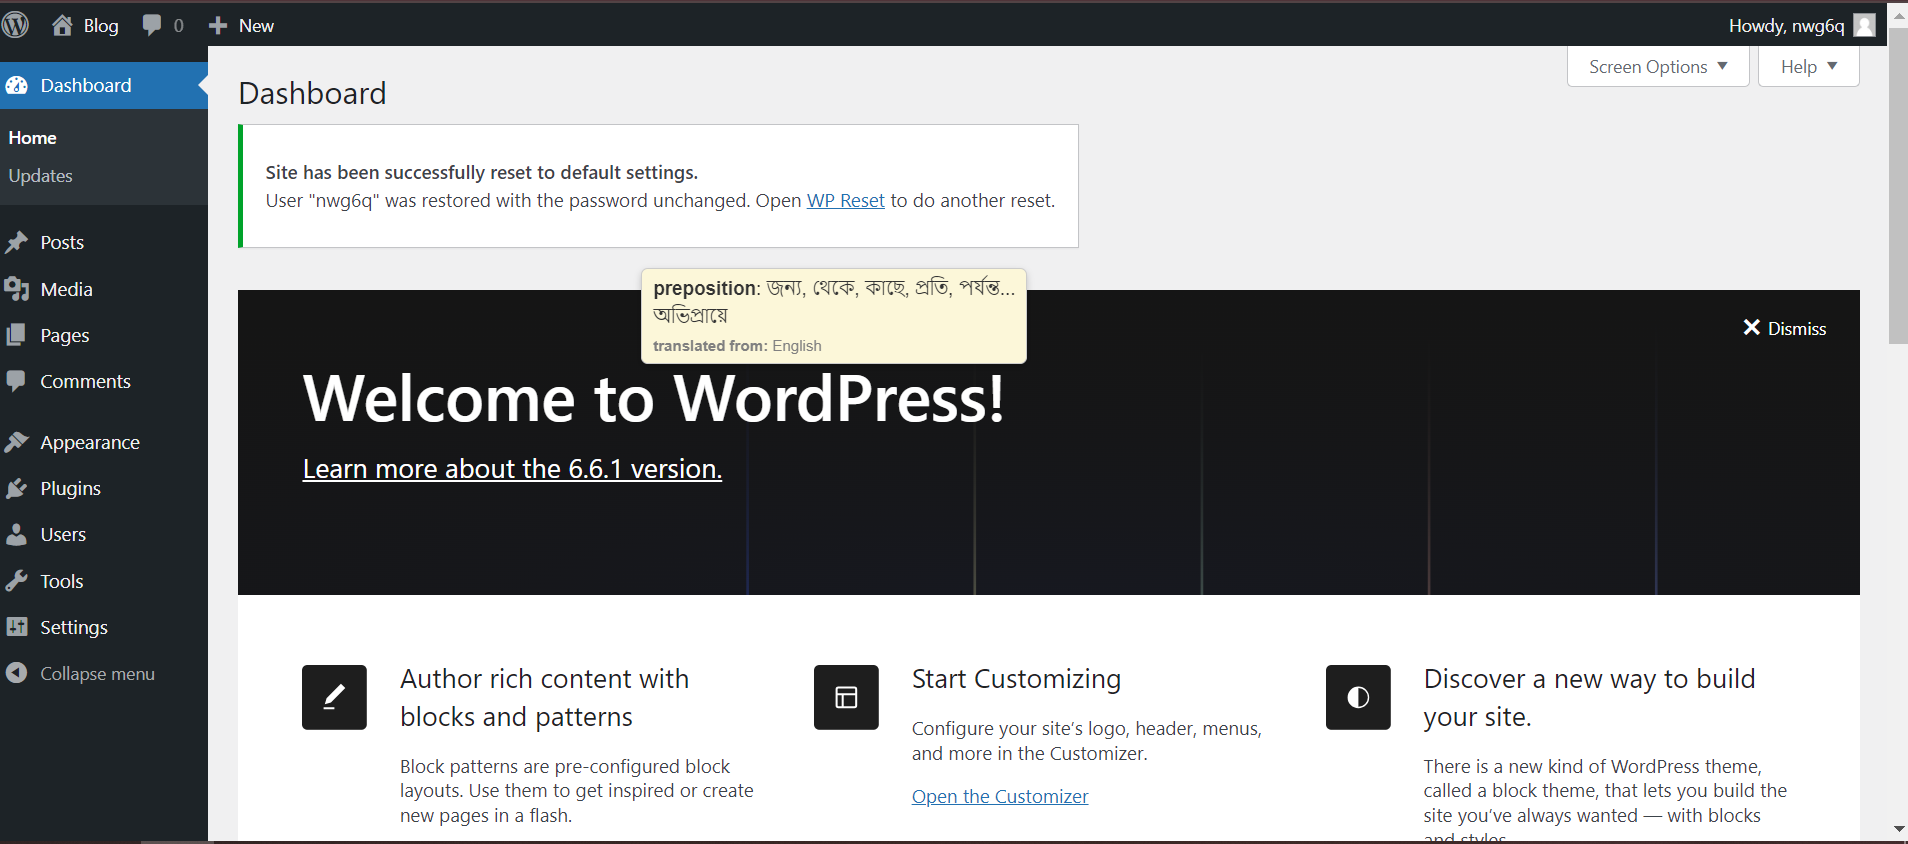
After logging in, you can see this page.
It is the WordPress website’s default dashboard.
You can manage everything on your blog website here.
Fine,
You have logged in to your WordPress website successfully.
Now it is time to…
Install A Theme To Design Your Blog Site

You need a theme for designing your WordPress blog website.
What?
What is a theme, and how does it work?
No worry
I’m telling you the truth.
A theme in the context of website design is a collection of files that determines the visual appearance and layout of a website.
It includes templates, stylesheets, and other elements that control how content is displayed, including colors, fonts, and overall design.
Themes provide a way to easily change the look and feel of a website without altering its core functionality or content.
Got It?
Yes, you are the best.
So let’s go install a theme.
Go to appearance, then theme, like this:
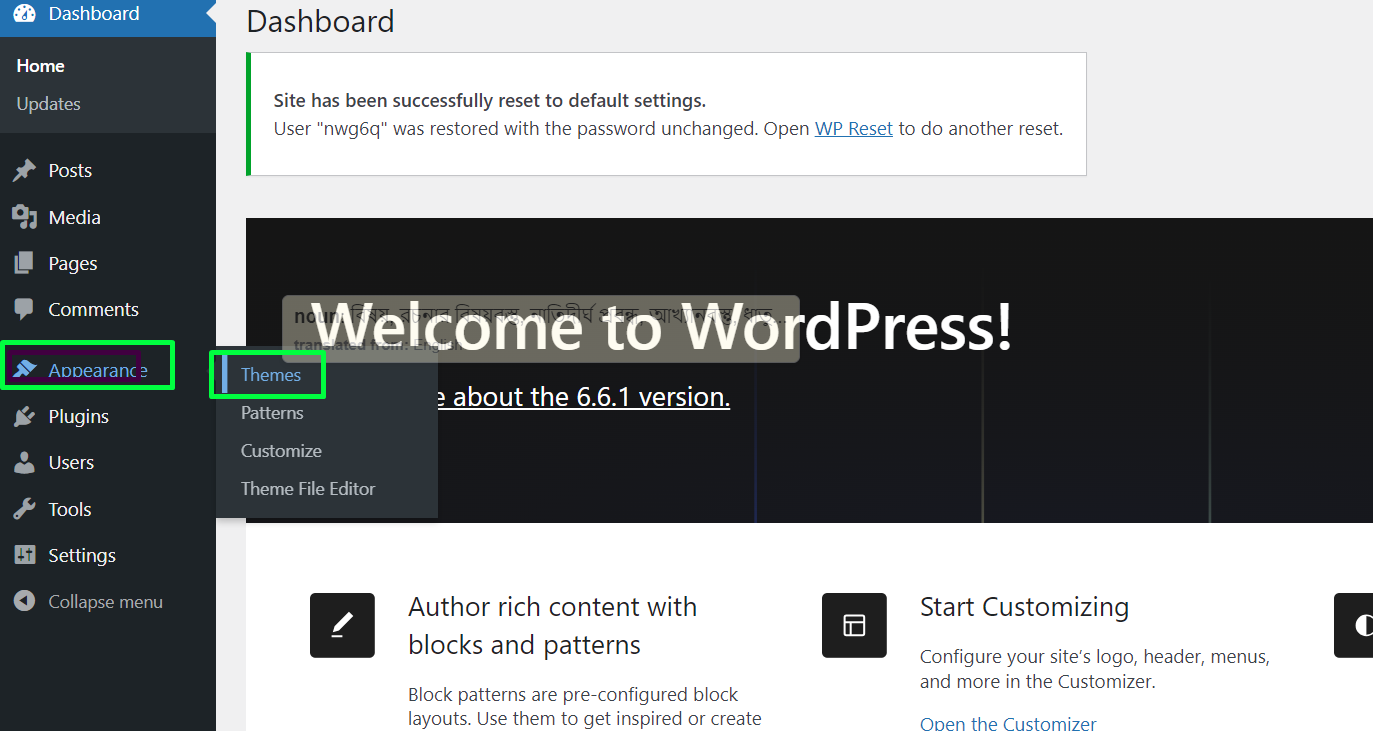
Now you can see this, and on this page, click on Add New.
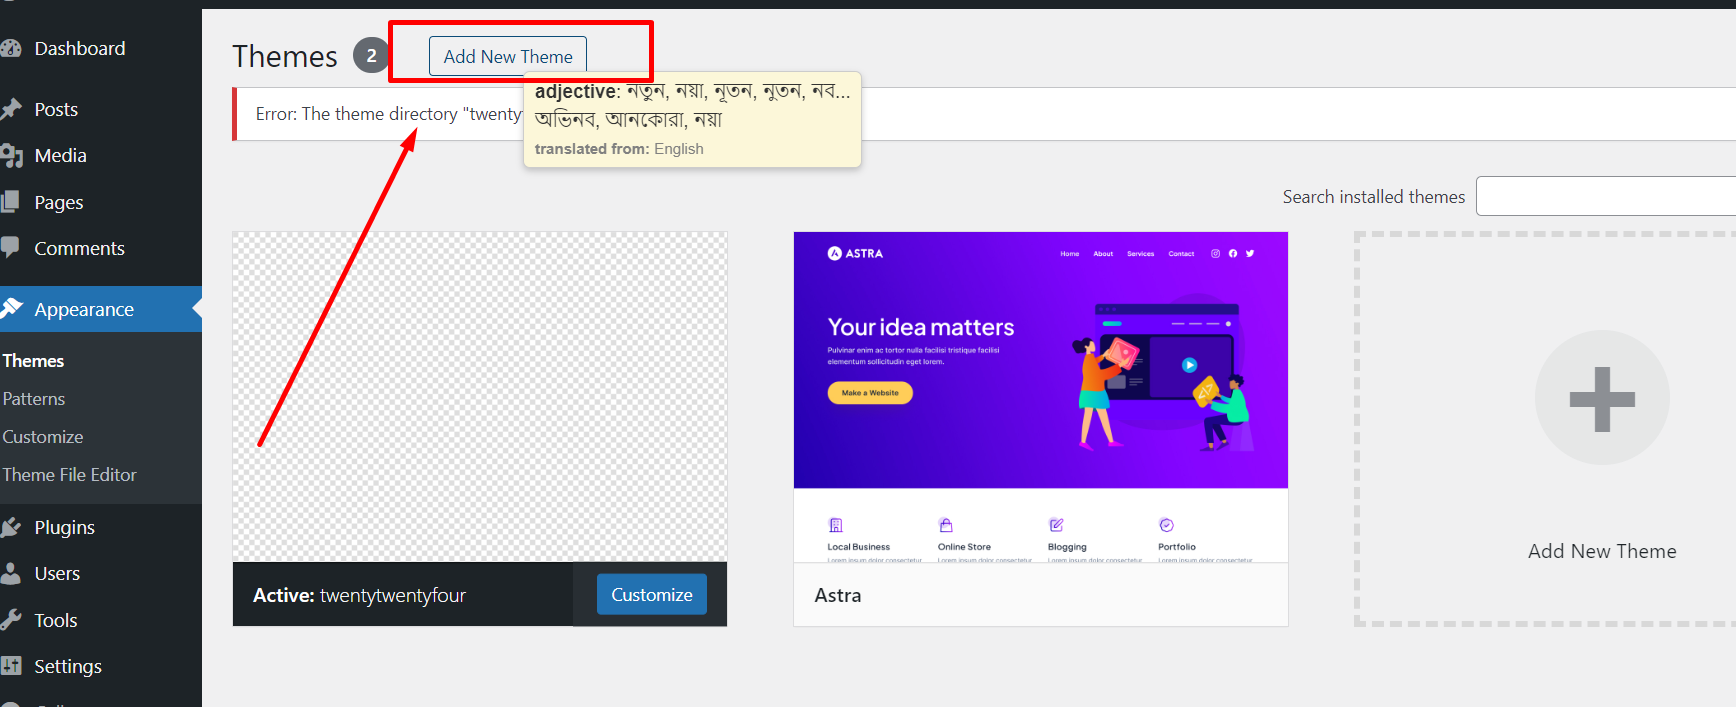
There are thousands of themes on this page for free, as well as thousands of paid themes out there.
I highly recommend you buy a paid theme for starting a WordPress blog website, though you can use a free theme.
Also, you can upload a theme here by clicking on the upload button.
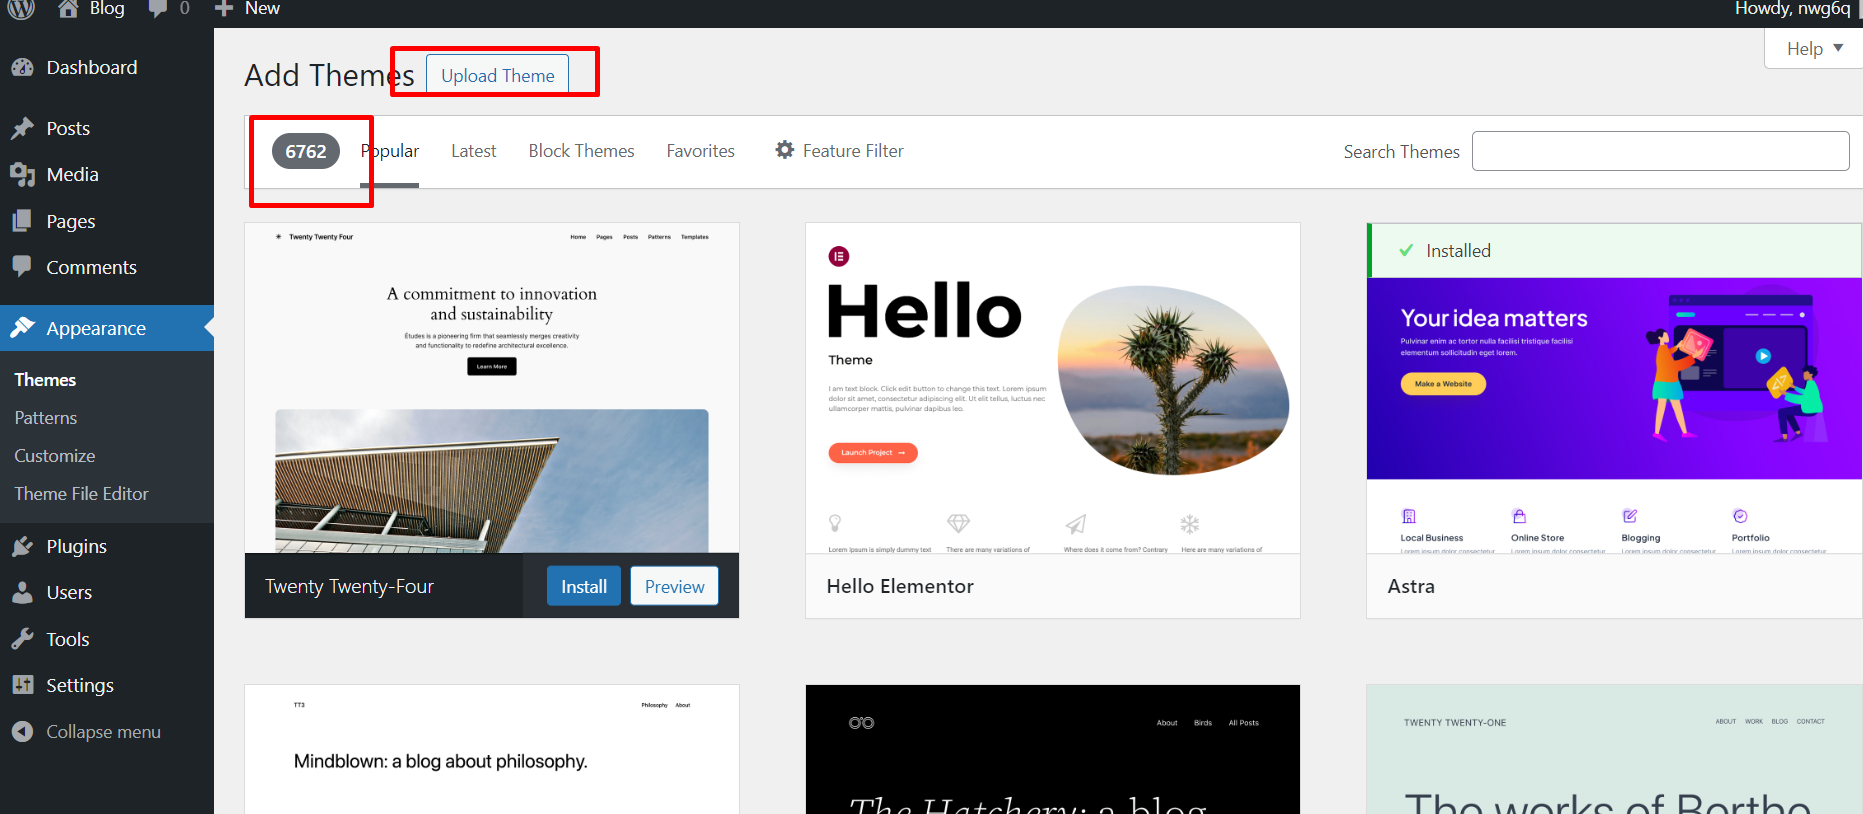
But here,
I’m showing you the design module with a free theme called Astra.
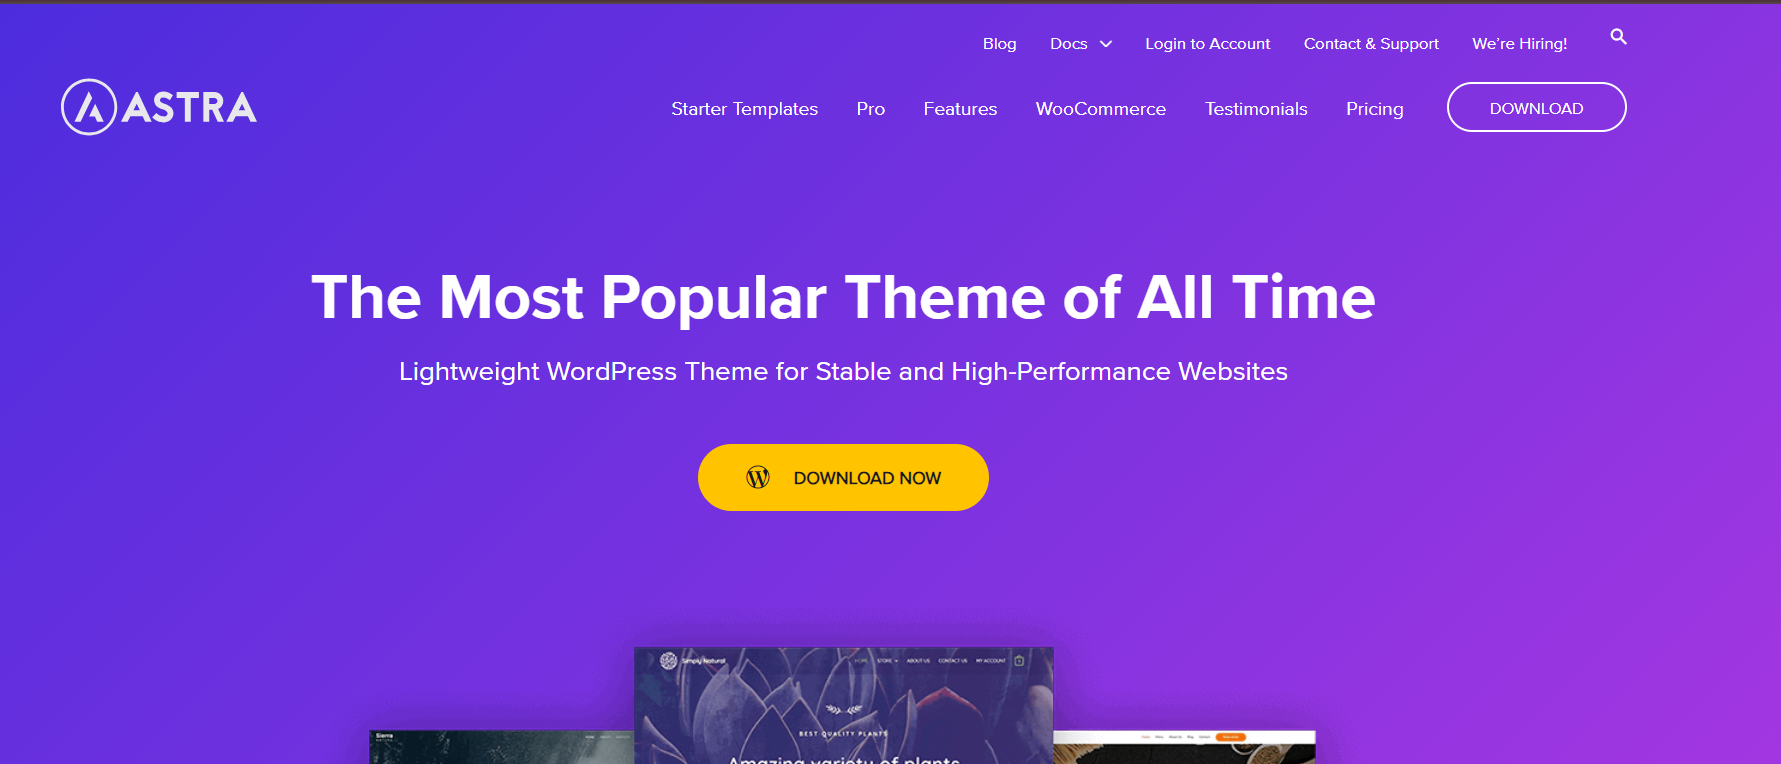
Astra is a fast, lightweight WordPress theme known for its flexibility and customization options.
With a wide range of pre-built templates and seamless compatibility with popular page builders, Astra helps you create a professional and visually appealing website quickly.
It’s also optimized for speed and SEO, making it a top choice for performance and search engine visibility.
So let’s install it right now.
Just type in the search bar, astra.
You can see the theme on the left side.
Click on install, like in the below image.
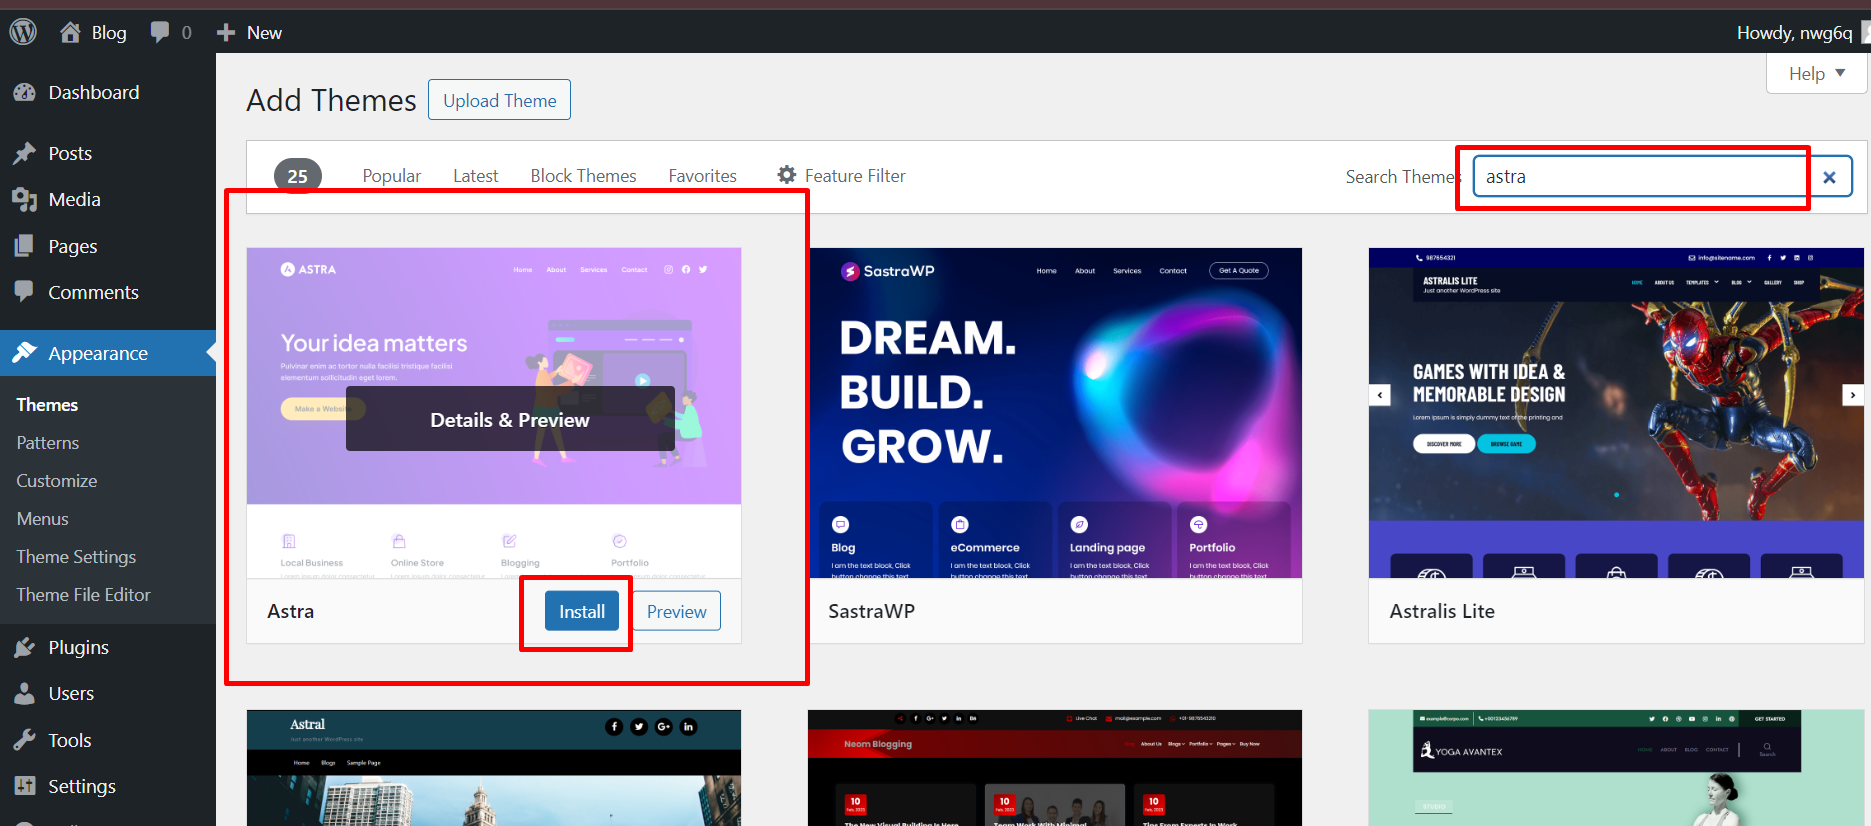
Then click on activate.
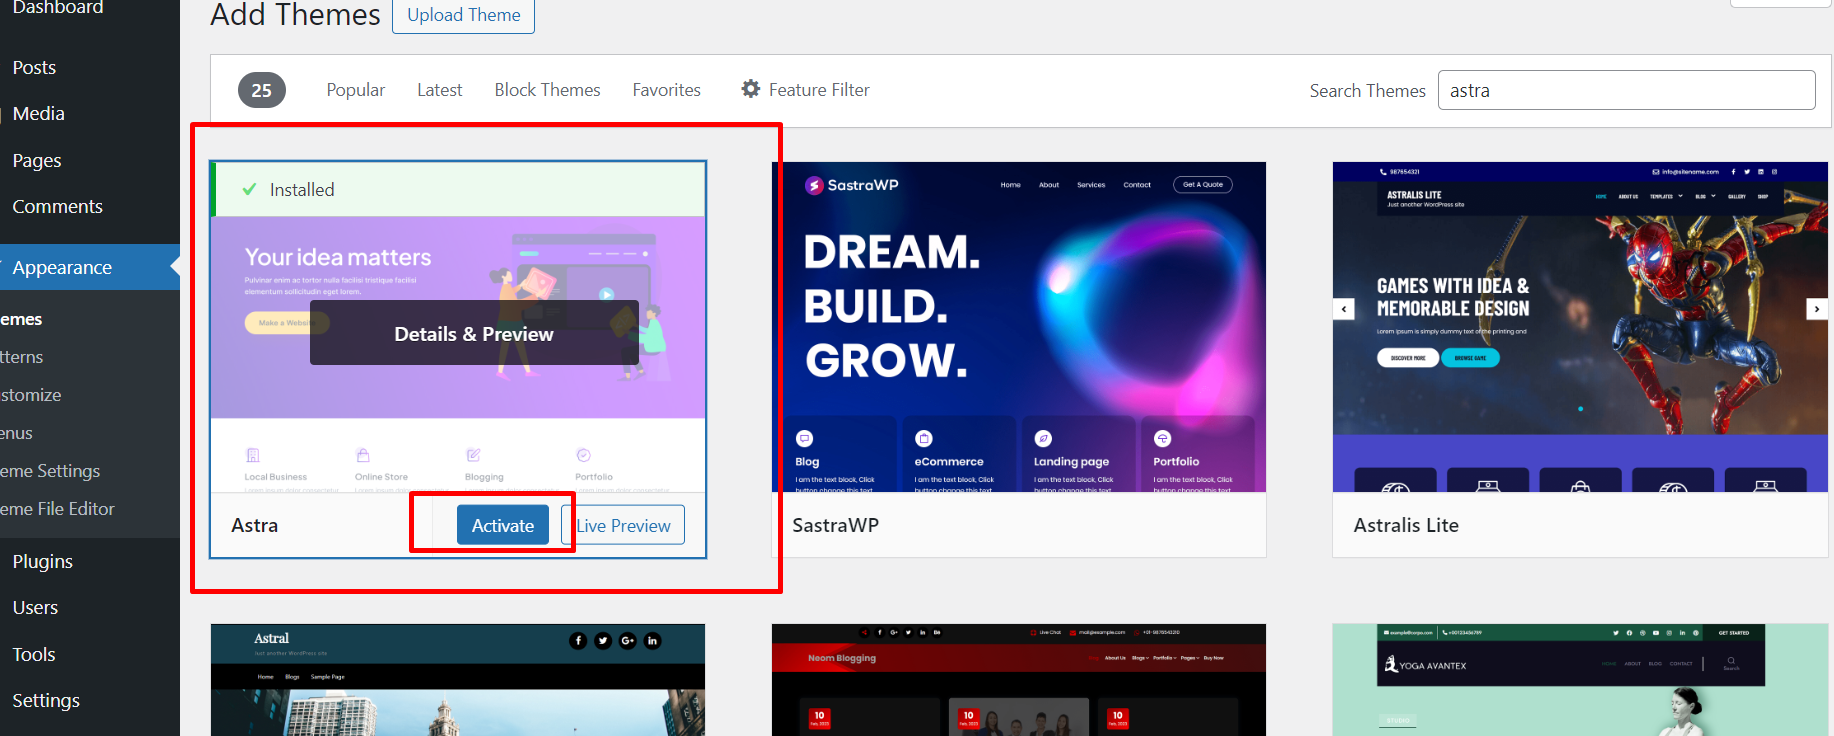
Its activated.
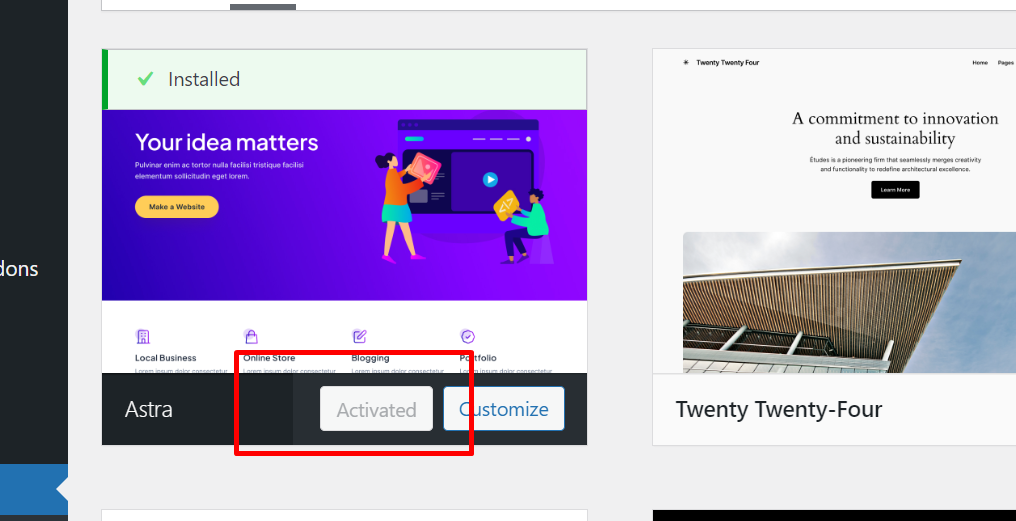
That’s all about the theme till now.
Moving on to…
Install A Plugin To Ease Your Design
Now you have to install a plugin called the starter template to add more functionality to your website.

What’s That?
Please let me tell you right away.
A plugin is a software component that adds specific features or functionalities to an existing application, such as a WordPress site.
By installing and activating a plugin, you can enhance your website with new tools and capabilities—like SEO optimization, contact forms, or e-commerce features—without altering the core code of your site.
Plugins offer a flexible and modular way to expand your site’s functionality to meet your needs.
There are hundreds of plugins like this one, but I’m showing you this one.
Because
Starter Templates is a plugin that provides a library of pre-designed website templates for WordPress.
It helps you quickly set up and customize your site with professional, ready-made designs, making it easy to get started with a polished look and feel.
Then why so late?
Let’s install it right away.
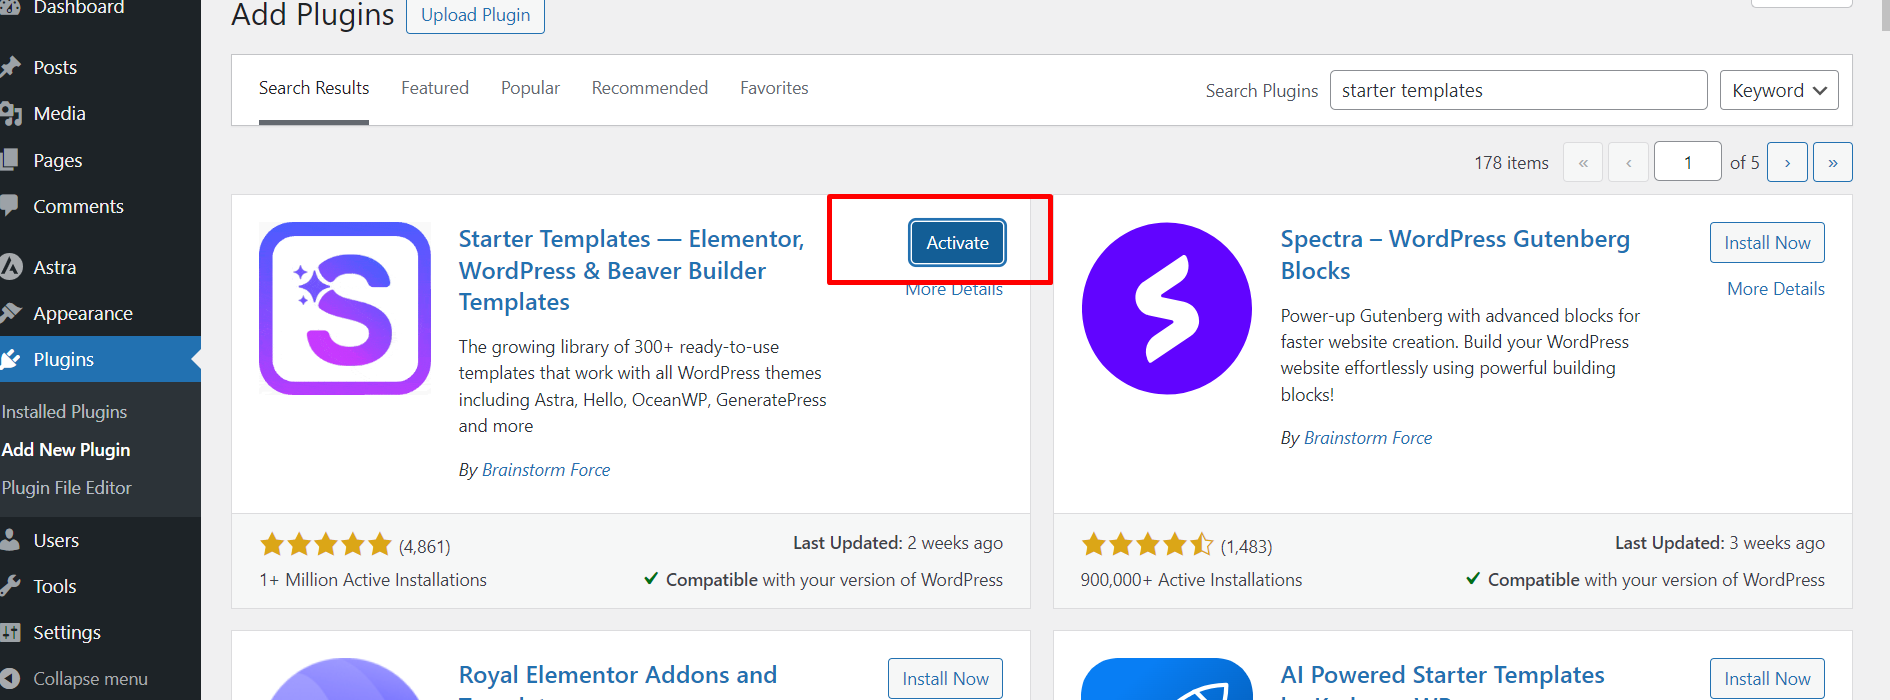
Just go to the plugin, then add a new plugin like this.
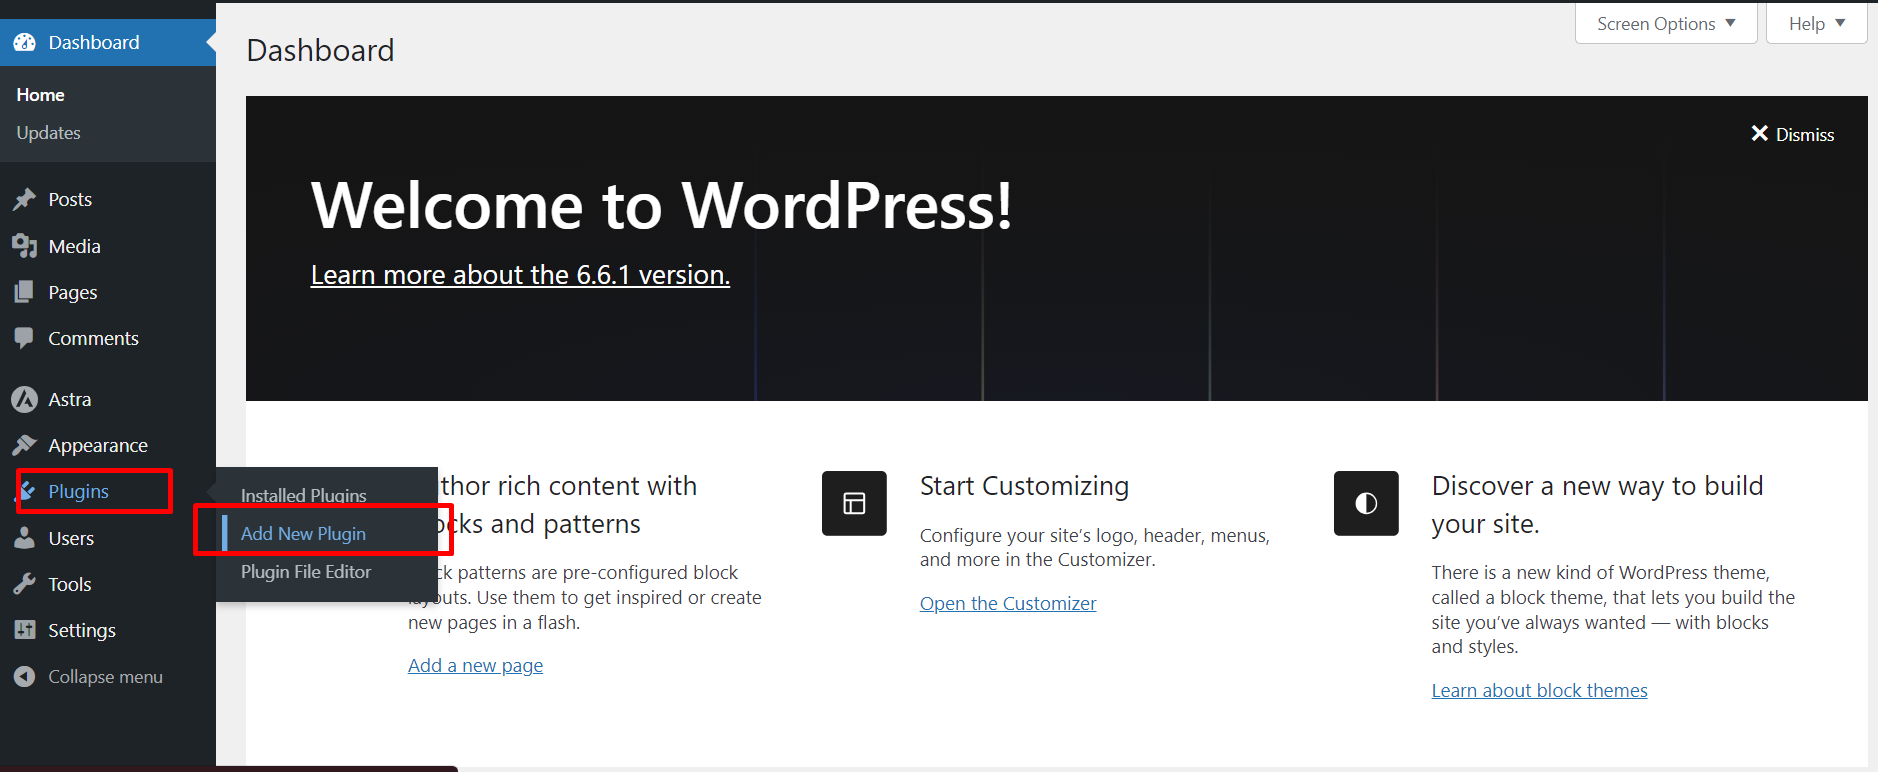
Next, type in the search box for starter templates.
Click on install.
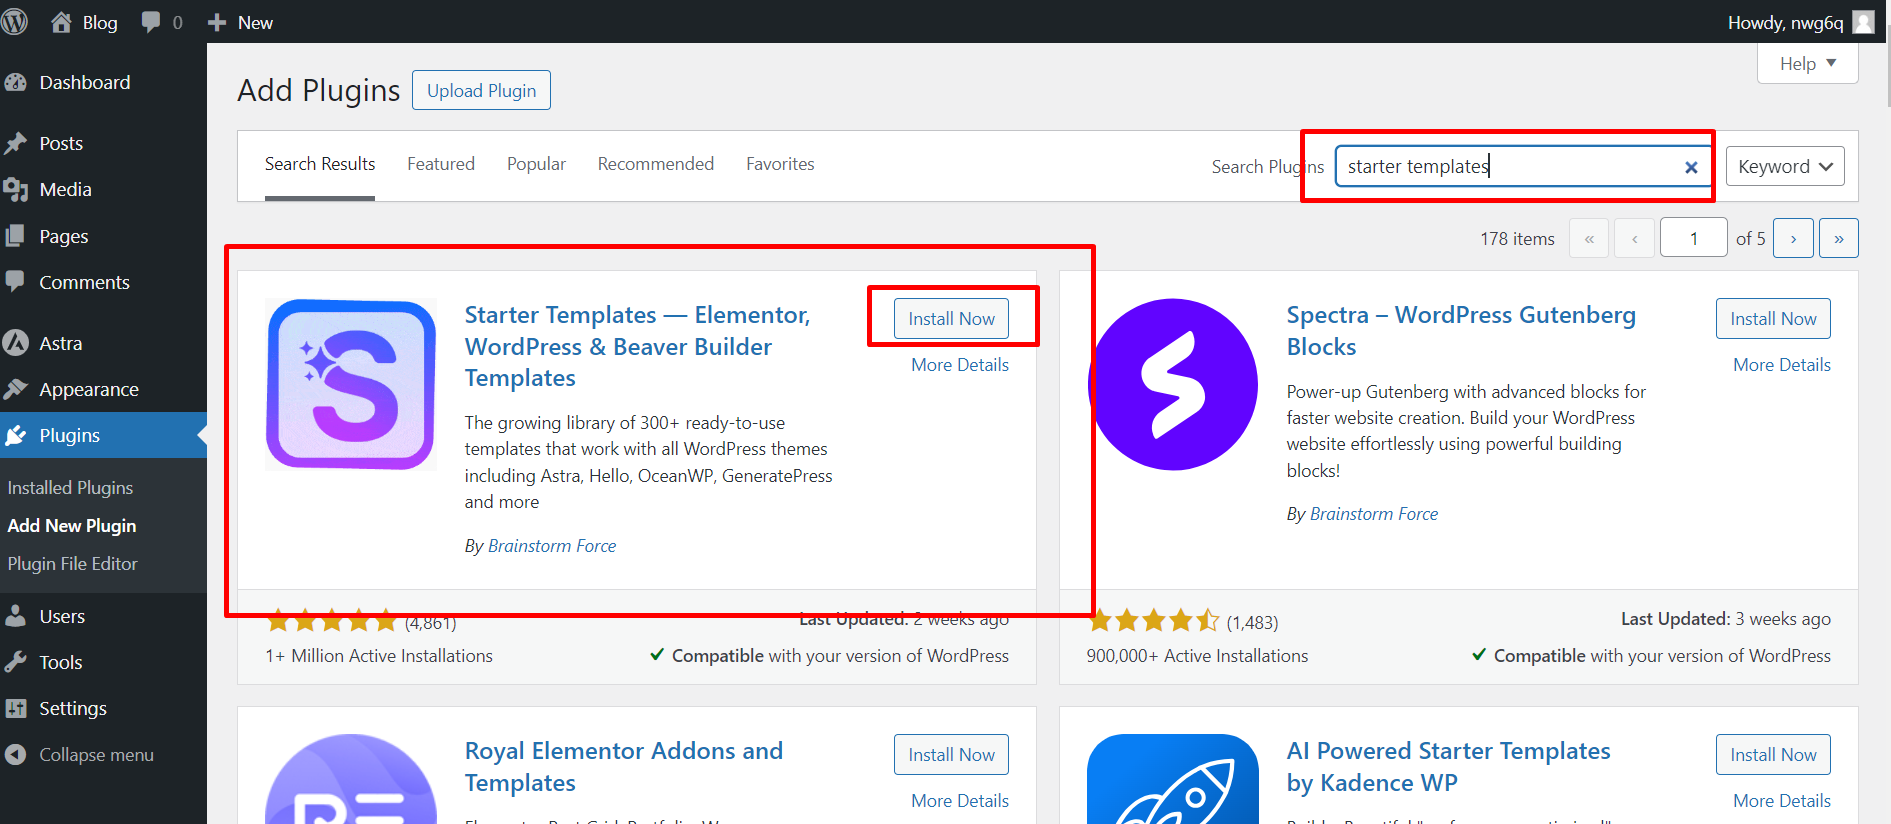
Finally, click on activate.
That’s great
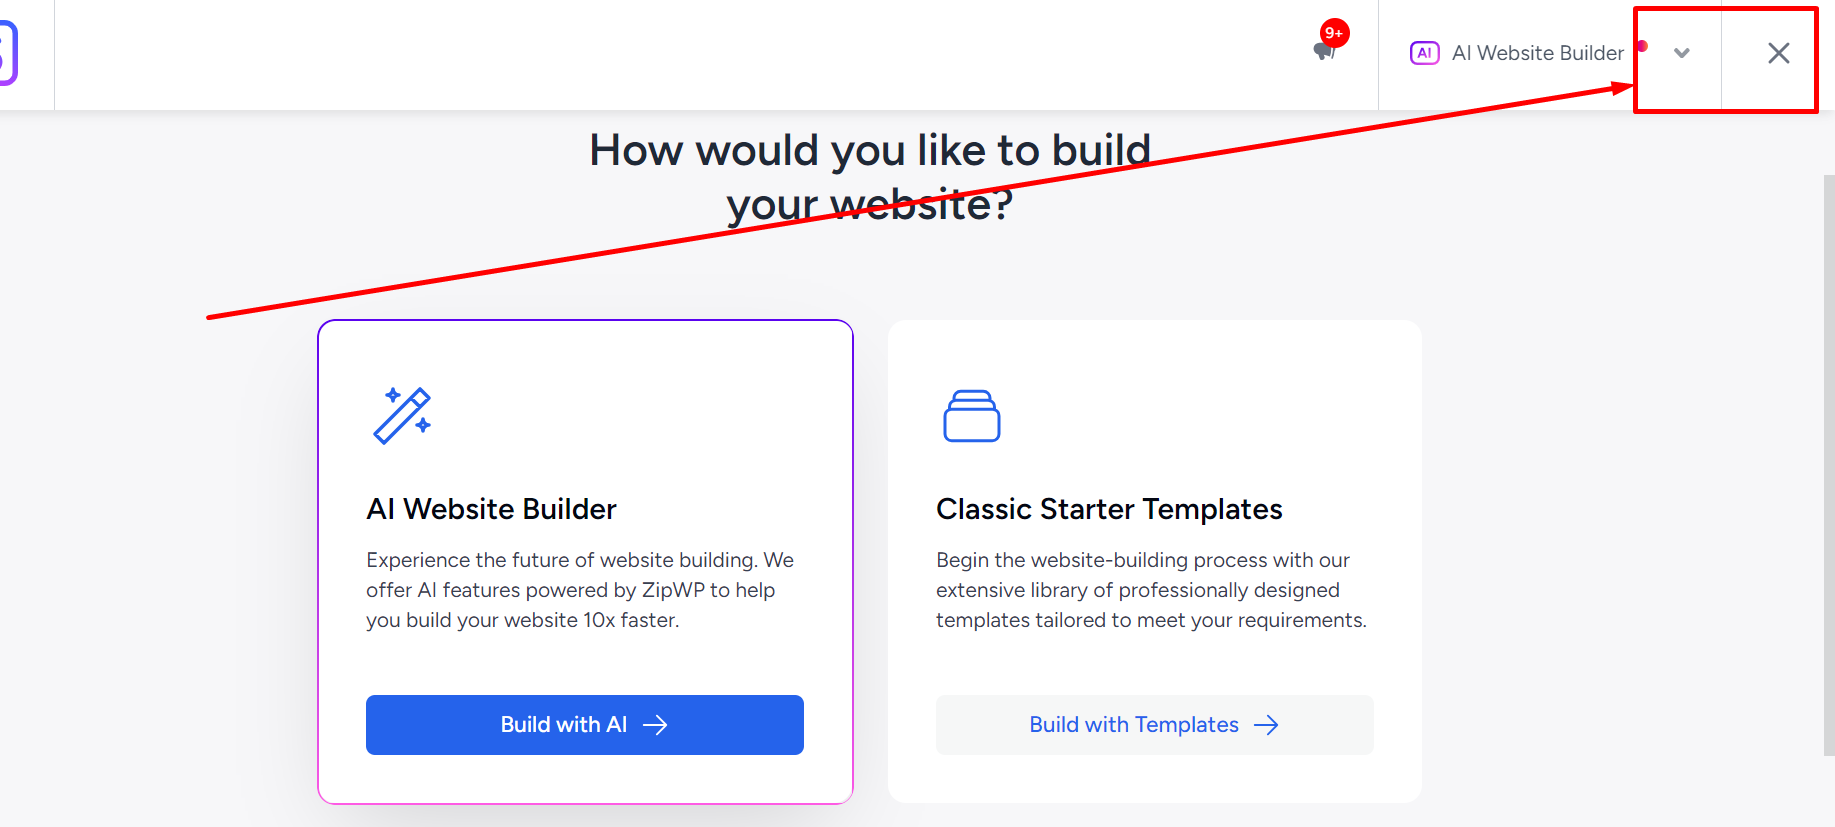
You have installed the starter template plugin successfully.
Just avoid it by clicking on the shown space.
With that, Its time to…
Install Your Dream Blog Template From Starter Templates
Here, you want to install your dream WordPress blog template from the huge collection of starter templates.
Let’s do it.
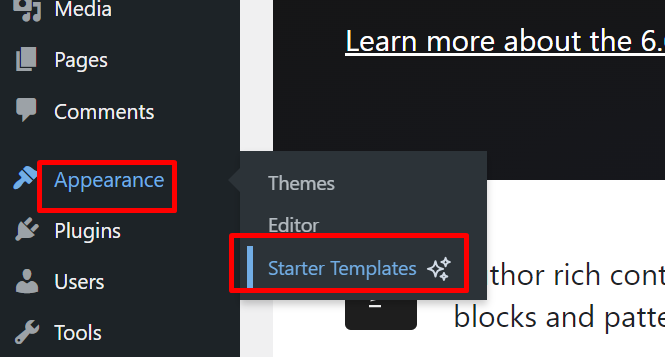
To do that, go to Appearance, then Starter Templates.
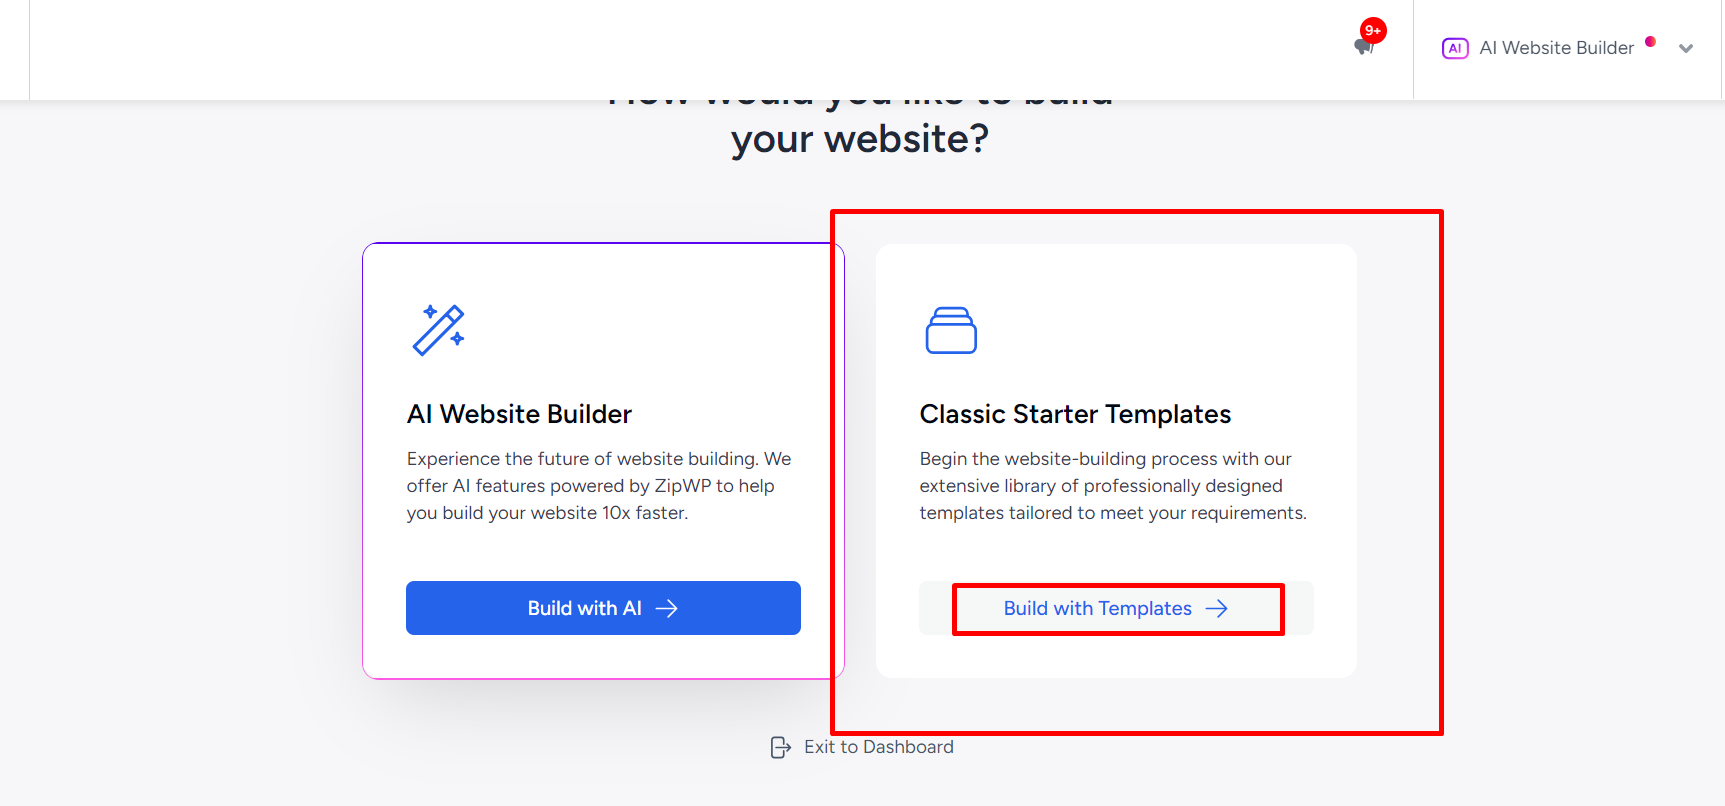
Now you see this page below, and here, click on Build with AI.
On the next page, you will see a search option.
Type your dream niche there, like this one.
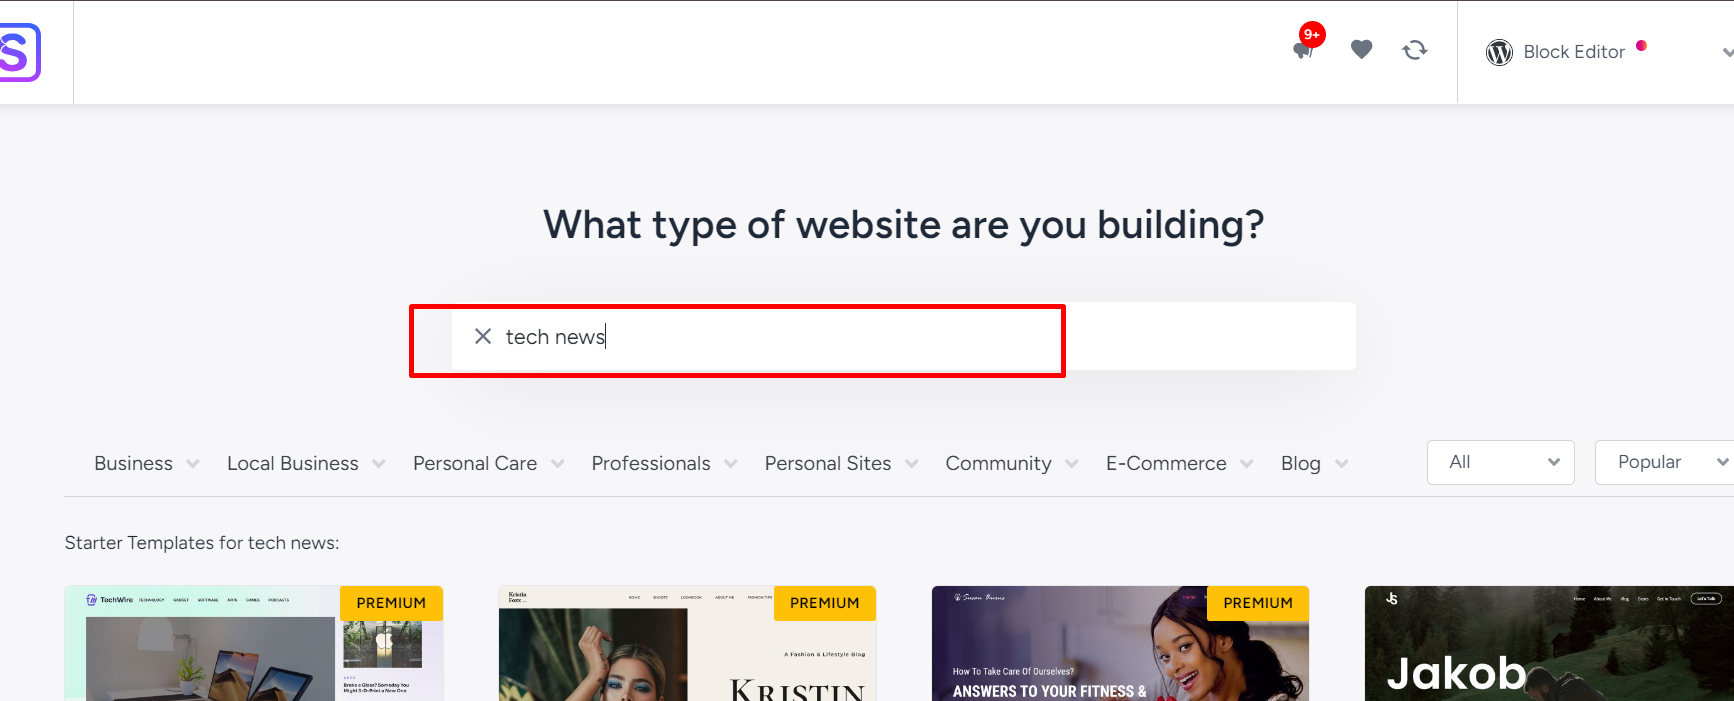
Here, you can see so many templates within two types.
Paid and free,
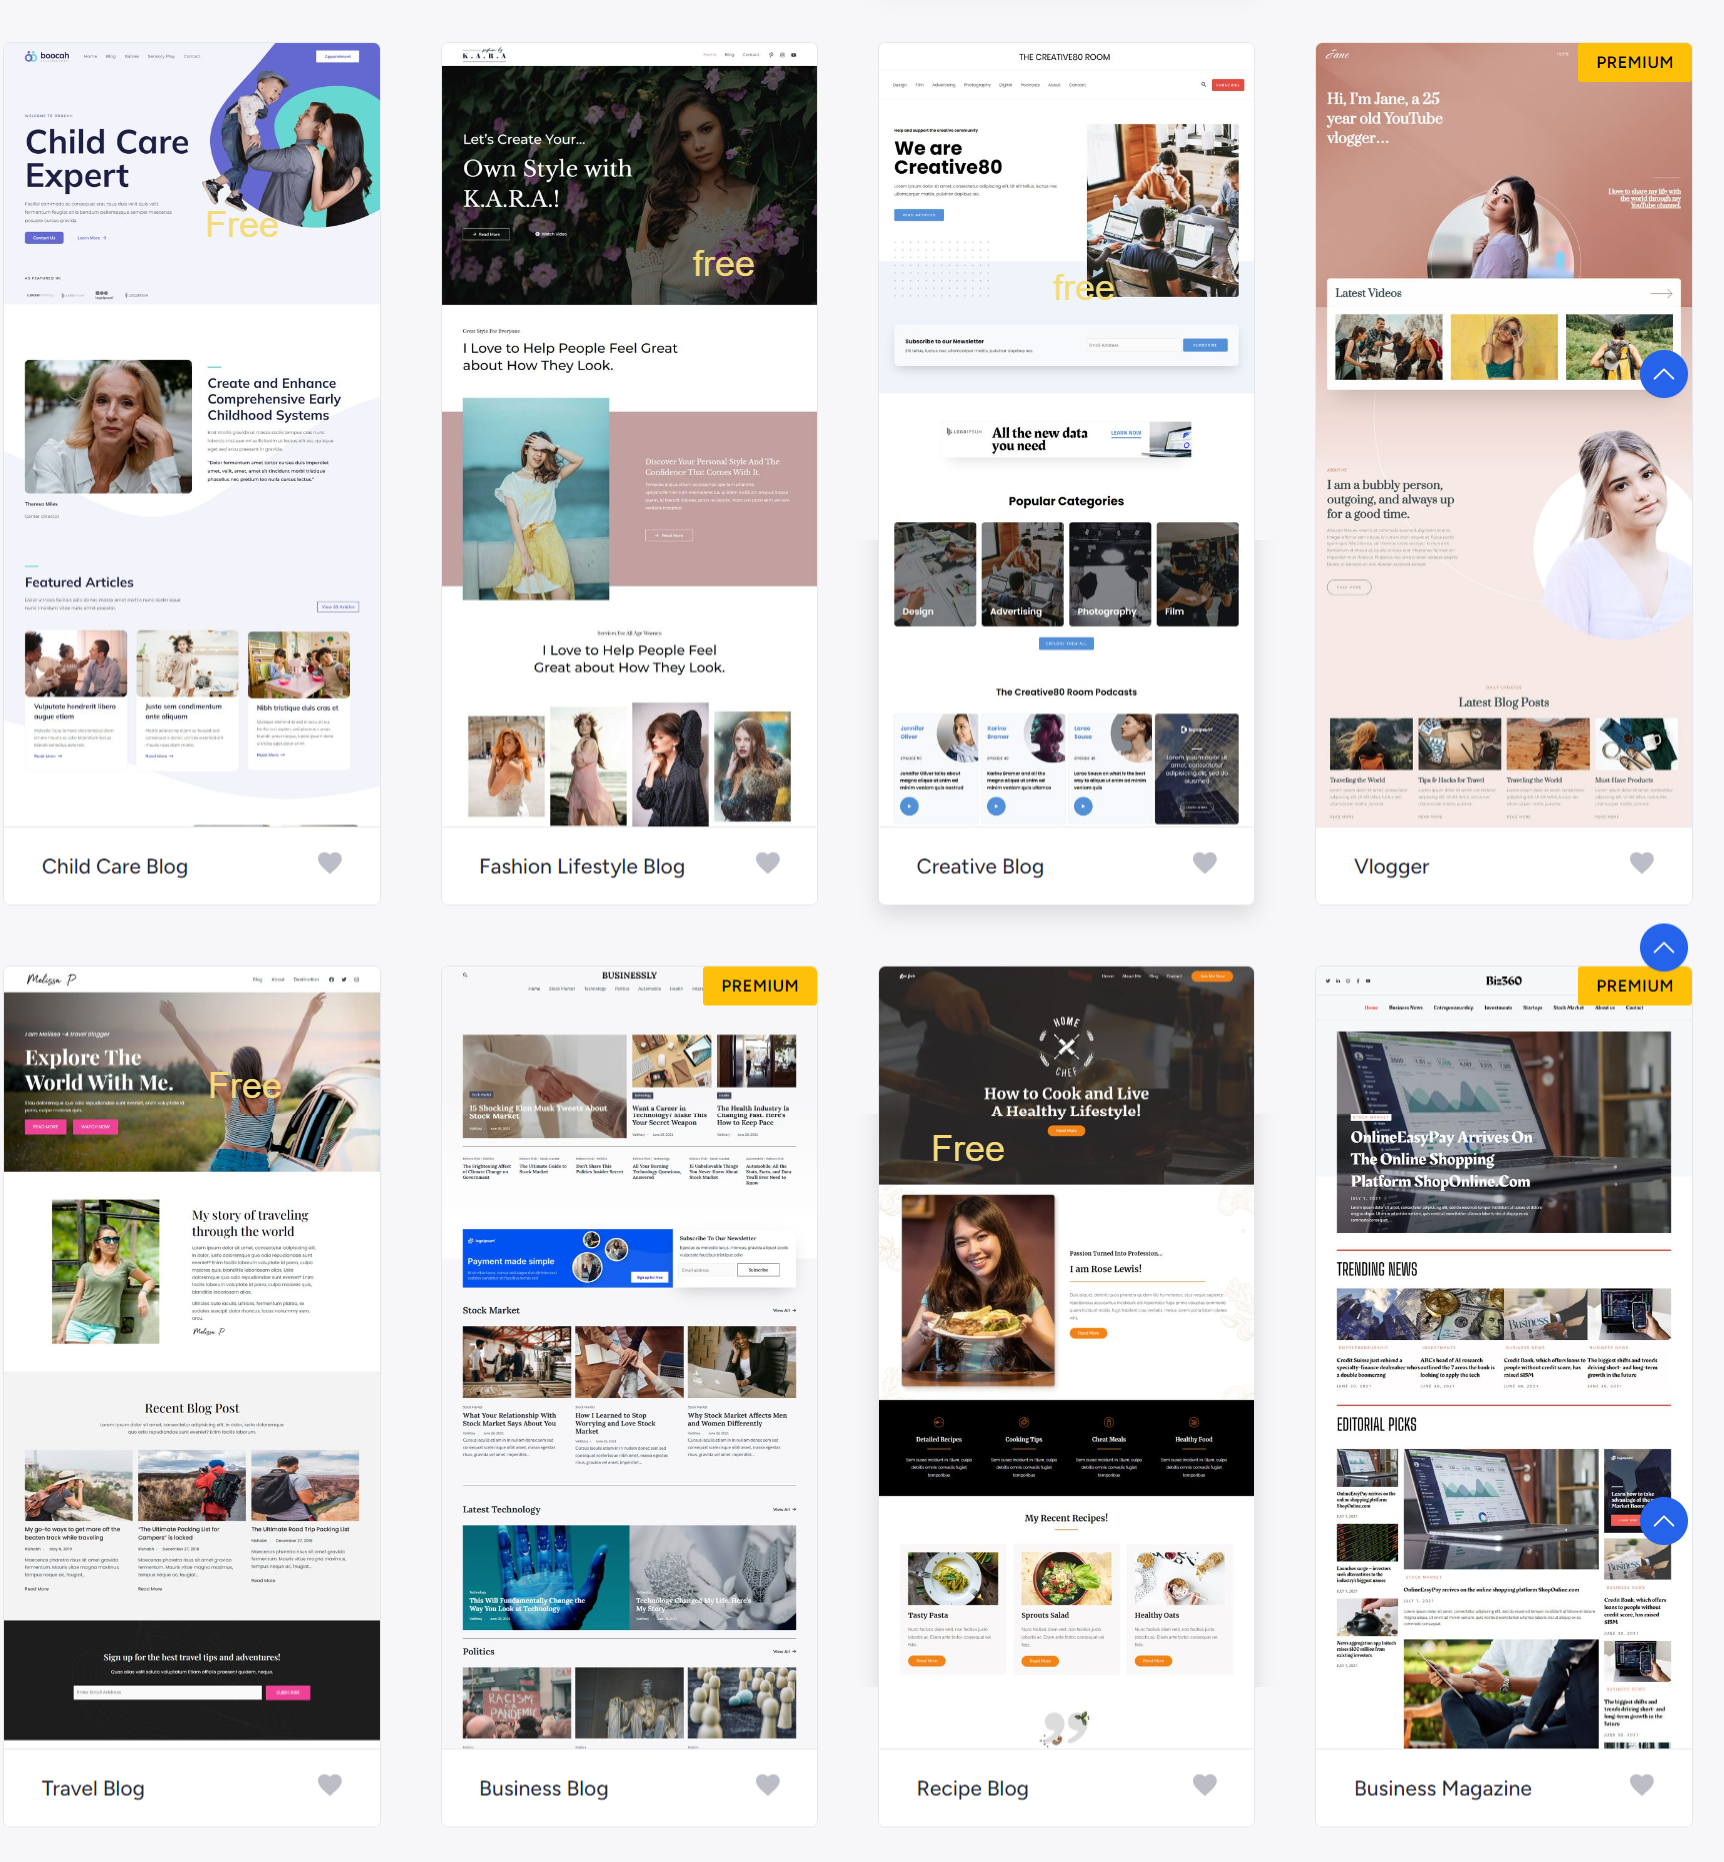
you can choose anyone that you want.
but paying is recommended.
here, I’m showing you a free template.
Ok,
Just click on the desired one.
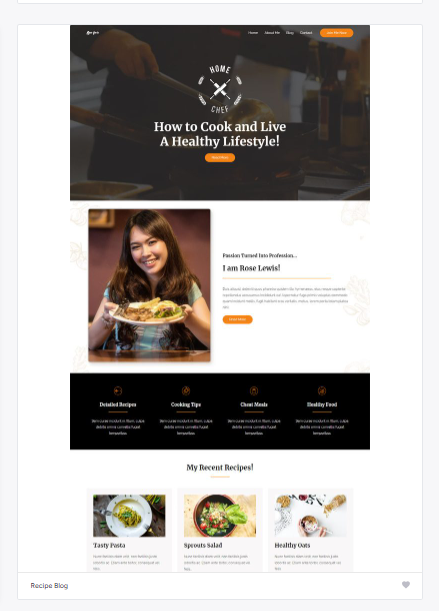
After clicking, you are boomed at it.
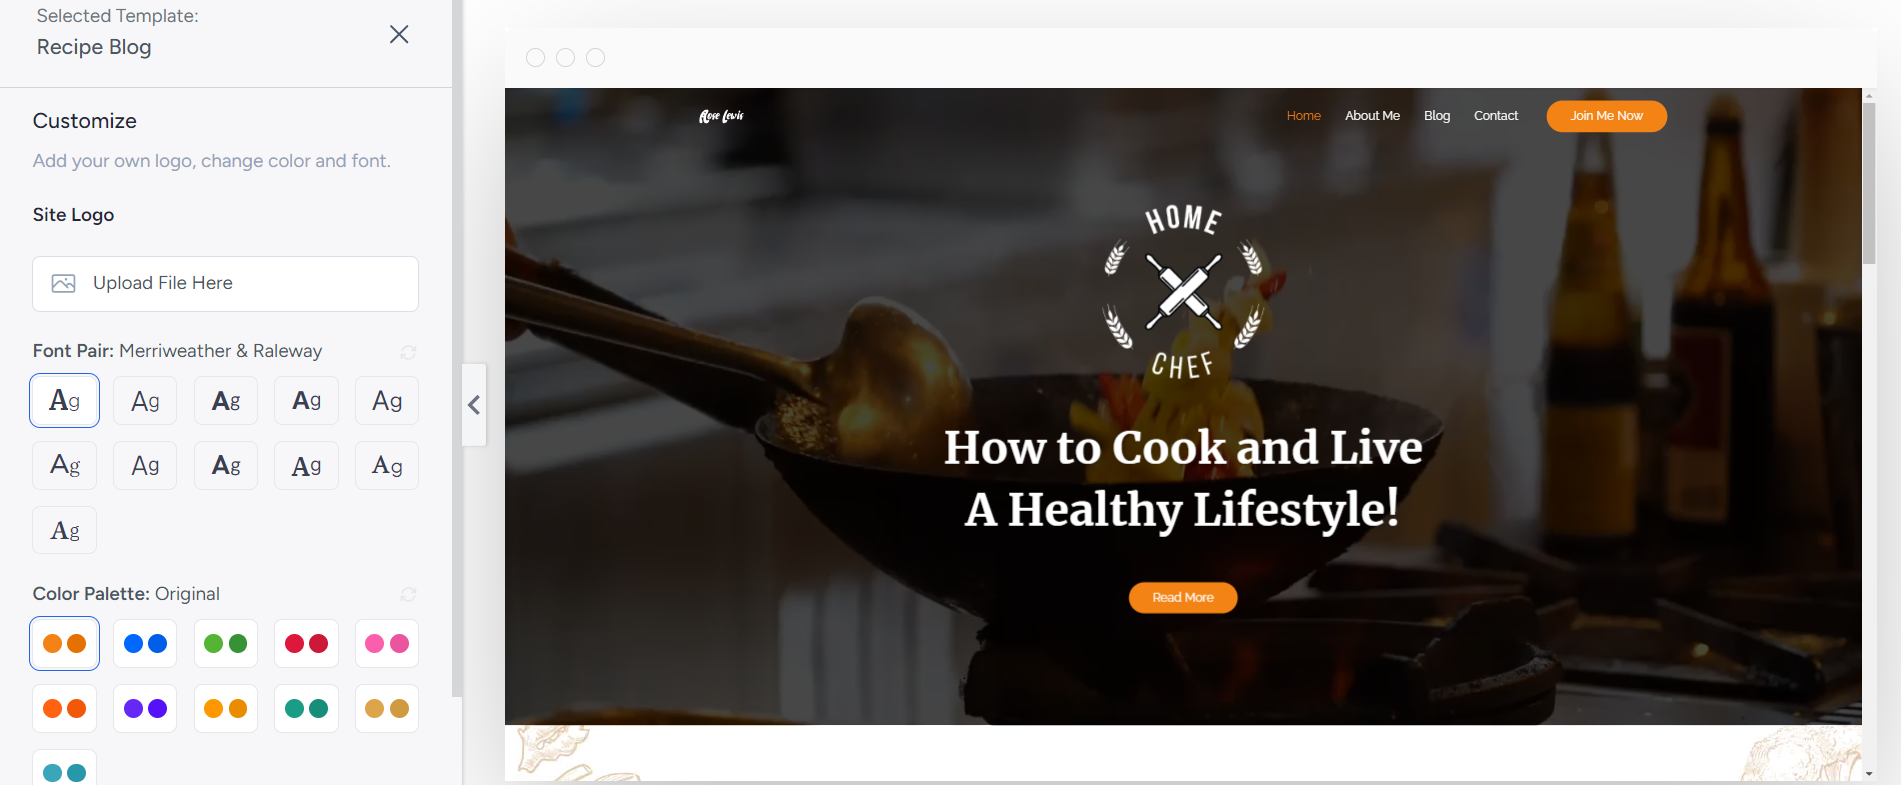
Here, you can customize everything you want with your real information.
But now, customization is not recommended.
Click on continue.

Now click on skip.
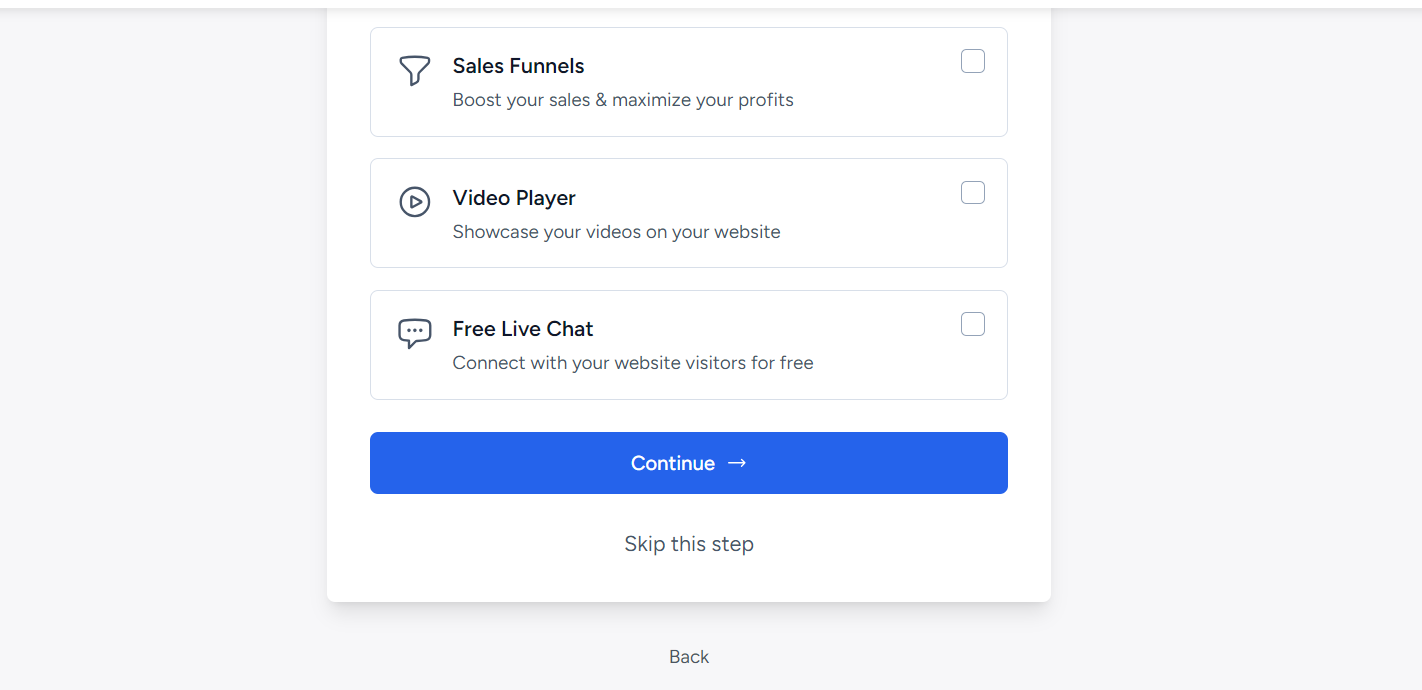
Now submit

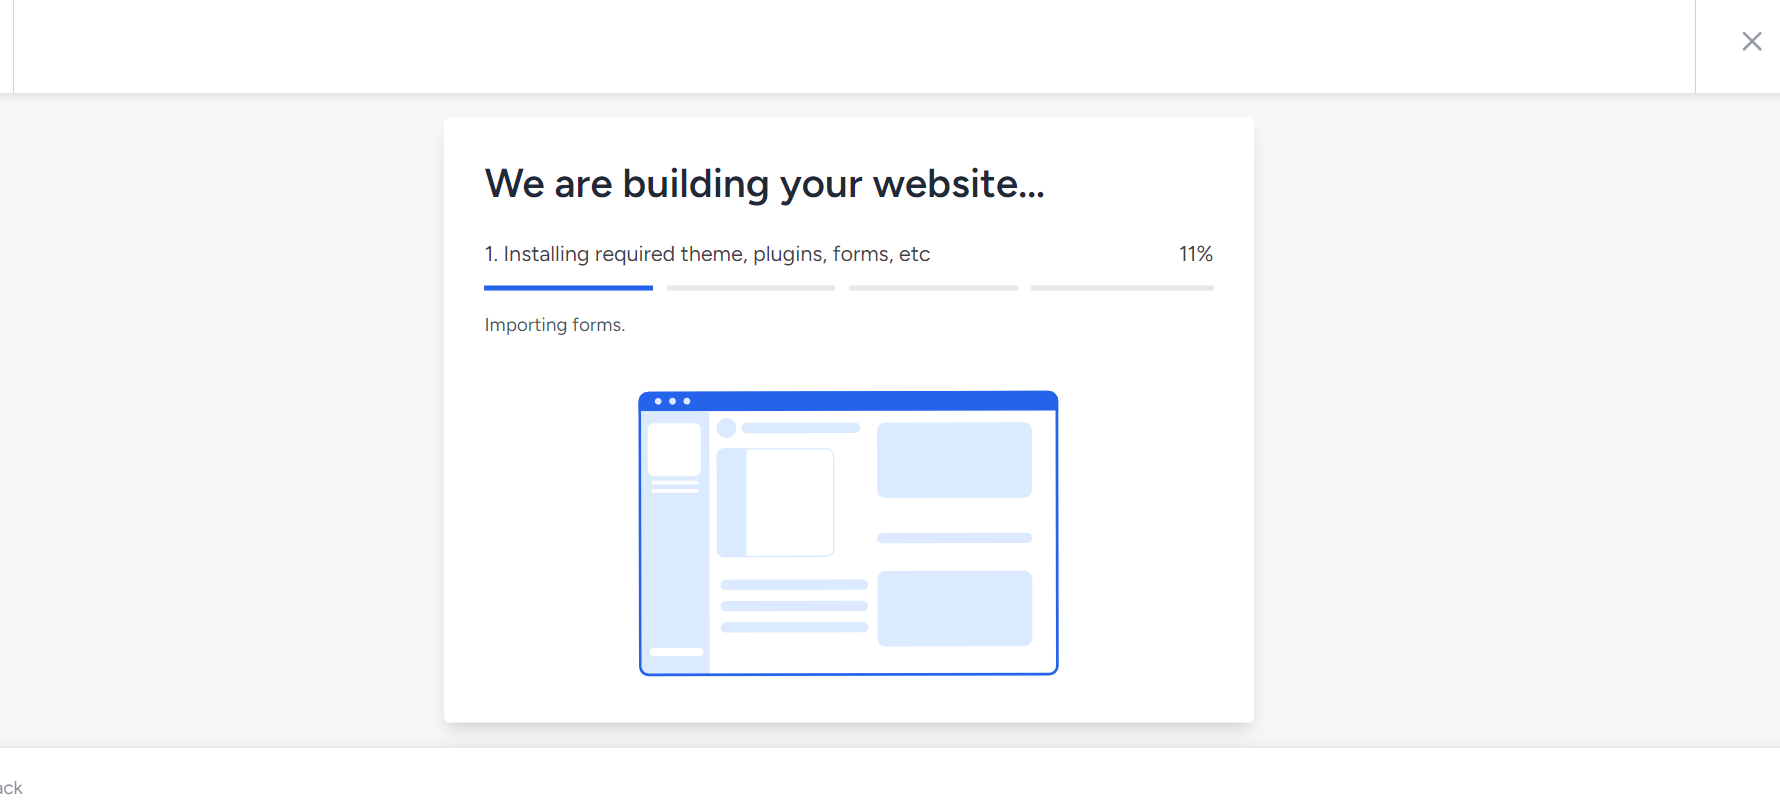
Now wait a bit.
Congratulations
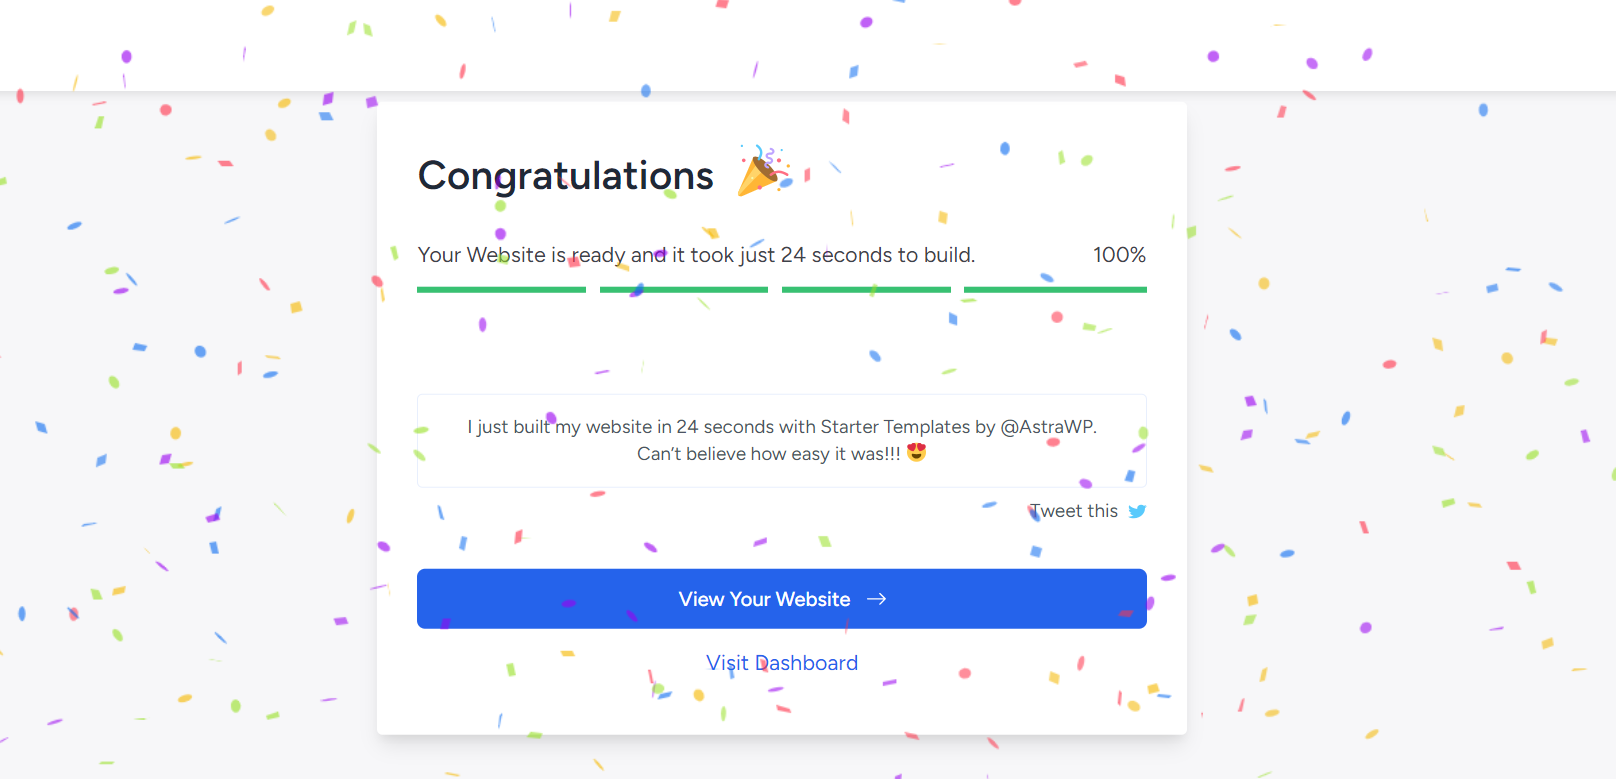
It is done.
Now you can go to your WordPress dashboard or have a look at your dream template website by clicking View Your Website, then go to Dashboard.
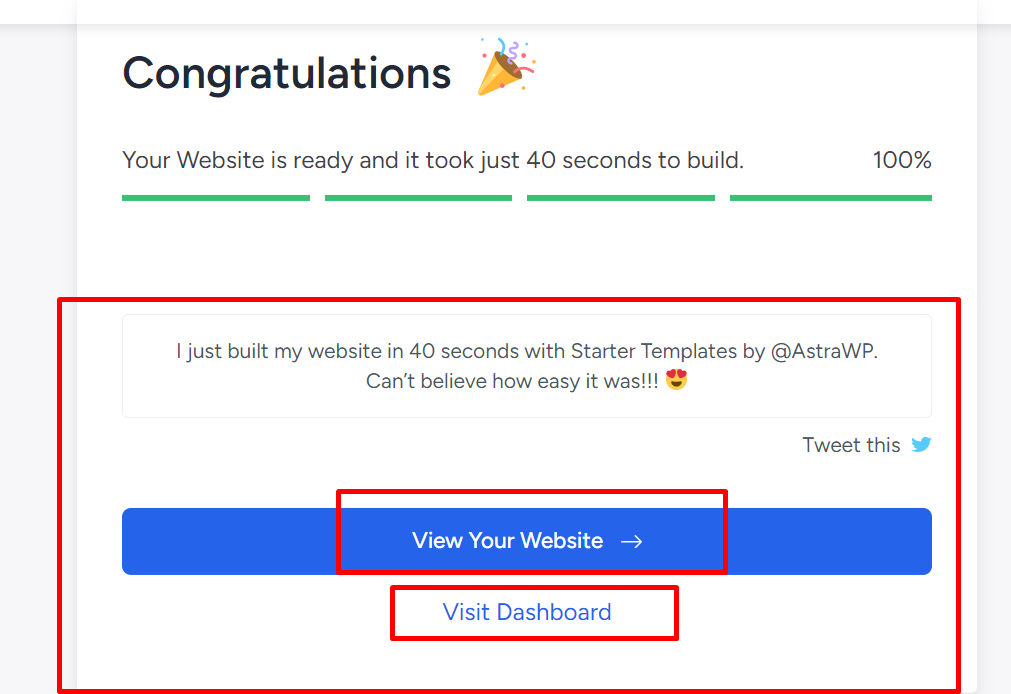
Here’s your website frontend dashboard.

After viewing your frontend dashboard, you can go to your backend dashboard.
To do that, just do what I have done in the below image.
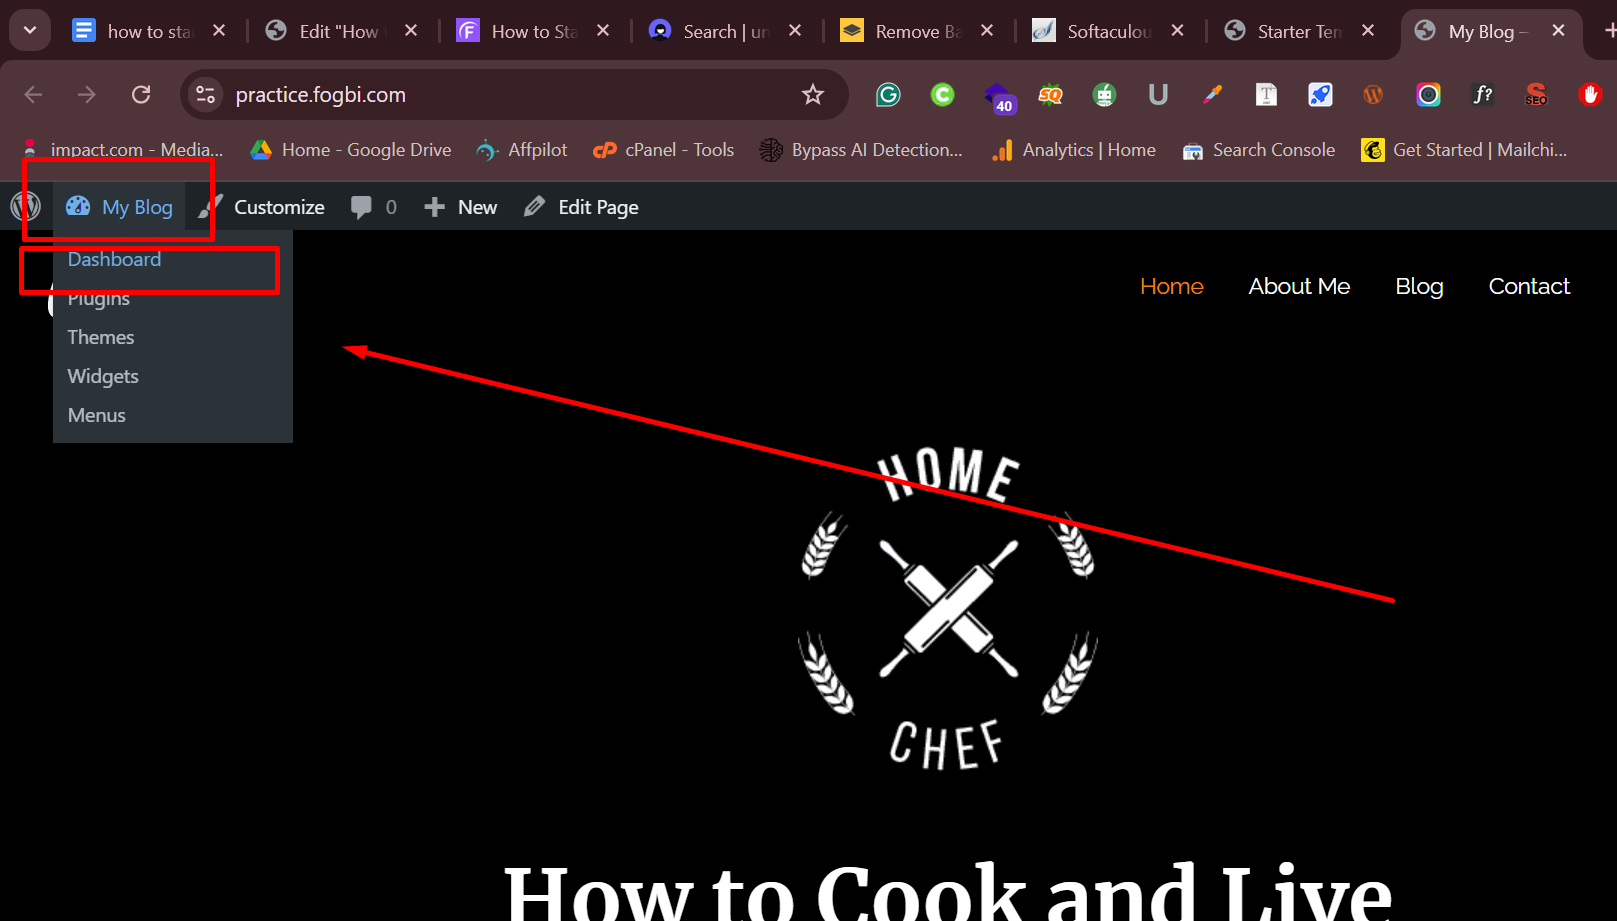
Hey, do you remember that I have not visited the frontend dashboard from here?

But I’m going to go to my WordPress dashboard from here.
Well done.
You have installed your dream templates successfully.
speaking of…
Customizing Your Dream WordPress Blog Website
Now, you can customize everything you want by adding your real information.
So let’s jump.
Go to the pages, then all pages, and see what is coming.

All the pages at a glance that you have by default from the theme.
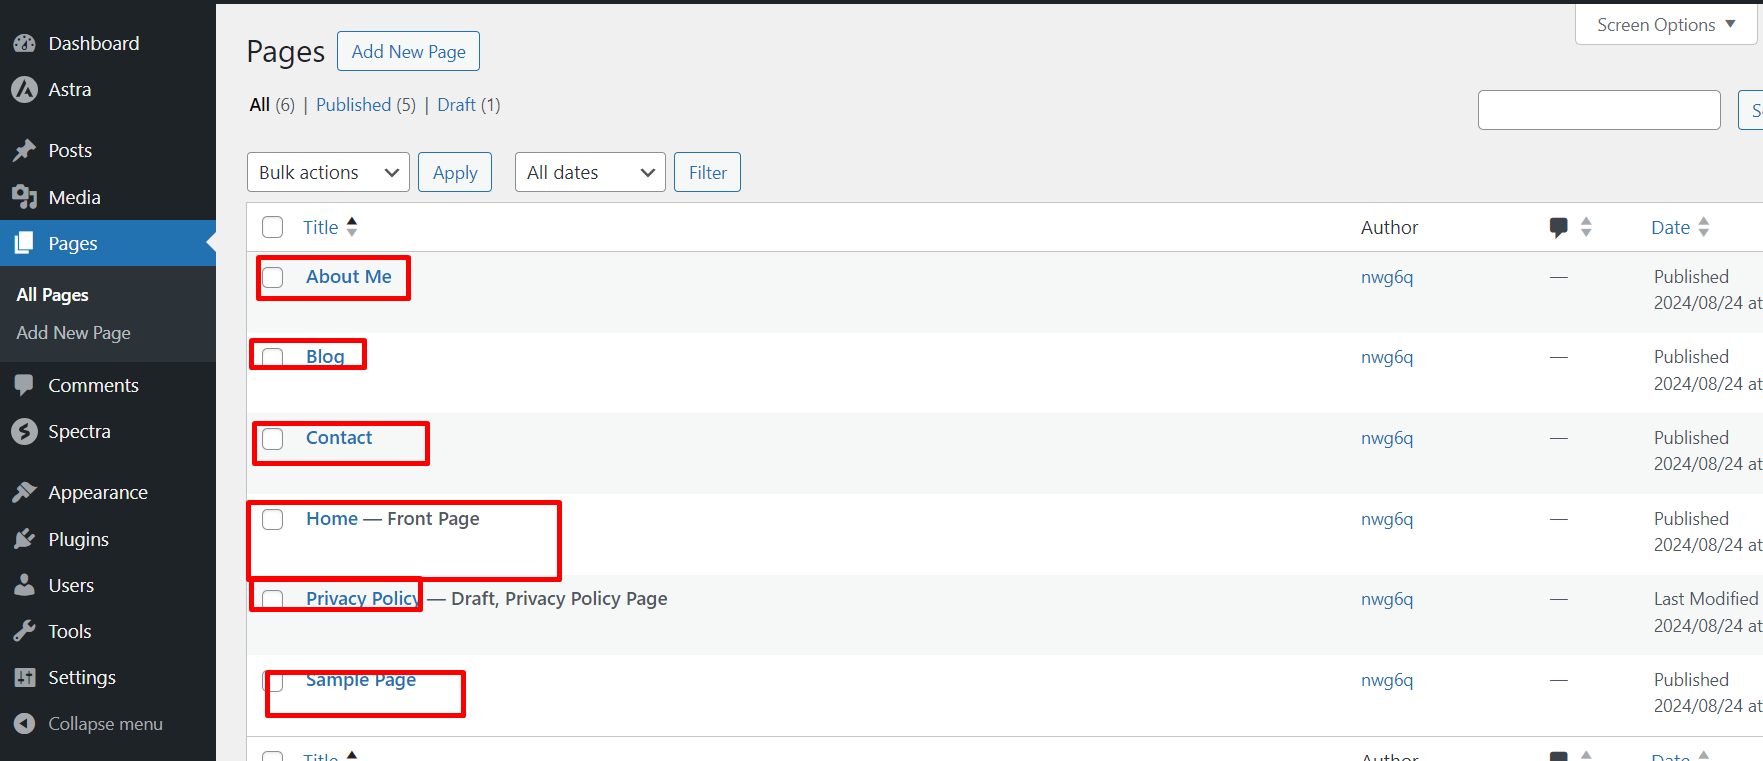
Now you can customize every page.
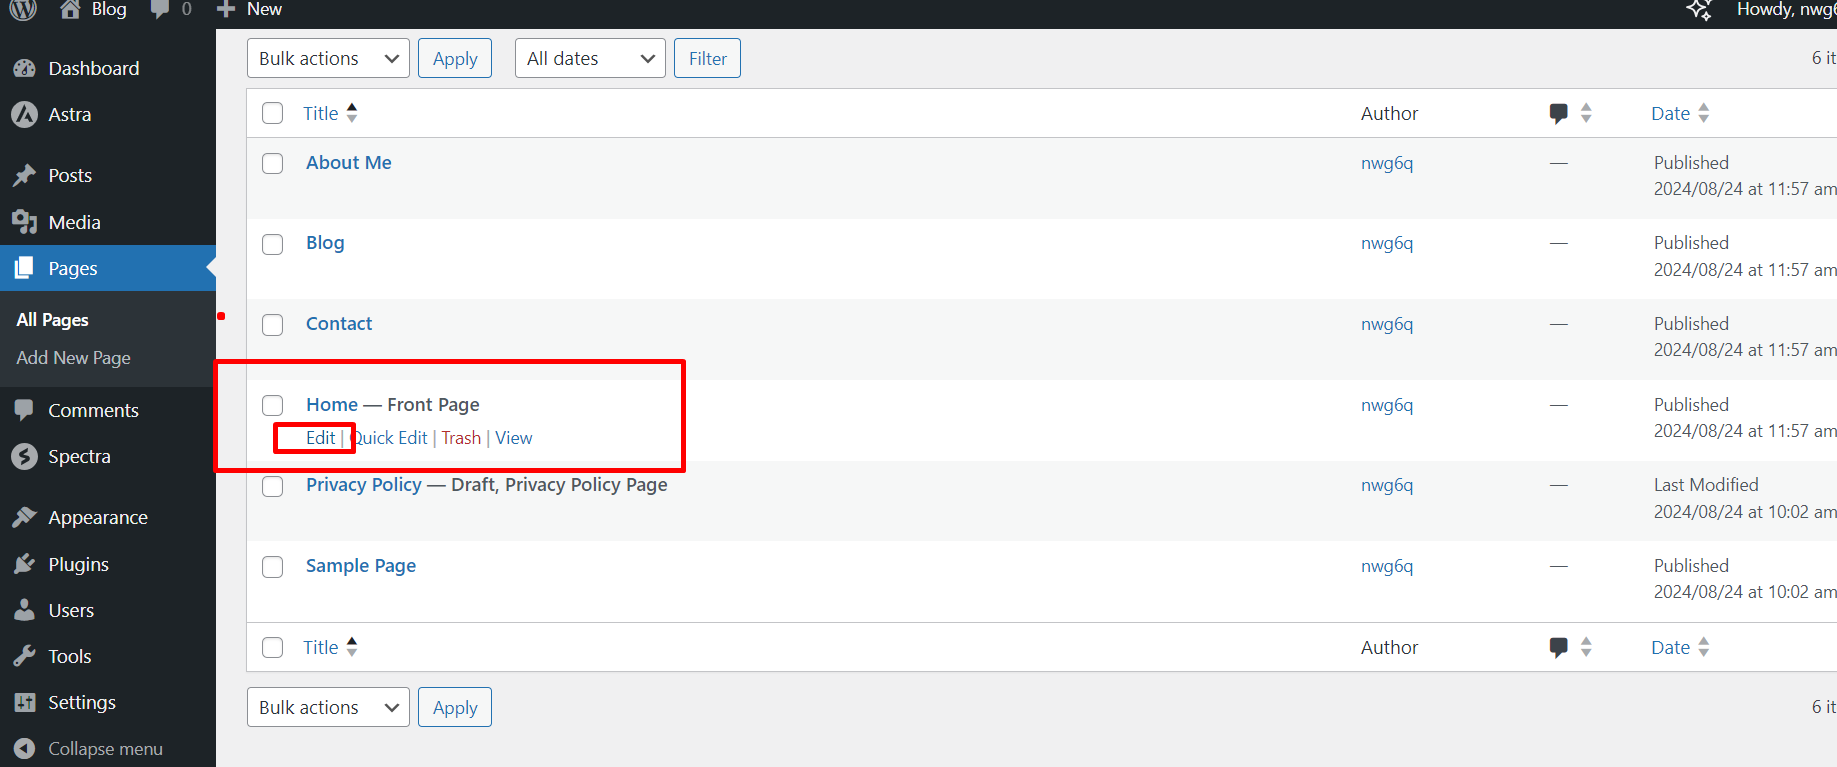
To customize a page, just hover over the text that you want to customize and click on Edit. Like this
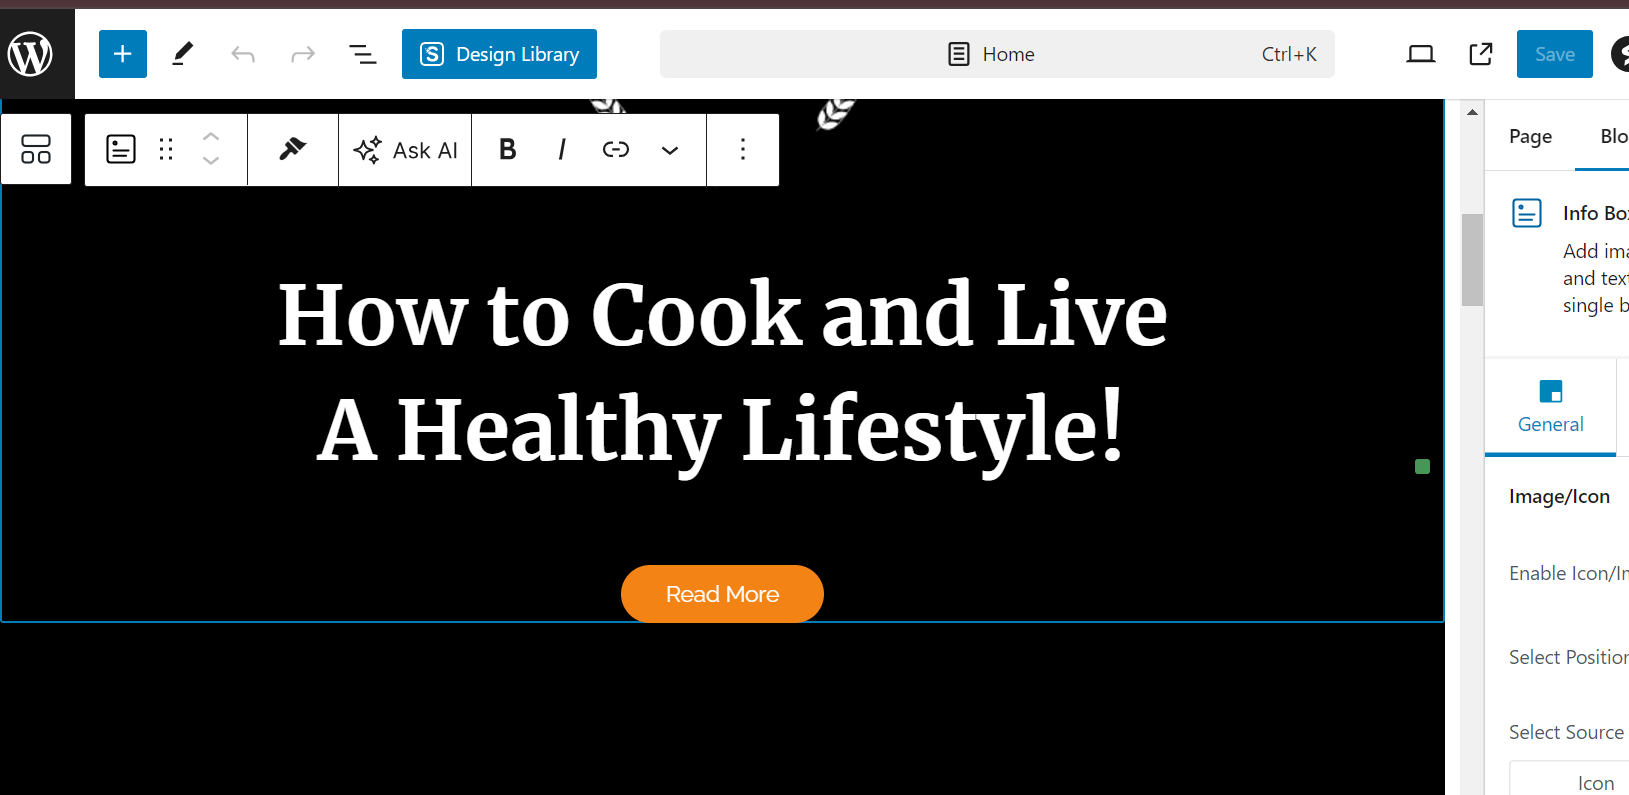
Now you can see the customization page, where you can customize anything you want, like this: Home Page
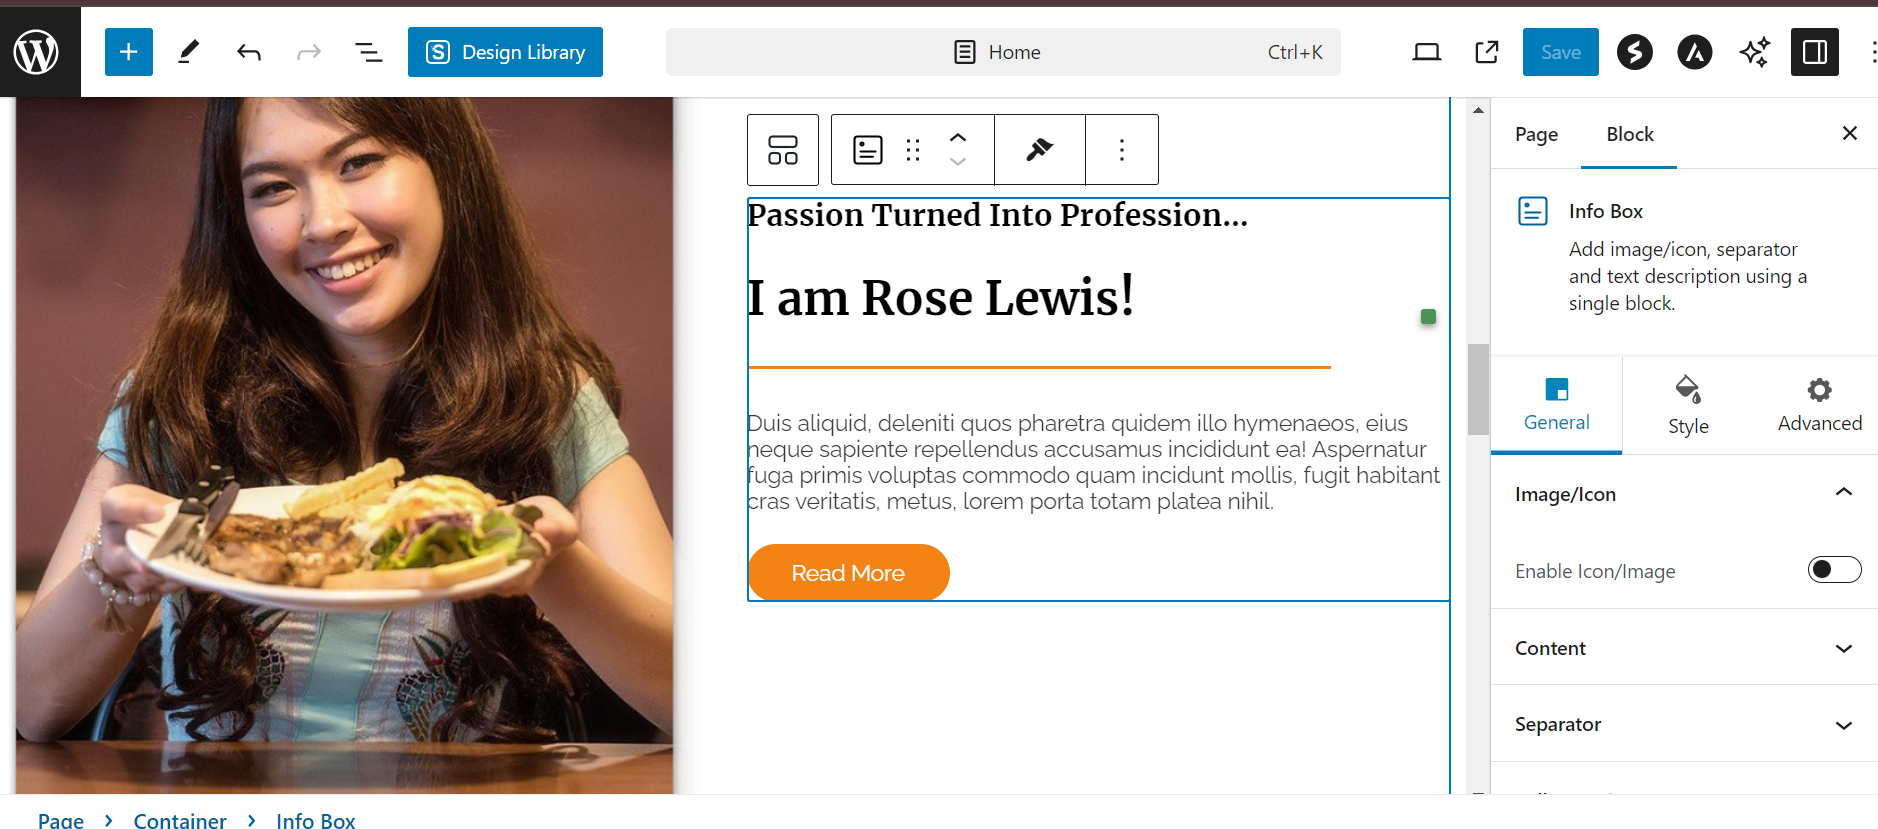
You can change the title
You change the testimonial.
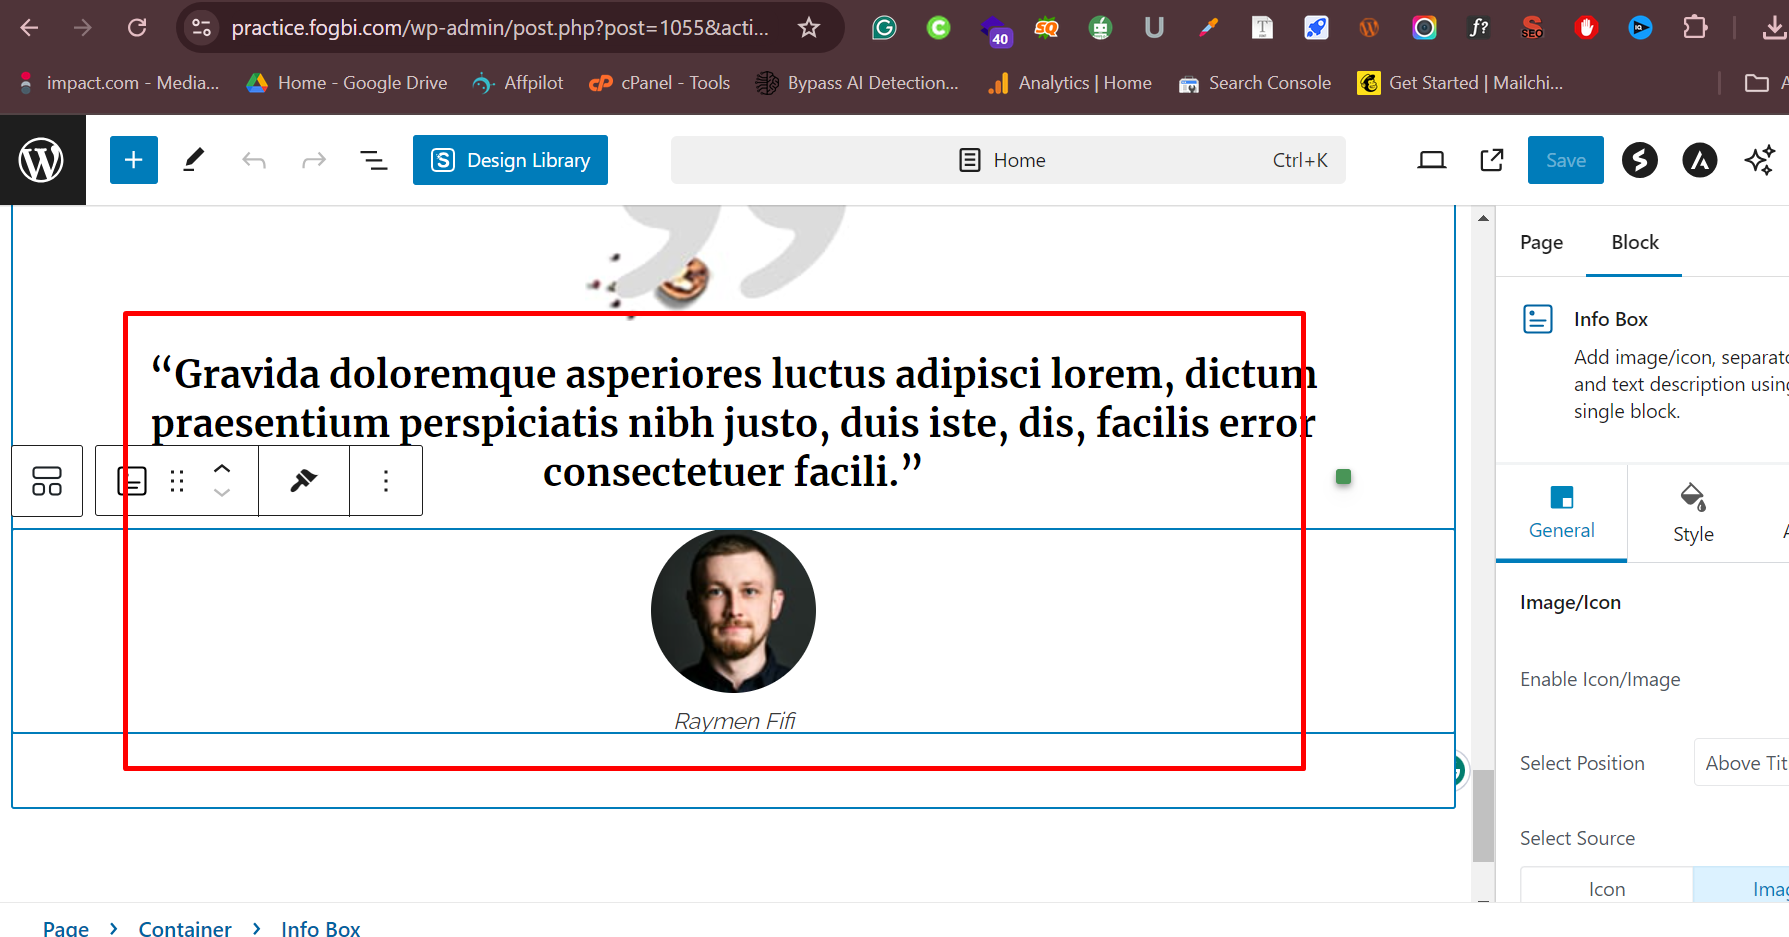
Hey, the fun is that,
In this way, you can customize everything—image, text, button, video, etc.—that you want.
Also, you can customize any page, like blog page, contact page, about page, etc., that you want.

Hope,
You got the topic.
Well done,
You have finished your WordPress design part successfully.
Also, consider these design tips:
- Use high-quality images to make your blog visually appealing.
- Ensure your font is readable and consistent throughout the blog.
- You may include a search bar to help visitors find content quickly.
Note: If you want to learn more and want to see the whole process of customizing a new blog website, watch our video tutorial.
because expressing everything in writing is not possible.
A Big Bonus of Chapter Six
Create The Necessary Pages
A blog website must require
- Home Page
- About Page
- Contact Page
- Blog Page
A blog website may require
- Privacy Policy Page
- Terms and Conditions Page
- Disclaimer Page
- Shop Page
- Lots More
With a theme, you may get the above must-require pages by default;
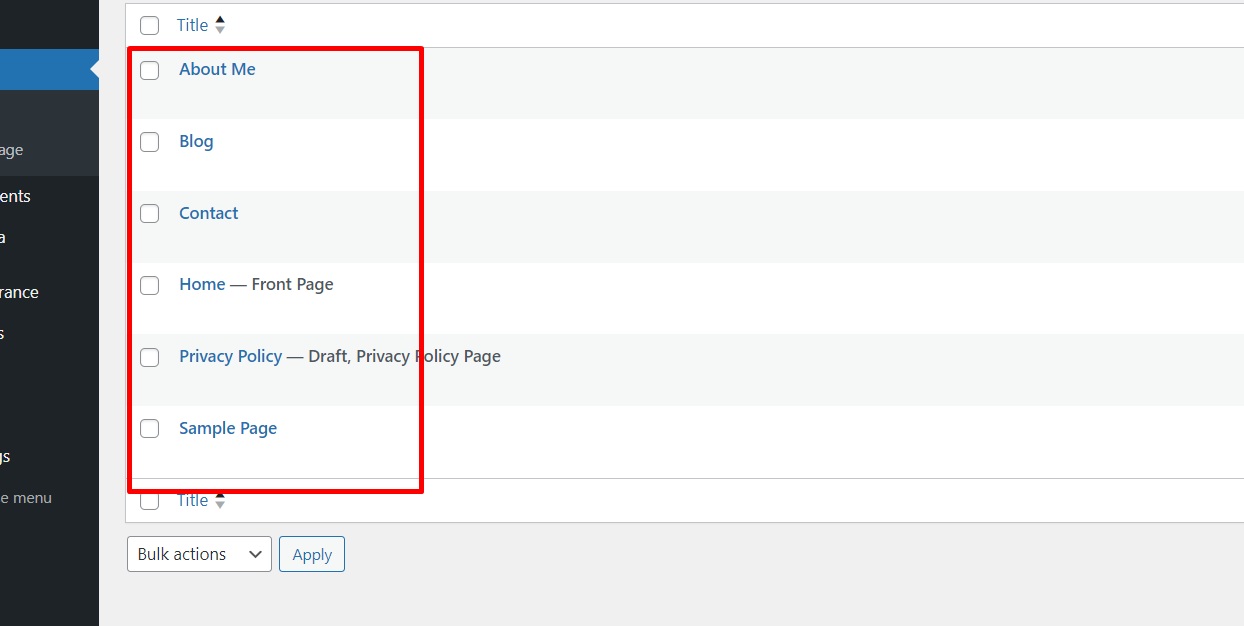
You just have to customize those with real information.
To customize, click on edit.

Now you can customize
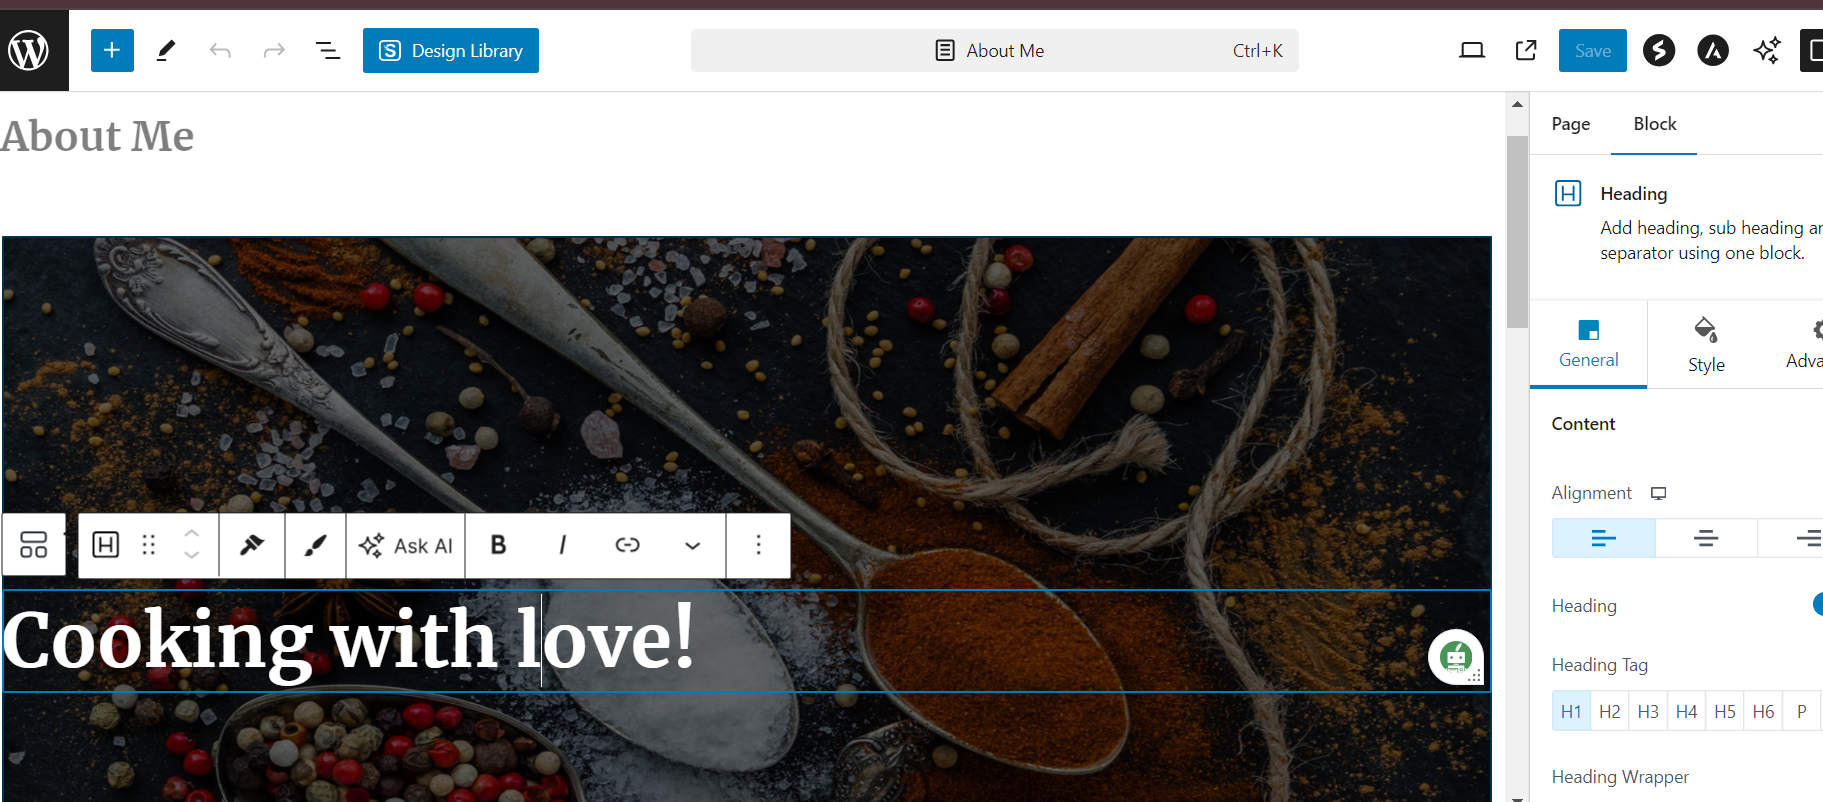
Ok,
This is how you can customize every single page.
Oh, wait, I have a question.
how do I create a new page?
It’s simple
Just click on pages, then add new page like this.
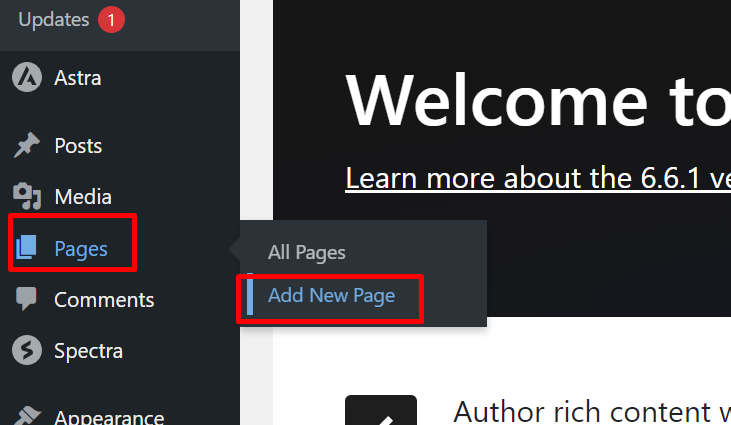
You see this page here. write your page name and click on publish.

That’s all about creating new pages.
With that, Time to move to…
Chapter Seven
Write Quality Content
Delve into the essential components.
of creating quality content, including
understanding your audience,
writing engaging posts,
incorporating multimedia.
Keep reading…
Understanding Your Audience

To create content that resonates, you need to understand your audience.
Knowing who they are, what they like, and what they need is crucial.
Start by defining your target audience with these key points:
- Demographics: age, gender, location, and education level.
- Interests: Hobbies, passions, and favorite topics.
- Pain points: problems they need solutions for.
Another effective approach is to create audience personas.
These are fictional characters that represent your ideal readers.
Here’s an example:
Persona | Details |
Busy Professional | Ages 25–35, works 9–5, interested in time-saving tips. |
Stay-at-Home Parent | Ages 30-45, manages the household and seeks parenting advice. |
By understanding your audience, you can create targeted, valuable content that keeps readers coming back.
So think of these deeply and take time to do this.
Now that you have caught your target audience,
let’s write hooky posts.
Writing Engaging Posts
Engaging posts keep readers hooked from start to finish.
To achieve this, follow these tips:
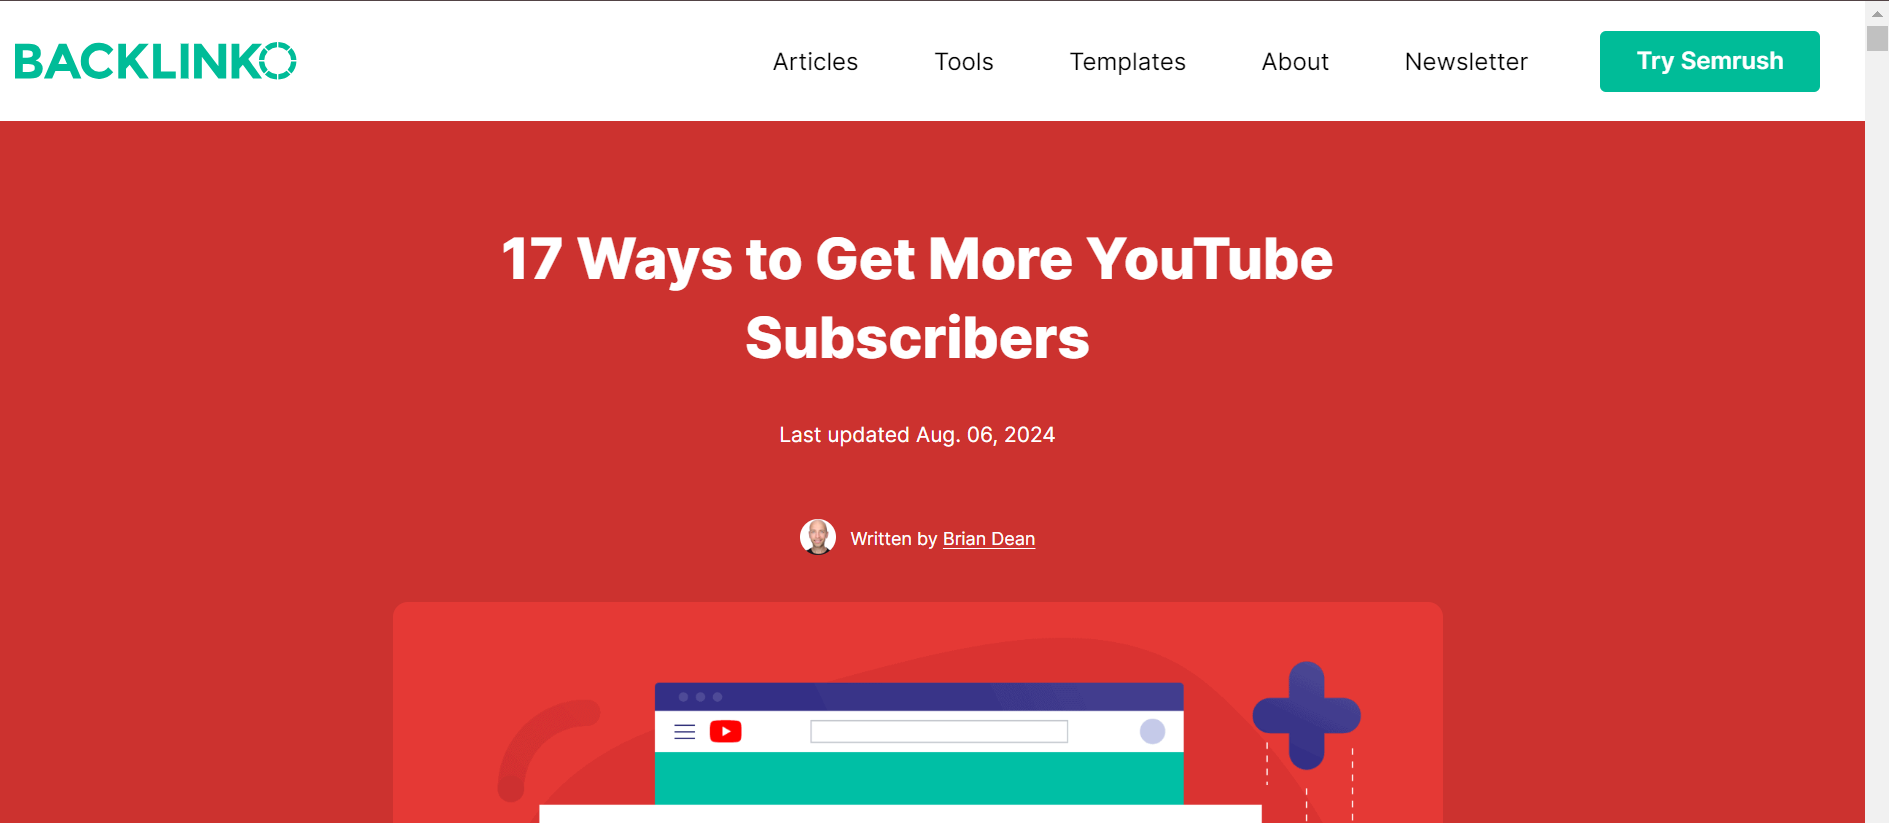
- 1. Catchy Headlines: Use attention-grabbing titles.
For example
- 2. Clear Structure: Break content into short paragraphs and use subheadings.
For example
No one likes this type of content.
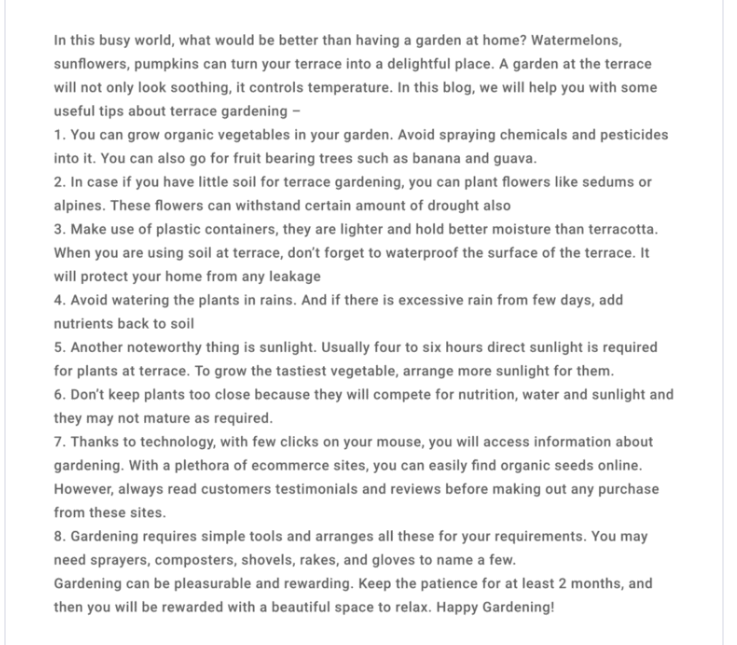
- 3. Storytelling: Share personal anecdotes or case studies.
For example
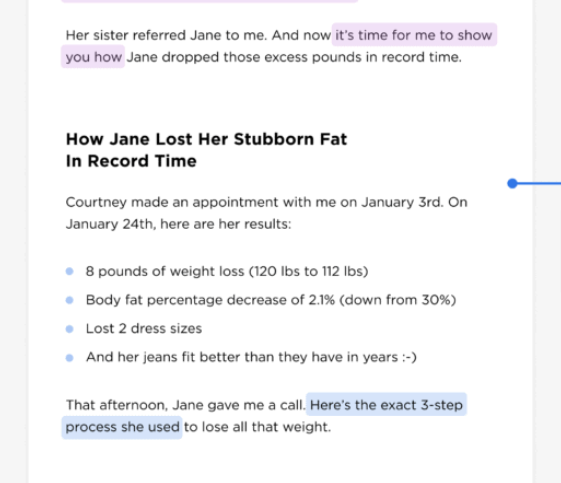
Write in a conversational tone, as if you’re speaking to a friend.
This makes your content more relatable.
Also, always provide value. Offer solutions, insights, or tips that readers can apply immediately.
Consider using the AIDA formula to structure your posts:
Here’s a visual of how it works, taken from Backlinko.com.
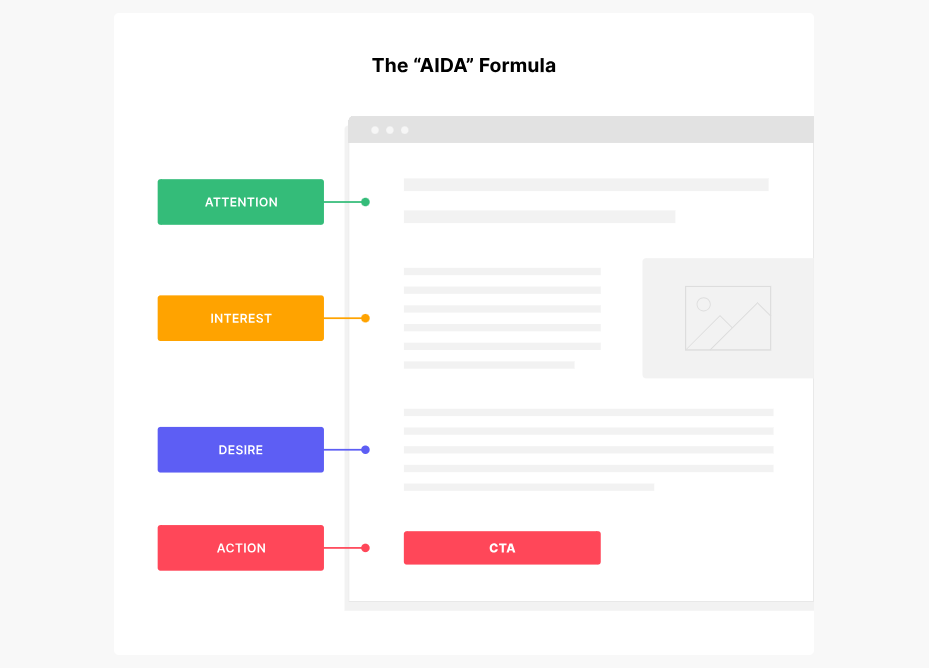
It stands for
- Attention: Start with a compelling hook.
- Interest: Provide interesting facts or insights.
- Desire: Show the benefits of your advice.
- Action: End with a clear call to action.
Here’s a real-life example of the AIDA formula.
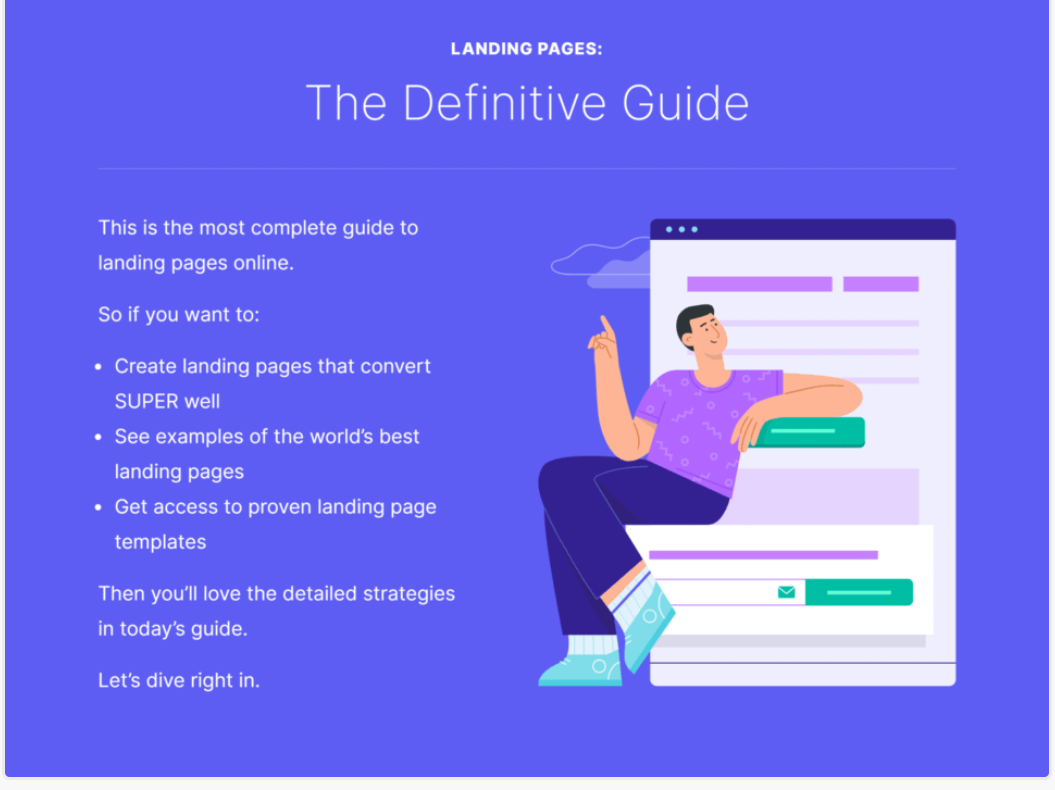
Here’s its explanation:
First, Brian Dean, an internationally recognized SEO expert,
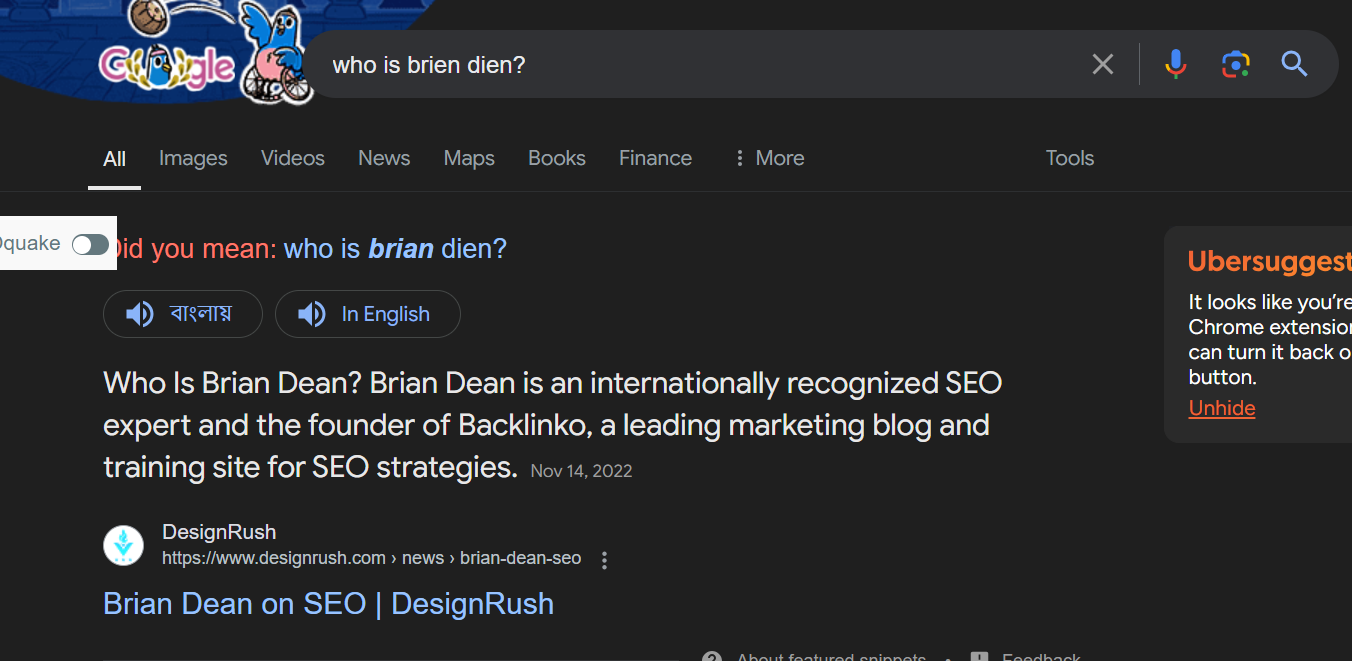
grabs attention to the first line.

Then, he drums up interest with a bold promise:

And he taps into the #1 desire anyone landing on this page has (higher Google rankings):
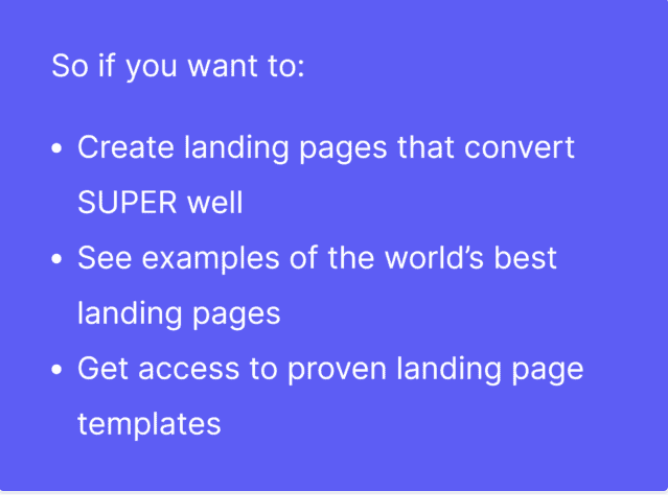
Finally, he caps things off with a call to action that pushes the reader to scroll down:

Engaging posts don’t just inform; they inspire action and foster a connection with your readers.
With all of that, it’s time to…
Incorporating Multimedia
Multimedia elements enrich your content and make it more engaging.
Visuals like images, videos, and infographics can break up text and provide additional information.

Here are some ideas for incorporating multimedia:
- 1. Images: Use high-quality photos to illustrate points.
For example

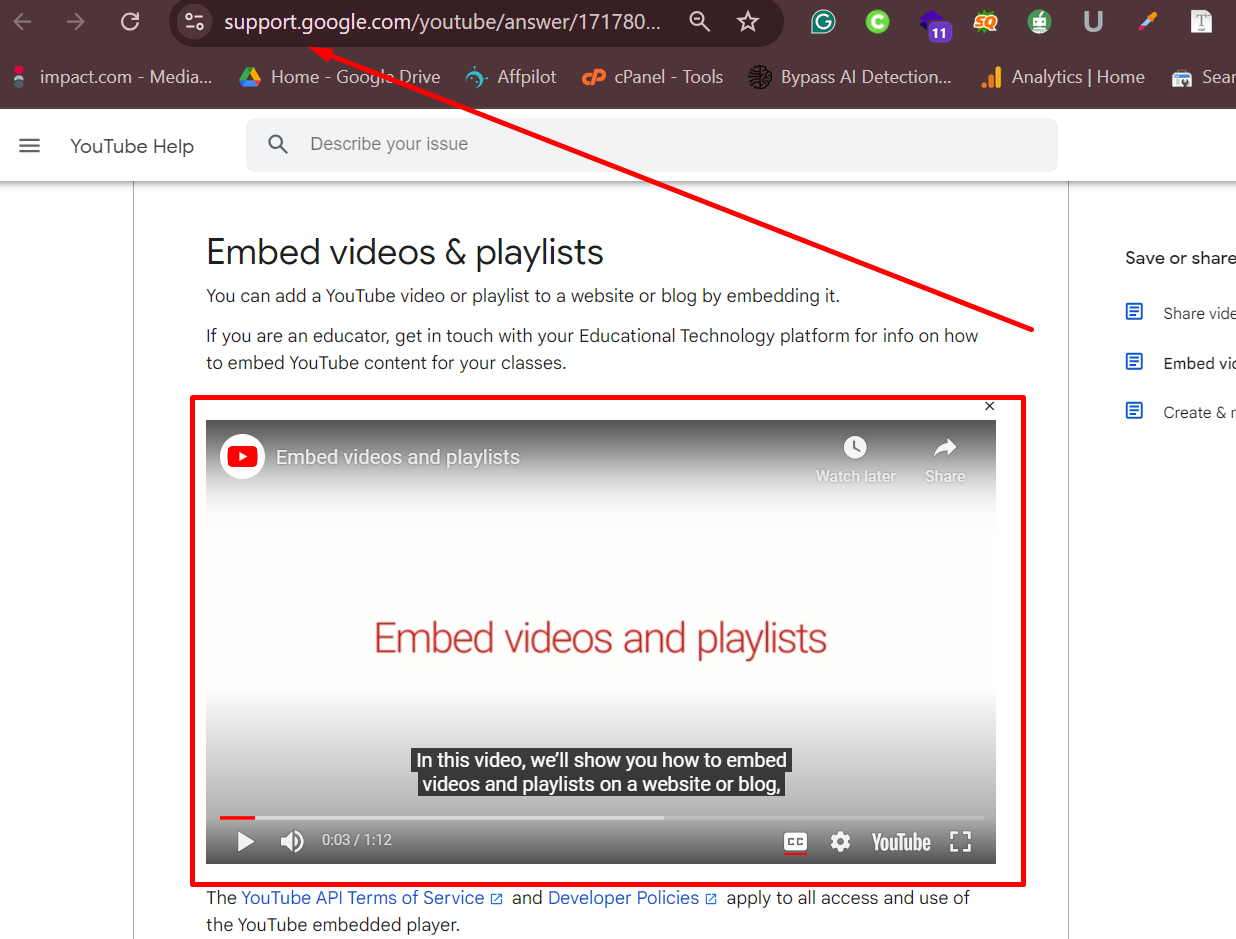
- 2. Videos: Embed relevant YouTube videos or create your own.
For example, from support.google.com
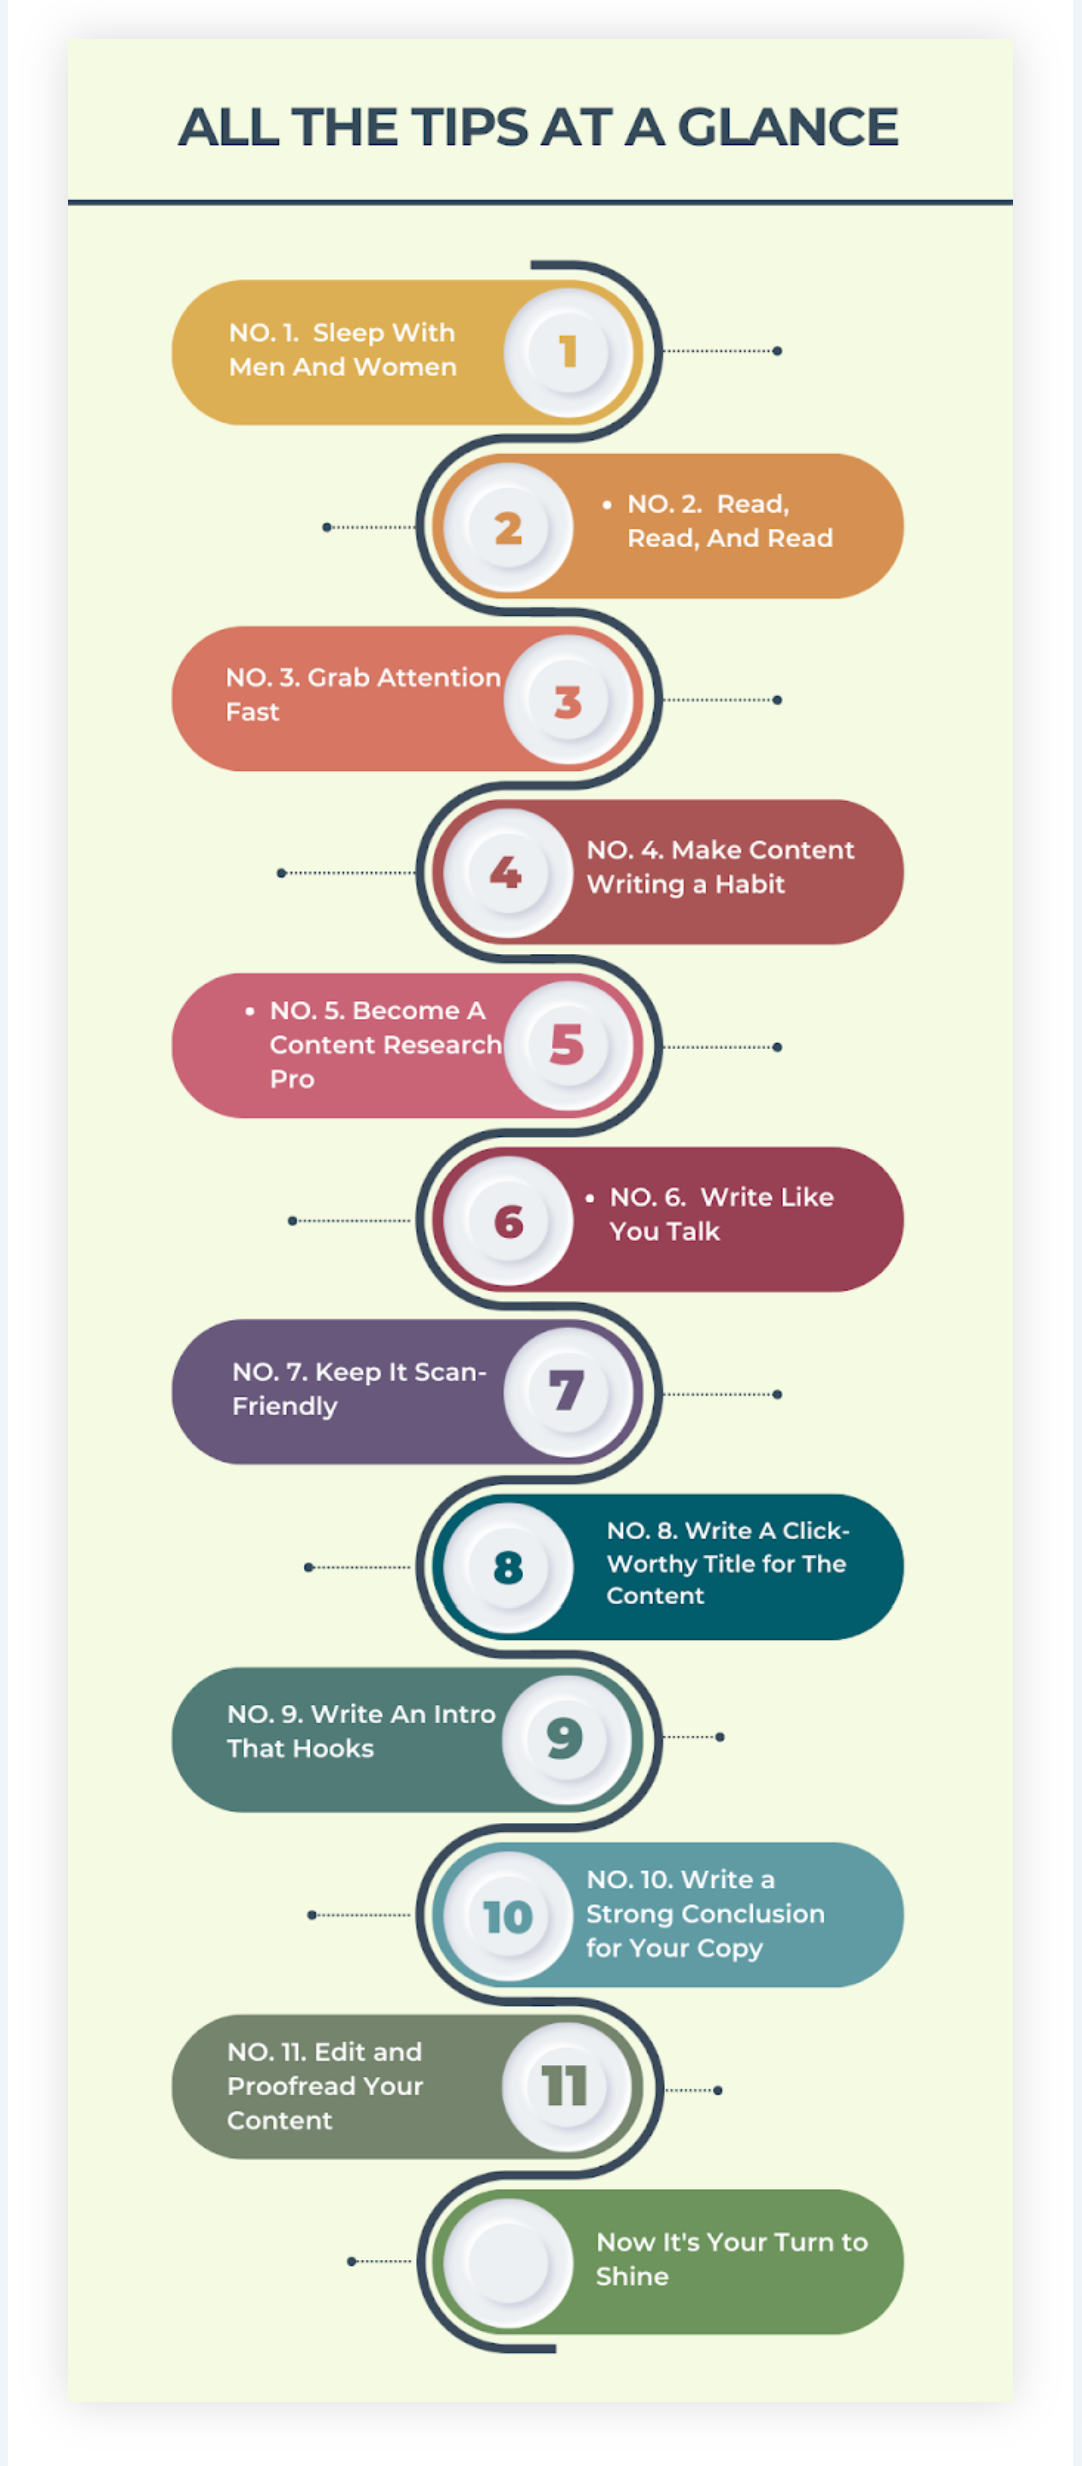
- 3. Infographics: Summarize complex information visually.
Here’s an example from my 11 Secret Content Writing Tips for Beginners post.
Here’s another infographic example from Backlinko’s The Complete SEO Checklist Post.
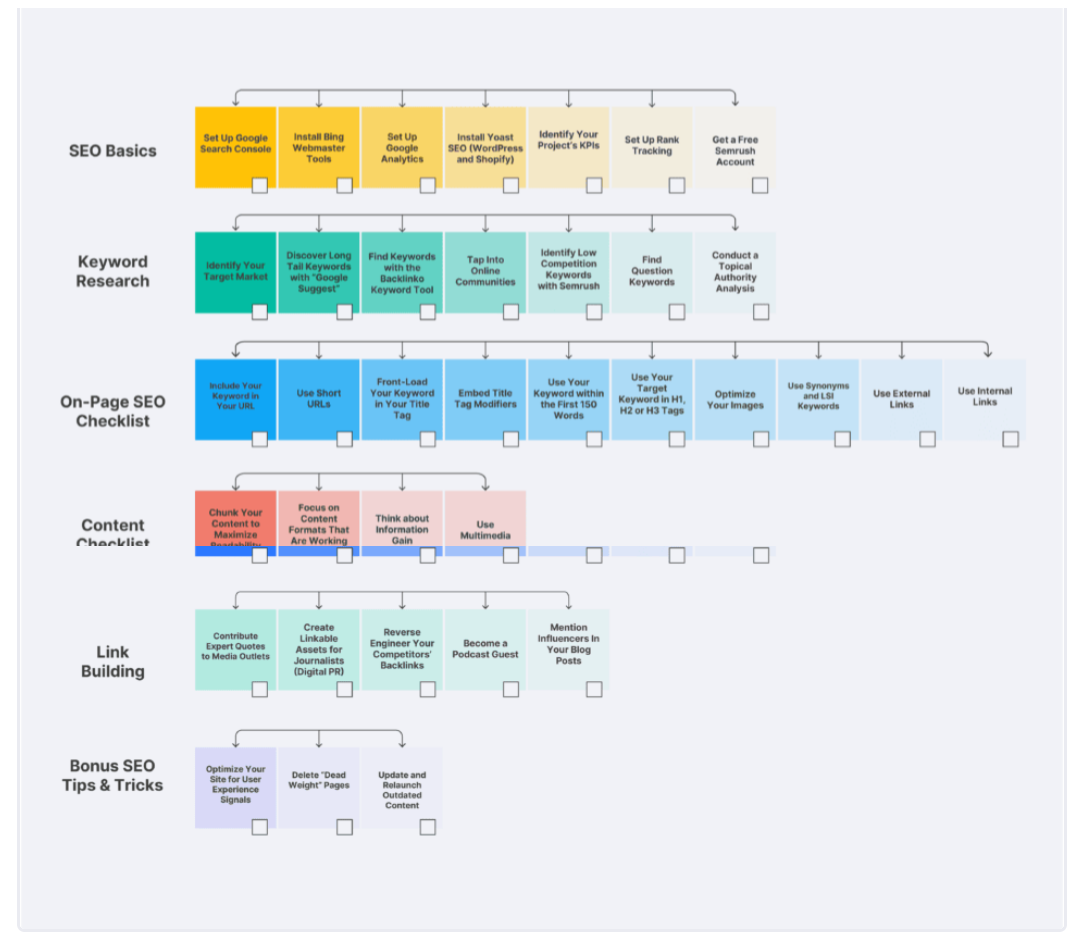
Using multimedia improves your blog’s visual appeal and can improve SEO.
Search engines favor content that includes a variety of media types.
Ensure all media is relevant and adds value to the content.
For accessibility, always include alt text (it is in short including your main keyword in the alt text box) (learn more about it from Hubspot) for images.
The below 34-second video will show you how to include alt text in your images.
And also add transcripts in your YouTube videos.

This ensures all readers, including those with disabilities, can enjoy your content.
Incorporating multimedia can make your blog posts more dynamic, informative, and shareable.
This keeps readers engaged and encourages them to return for more.
Hey,
Do you notice that now you can write captivating blog content?
Yes, you can do it.
(To know more about content writing, read this post.)
So now it is time to…
Chapter Eight
Publish Your First Blog Post
I’m going to walk you through the
steps of how to publish your first
blog post from your blog site.
Here’s the deal.
Ok,
You have content you wrote that you will publish now.
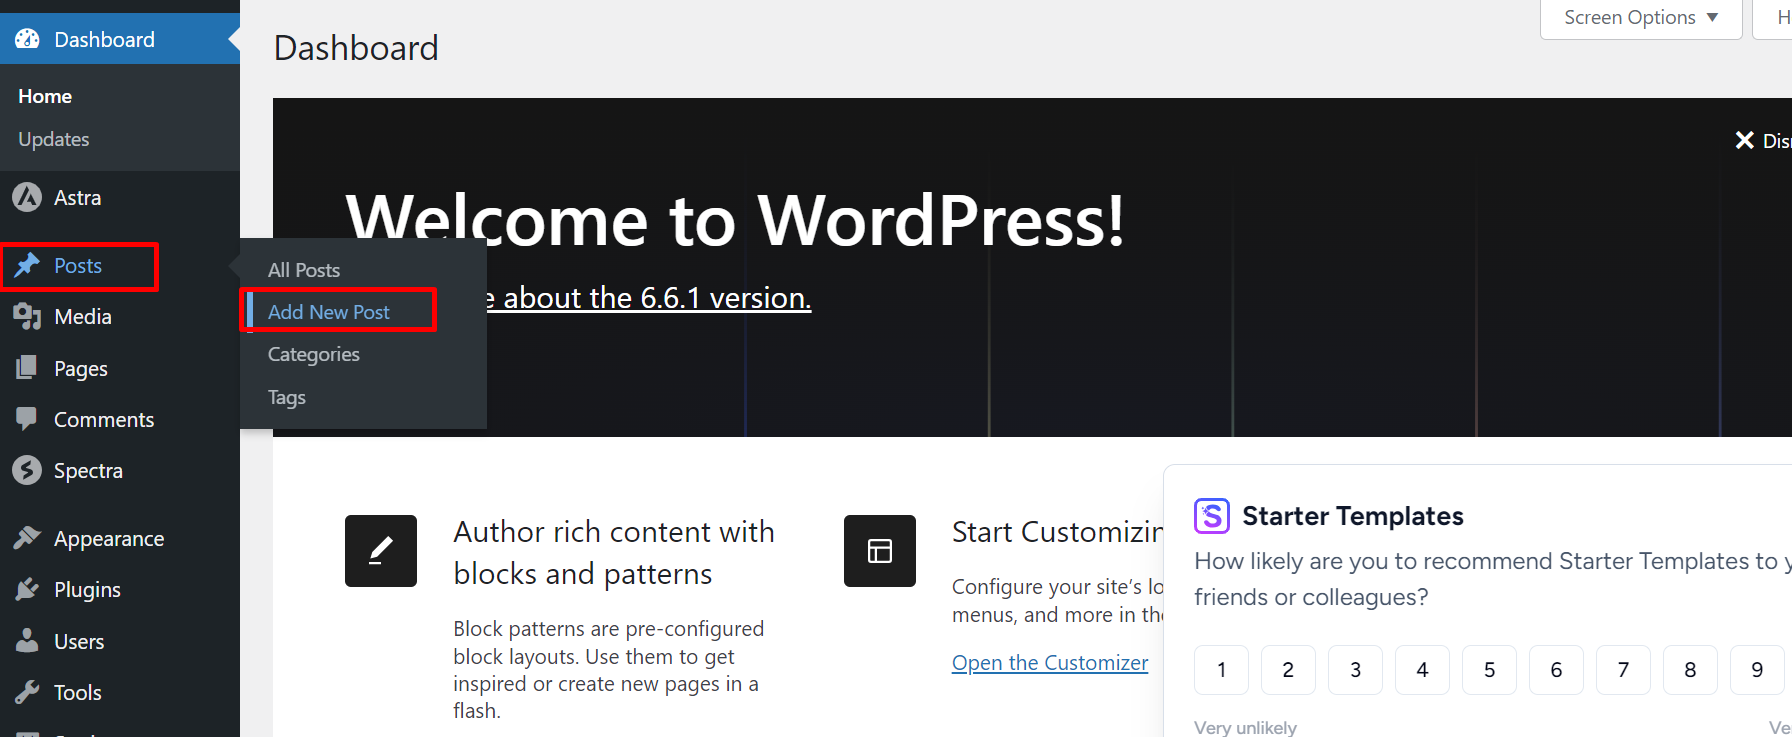
To do that
Go to posts, then add new post and click on it.
This is the space where you can arrange your blog post.
You can add a title, paragraphs, images, videos, etc.
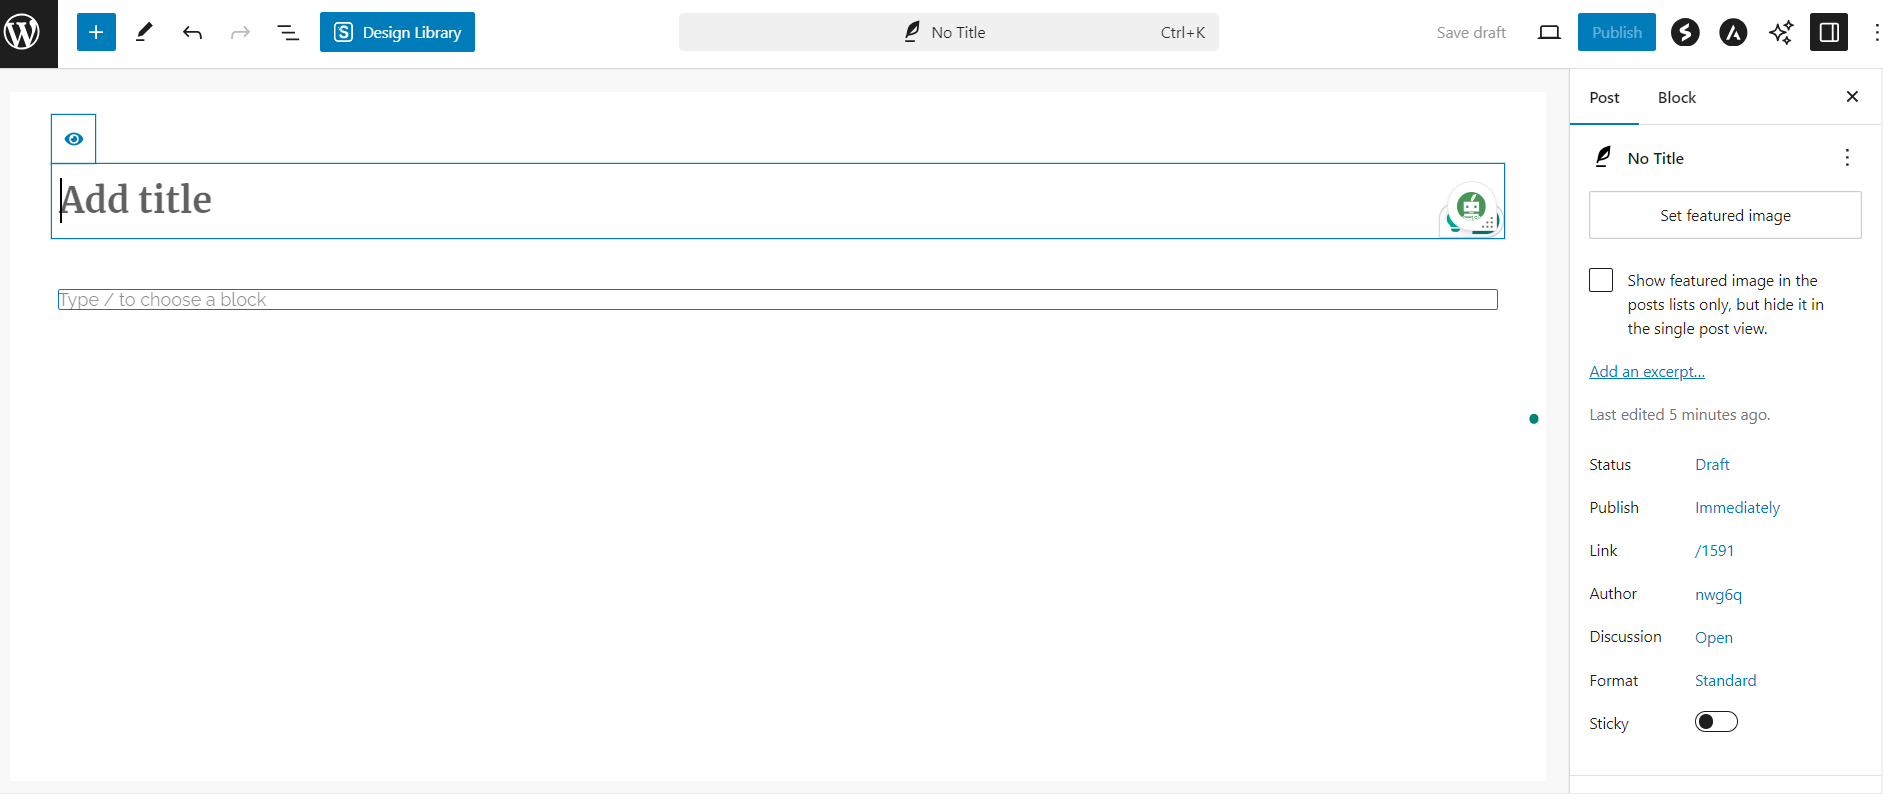
For example
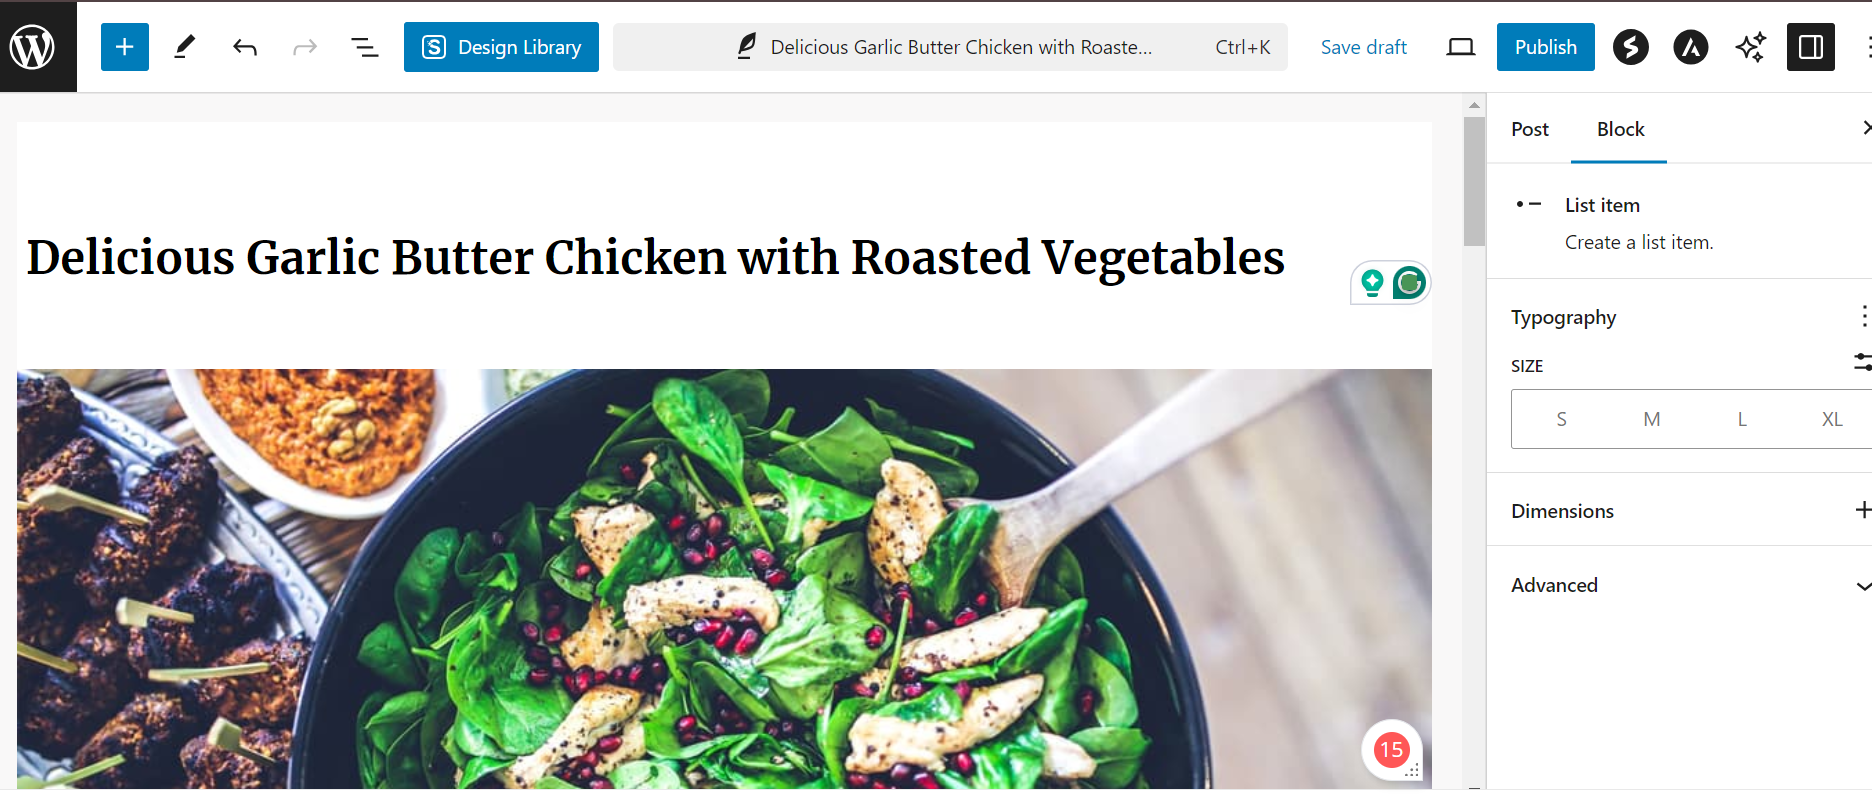
After arranging your blog post completely, click on publish.
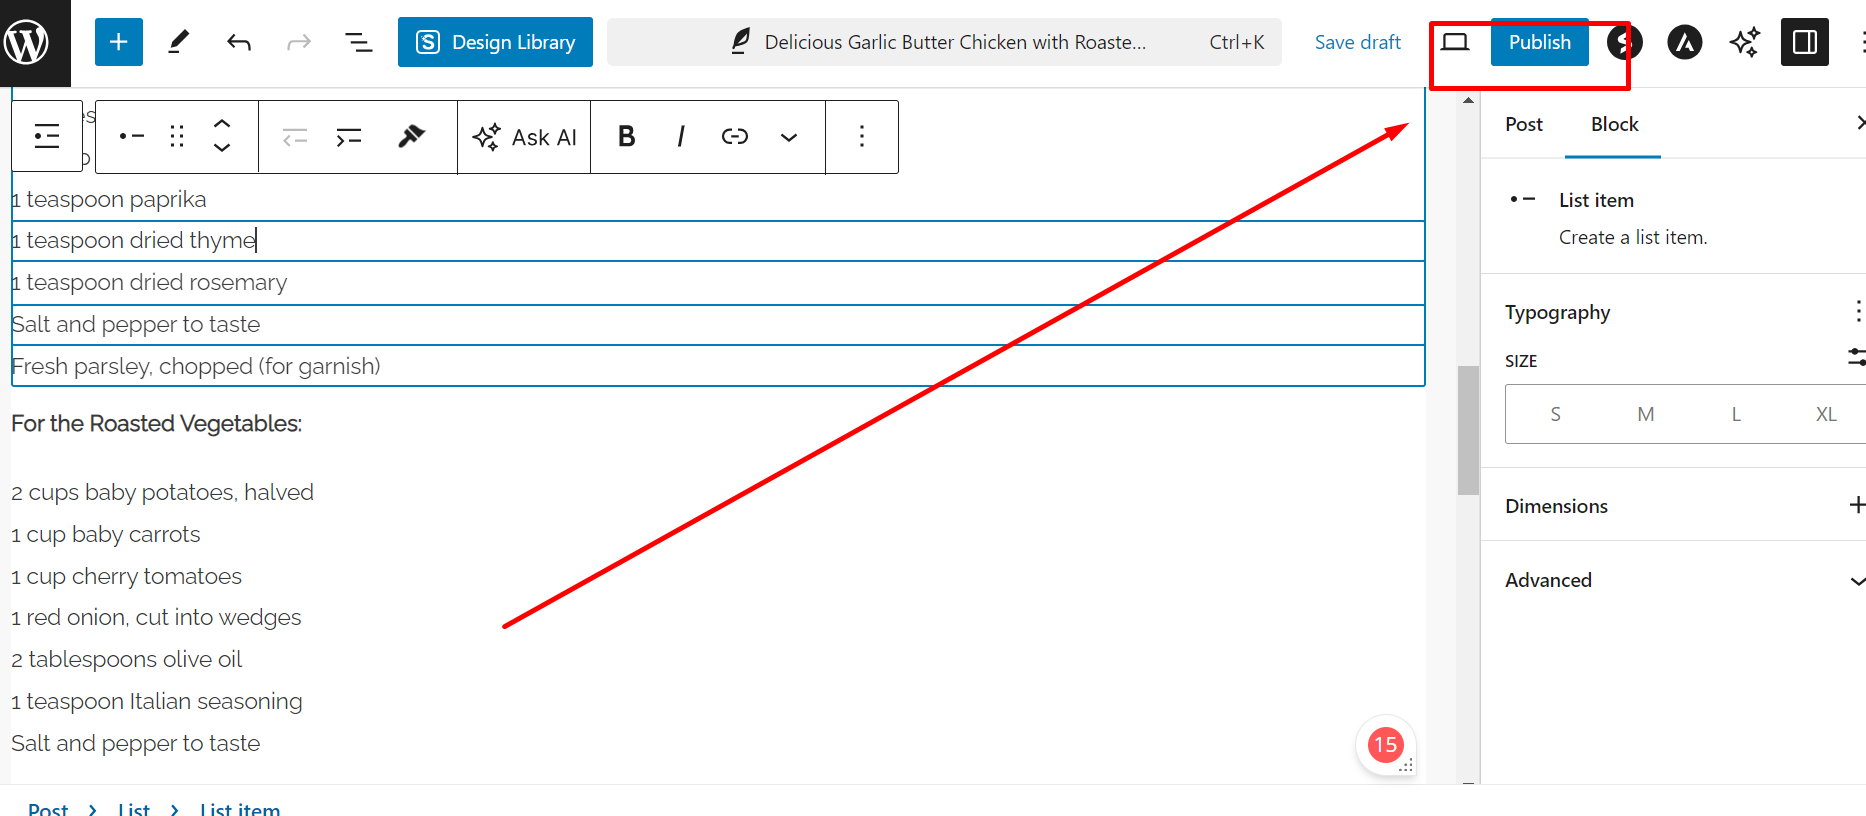
It is done.
You have published your blog post successfully.
Now moving to the next step…
Chapter Nine
Generate More Blog Topics.
More blog topics mean
More blog posts……..
More blog posts mean
More traffic………
And more traffic means
More money in your pocket.
So without further ado, let’s grab it

You have to have a lot of topics in a niche so that you can publish your blog posts continuously and consistently.
For that reason, you want to figure out more blog topics.
To generate more blog topics, I highly recommend that you use the Semrush tool.
Below is the Semrush website looks like this.
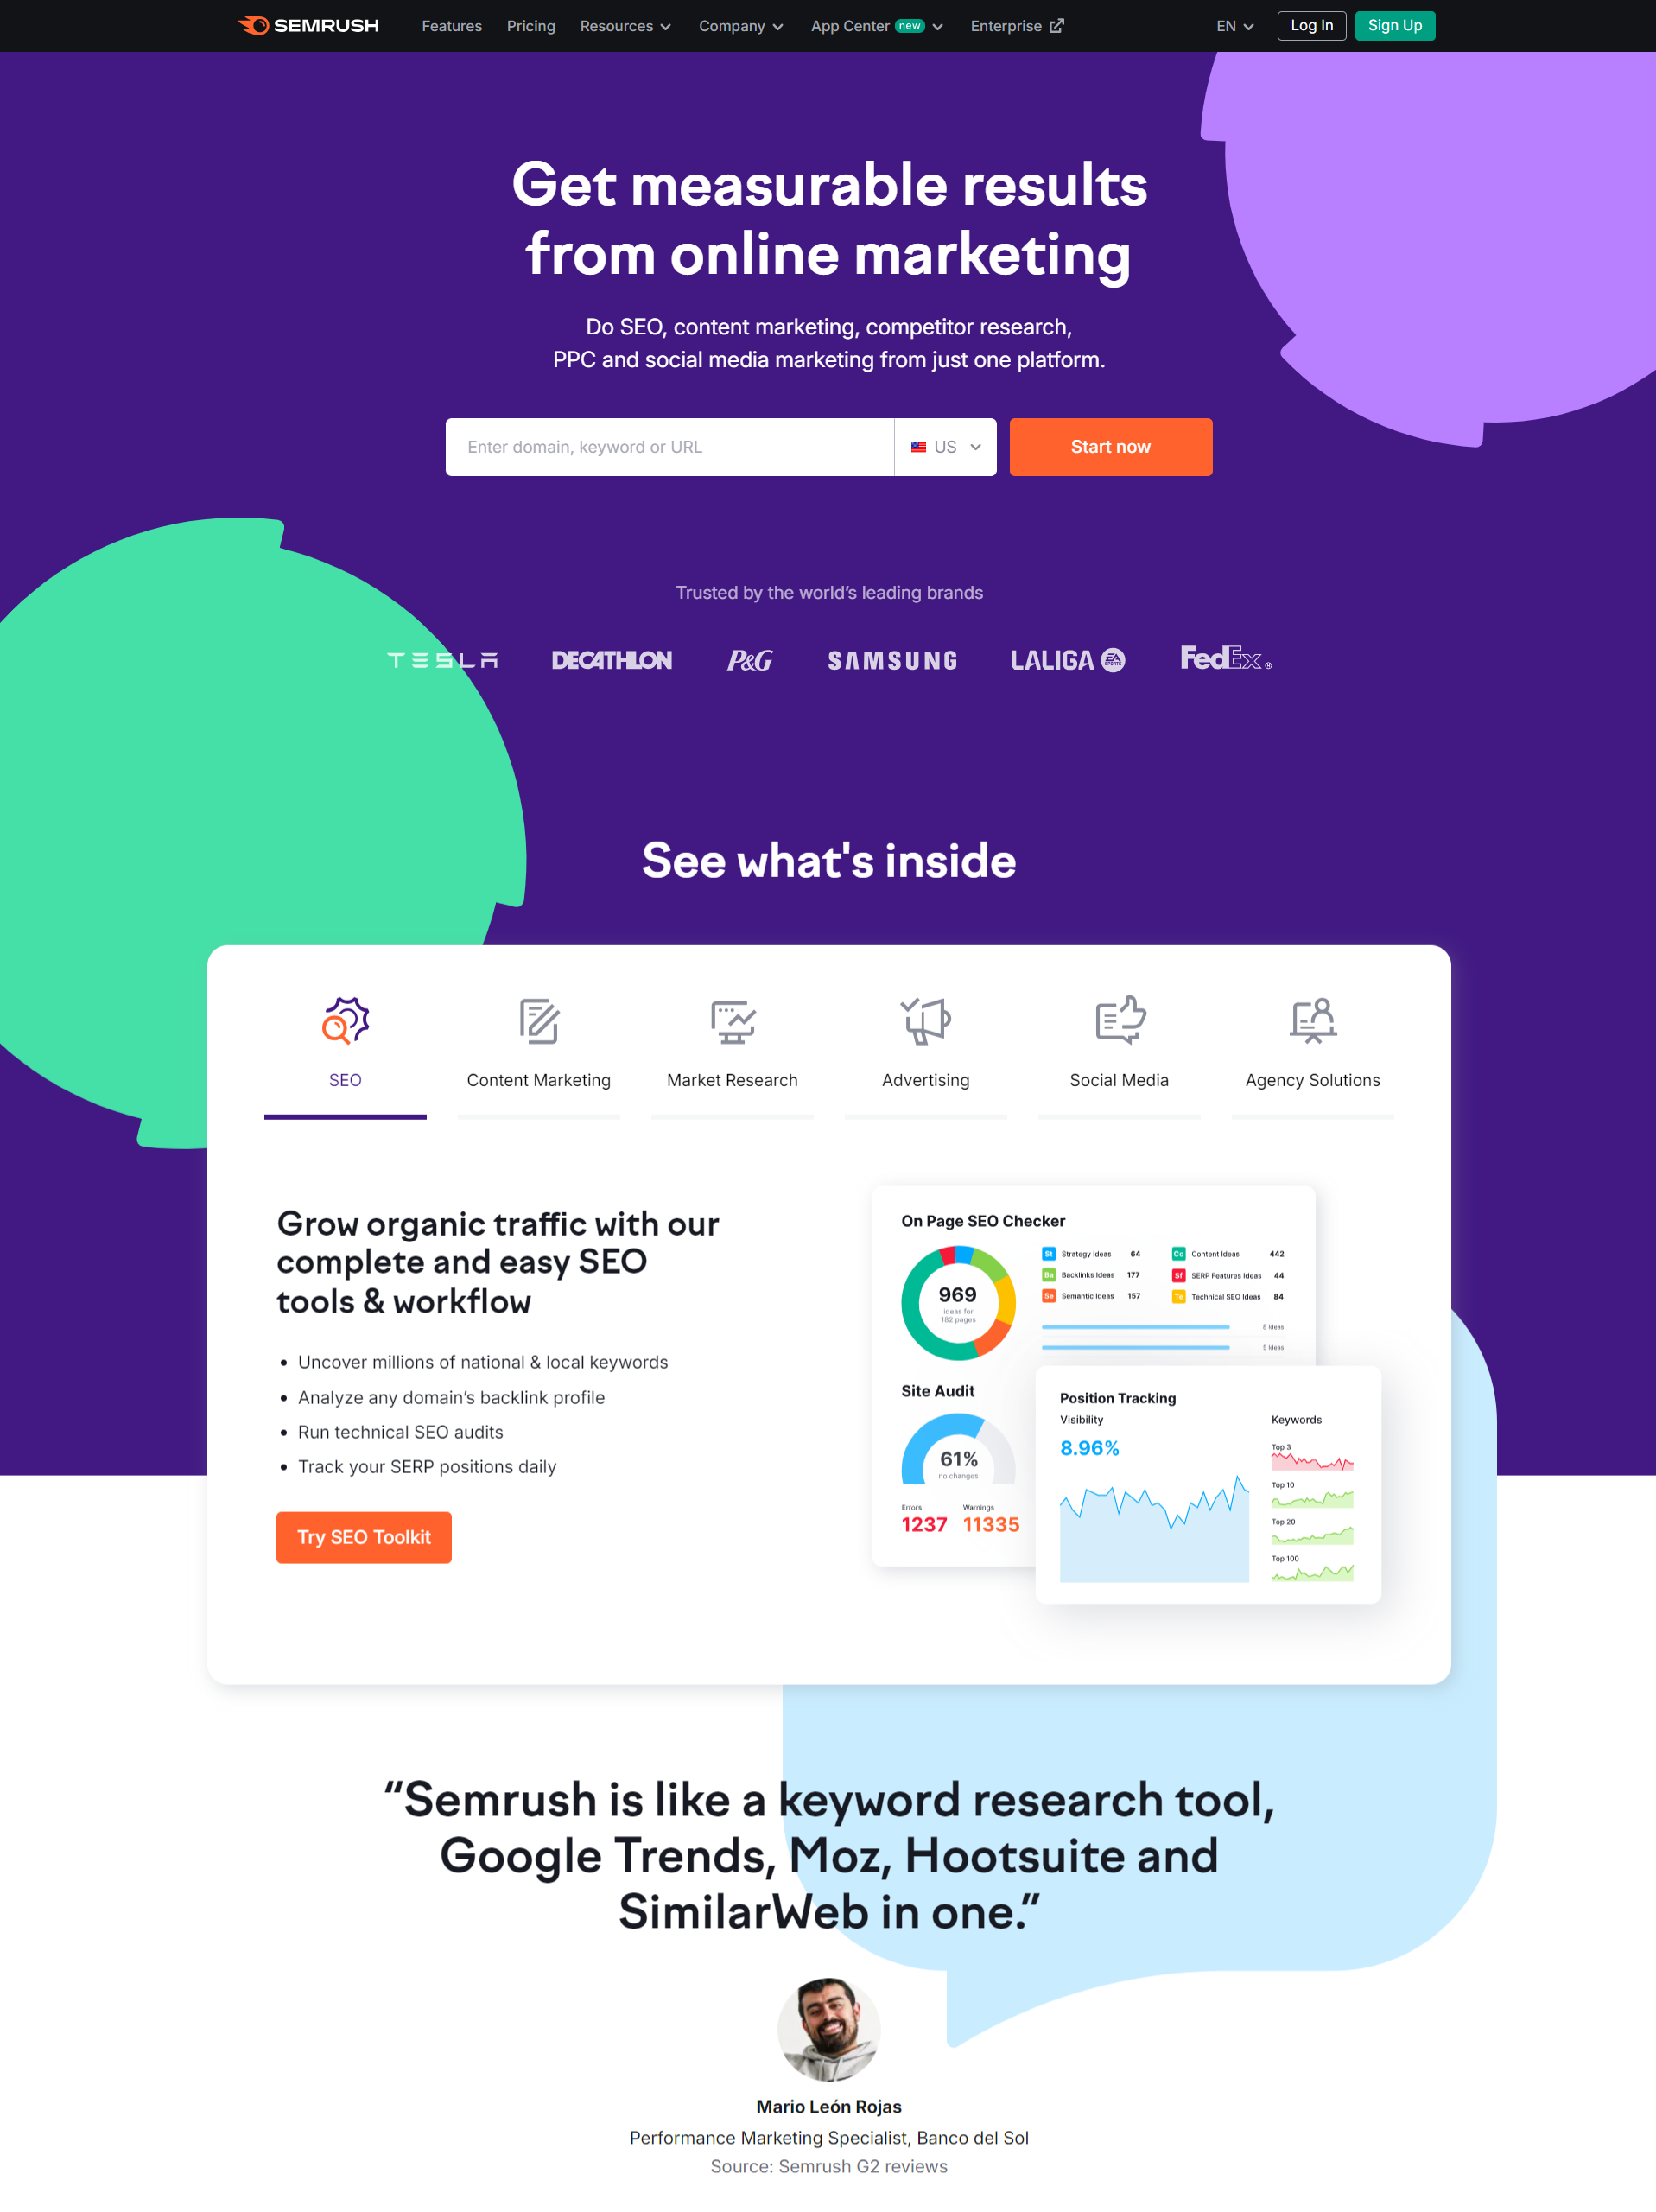
Here’s a short description below about Semrush and how it works.
SEMrush is a digital marketing tool that helps improve online visibility by offering features like keyword research, SEO analysis, and competitor insights.
It enables users to optimize their websites, content, and advertising strategies by providing actionable data from search engines and websites.
So let’s start generating more blog topics.
Type Semrush in your browser, go to its website, and log in with an email and a password.
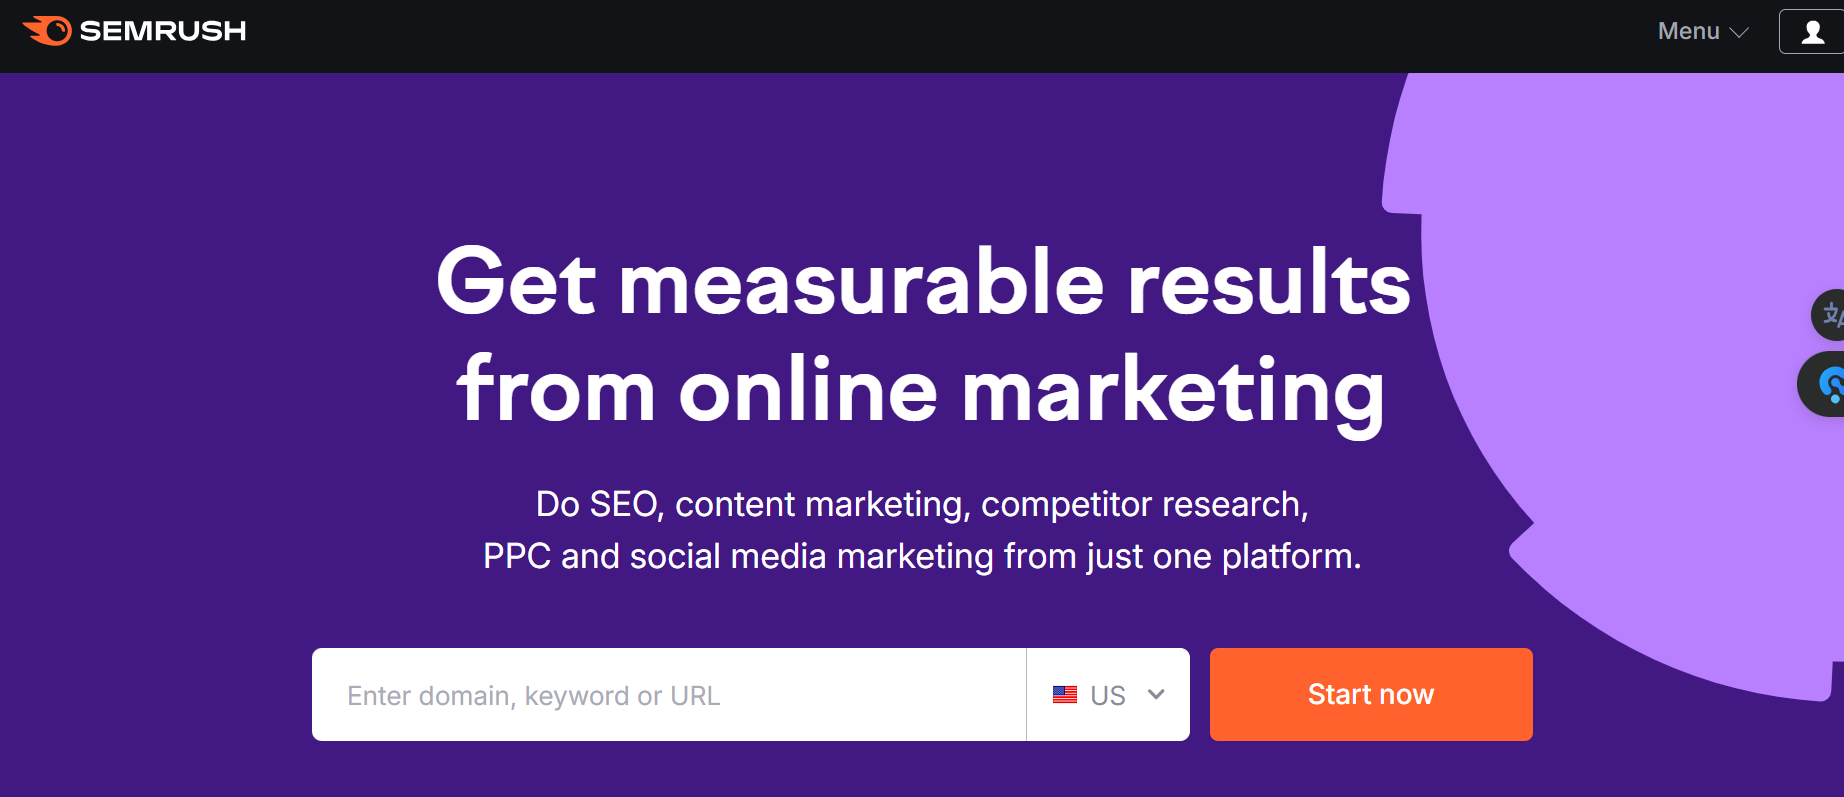
I hope you can do it.
Note: This is a paid tool, although you can research 10 keywords daily.
But I recommend that you purchase it for only the first month. In this first step, you can get everything you need to succeed by blogging.
I mean, in the first month, you can figure out thousands of blog topic ideas; you need at least one year to write blogs on those topics.
So after one month, you can unsubscribe from Semrush.
Got the secret?
Yep.
After logging in to Semrush, you can see this page; here, just click on the keyword magic tool.
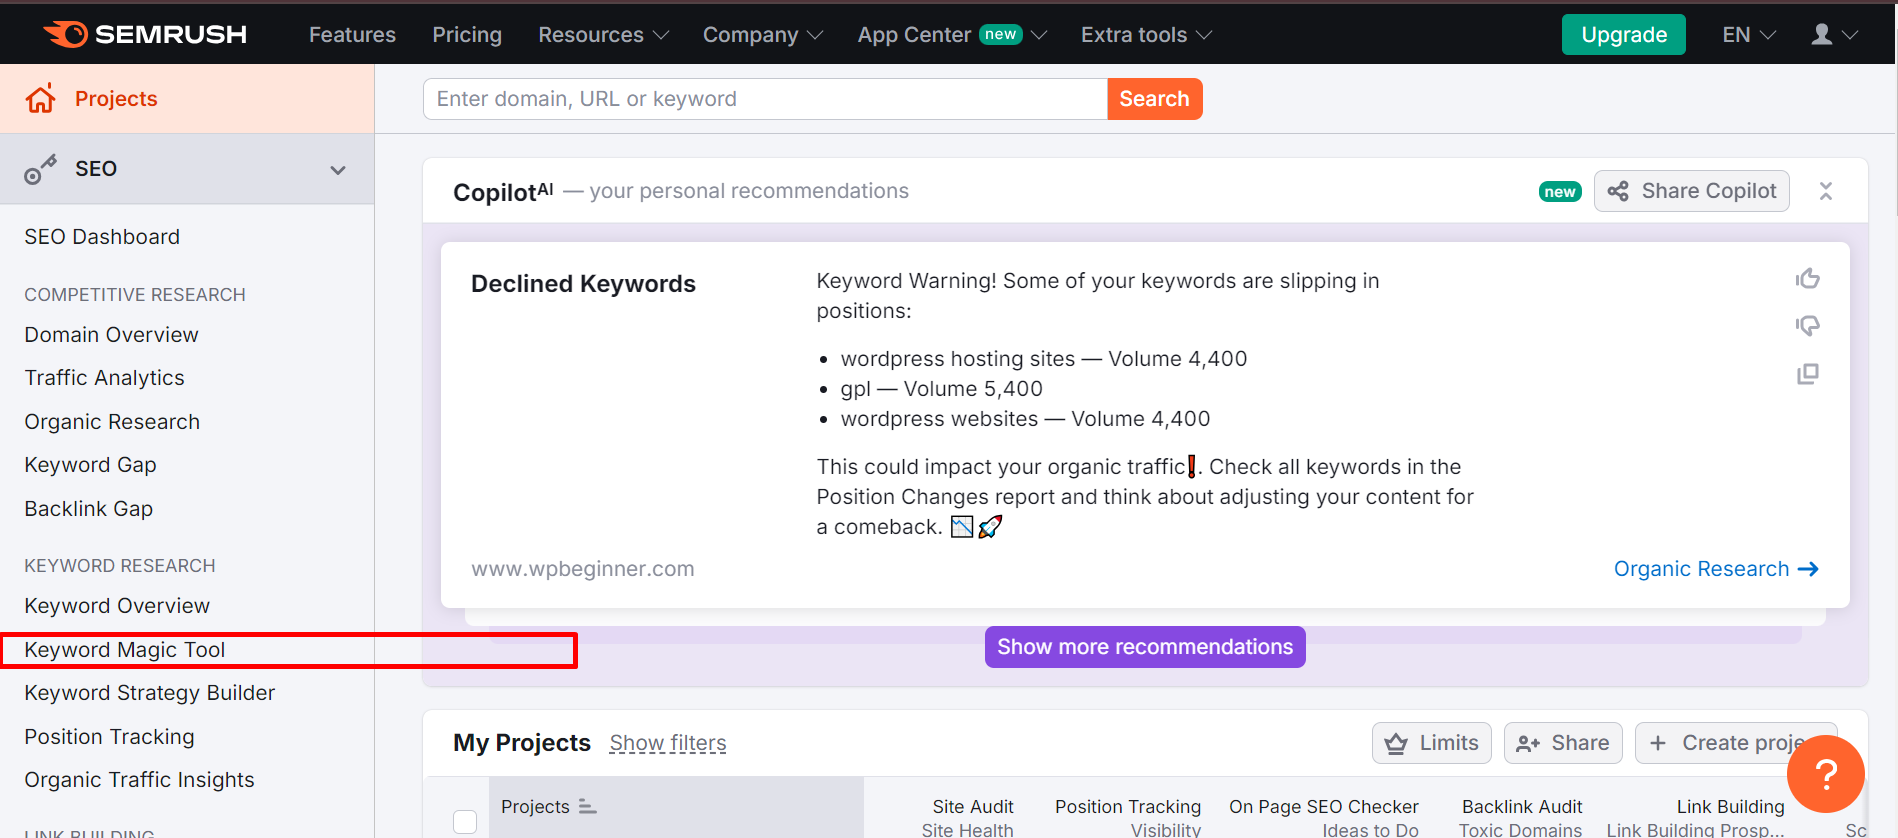
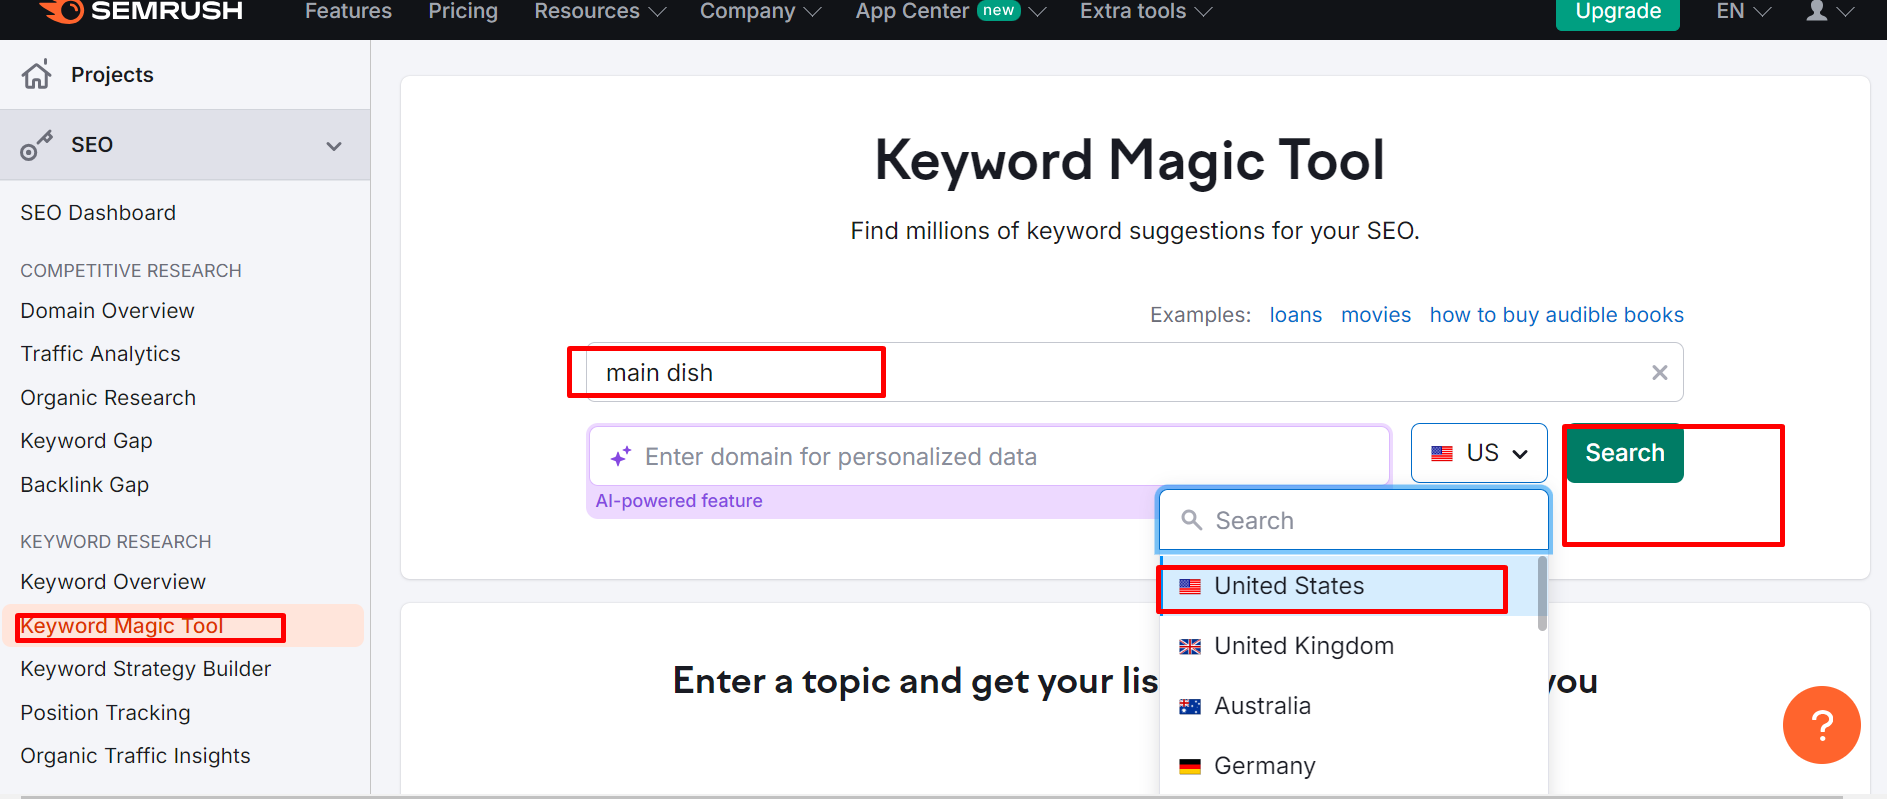
Then type your seed keyword in the search box, select your country, and click on search.
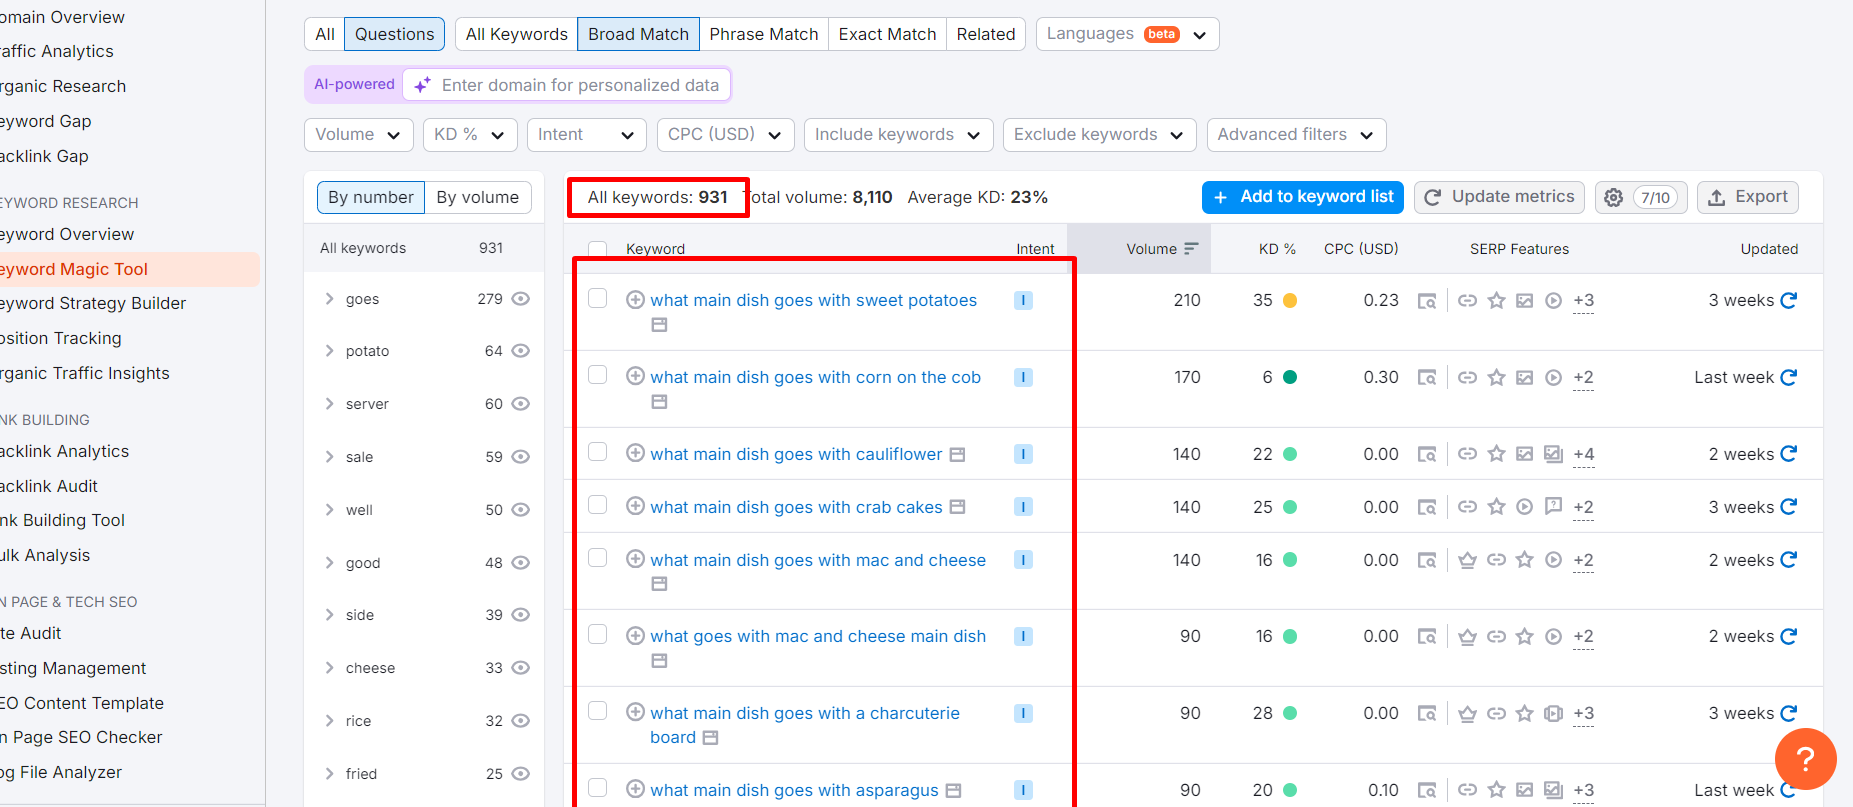
Now you can see this page. Here, click on questions and type KD 30 like I did.

Boom, lots of blog topics; now you get almost 931 in a few minutes.
Now you can export everything to an Excel sheet.
To do that, just click on export and select what you want.

But with a free account, you cannot export.
When you click on export with a free plan, you see this popup.

So make sure you have a paid tool like Semrush.
In this list of blog topics, you also want to filter more deeply. Because similar topics may be there and a topic that you do not want to write about.
So make sure you filter it according to your needs.
That’s nice,
You have generated a lot of blog topics successfully in a few minutes.
Then let’s move on to the next step…
Chapter Ten
Optimize Your Blog Post for SEO
SEO-optimized blog post
Ranks on search engines
And get more traffic.
Keep reading…

To optimize your blog post,
you want to install a plugin called Yoast SEO.
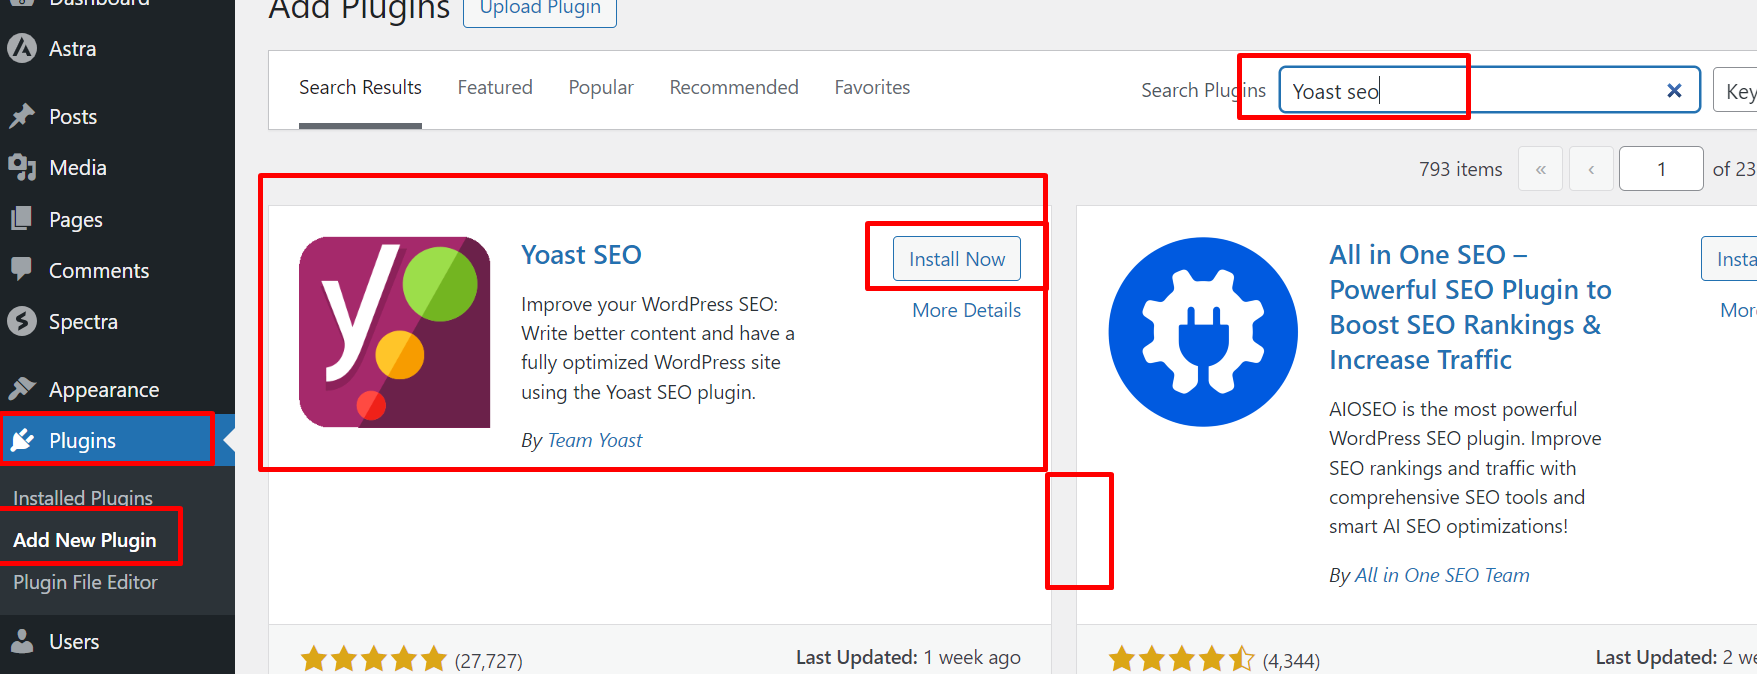
You have already learned how to install a plugin.
Just install and activate it.
Ok,
I guess
You have done it.
Now go to a post and scroll down at the bottom.
Here you can see this page, like this or similar to this.
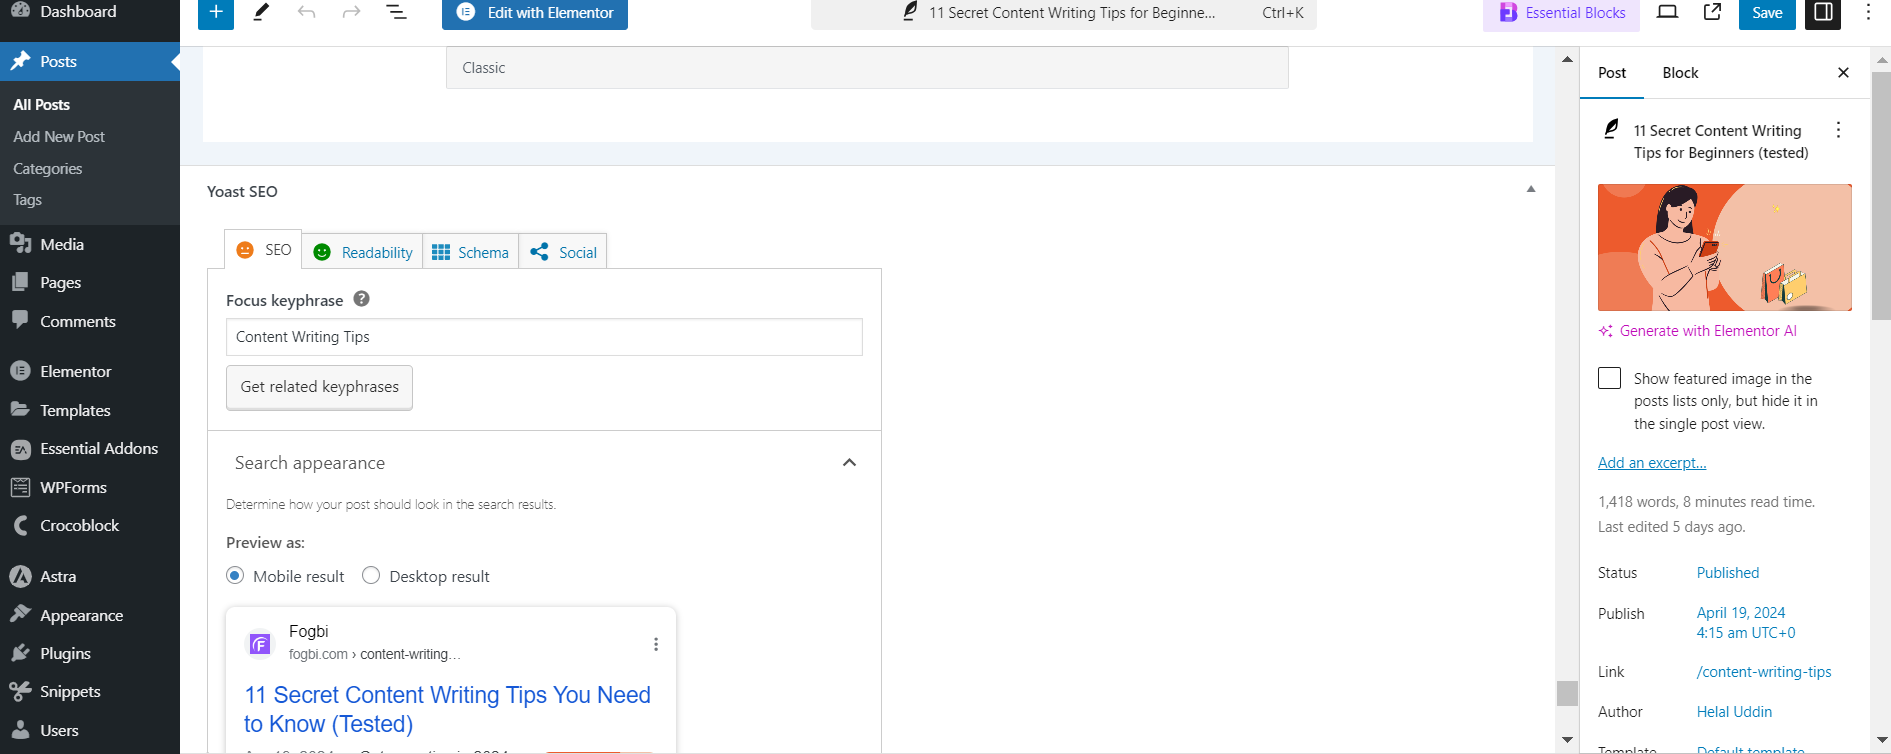
Write your focus keyword (main keyword? here, like this.

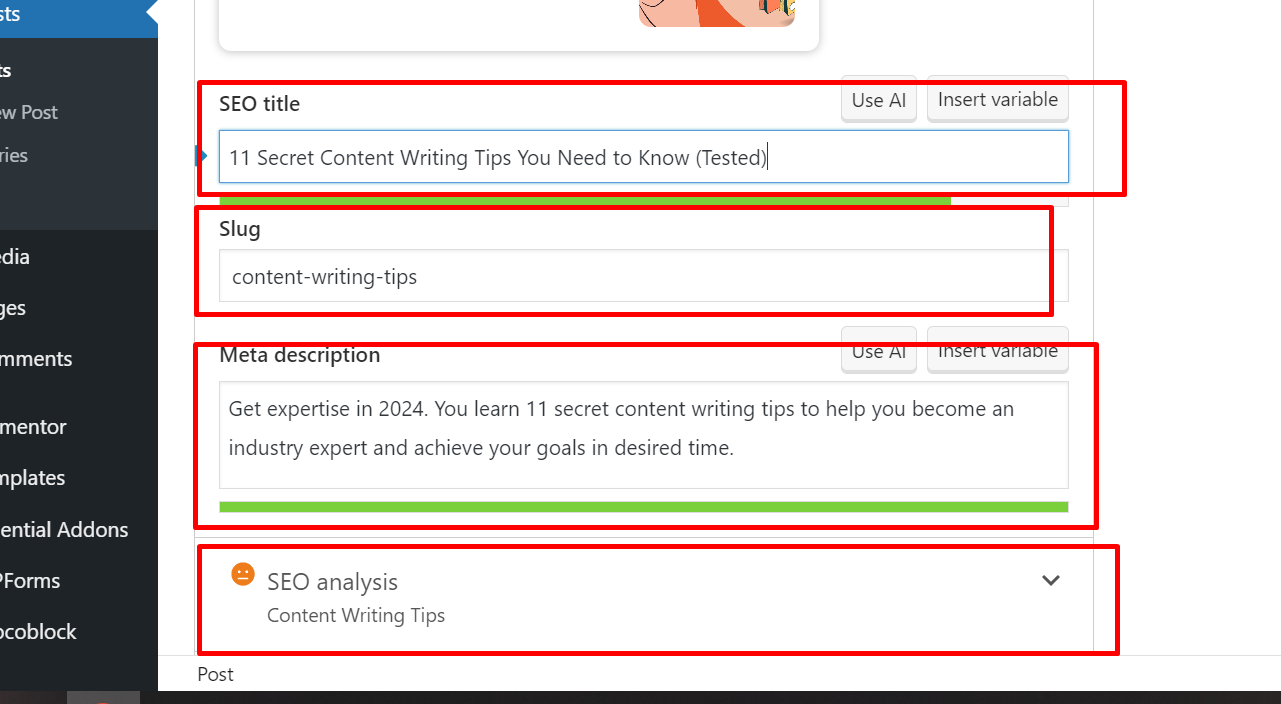
Now add your title and only the focus keyword in the slug and meta description, like this. Lastly, click on SEO analysis.
If you do not click on SEO analysis, you can see this page like this.
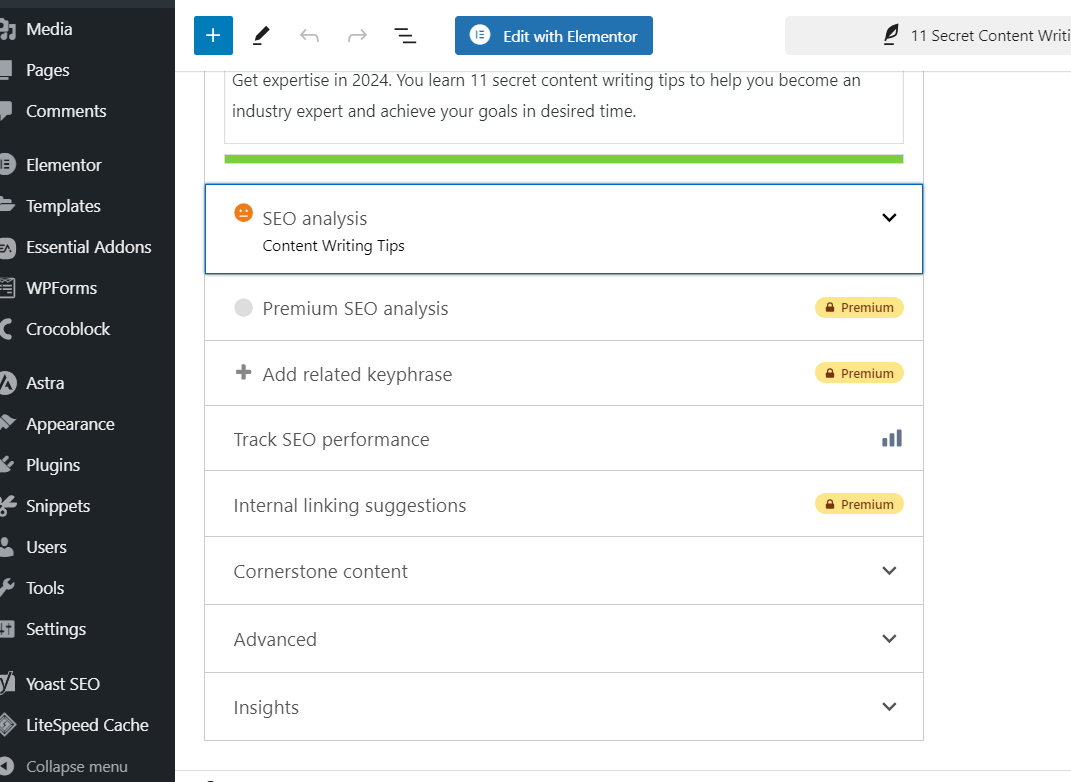
After clicking on it, you can see this page like this.
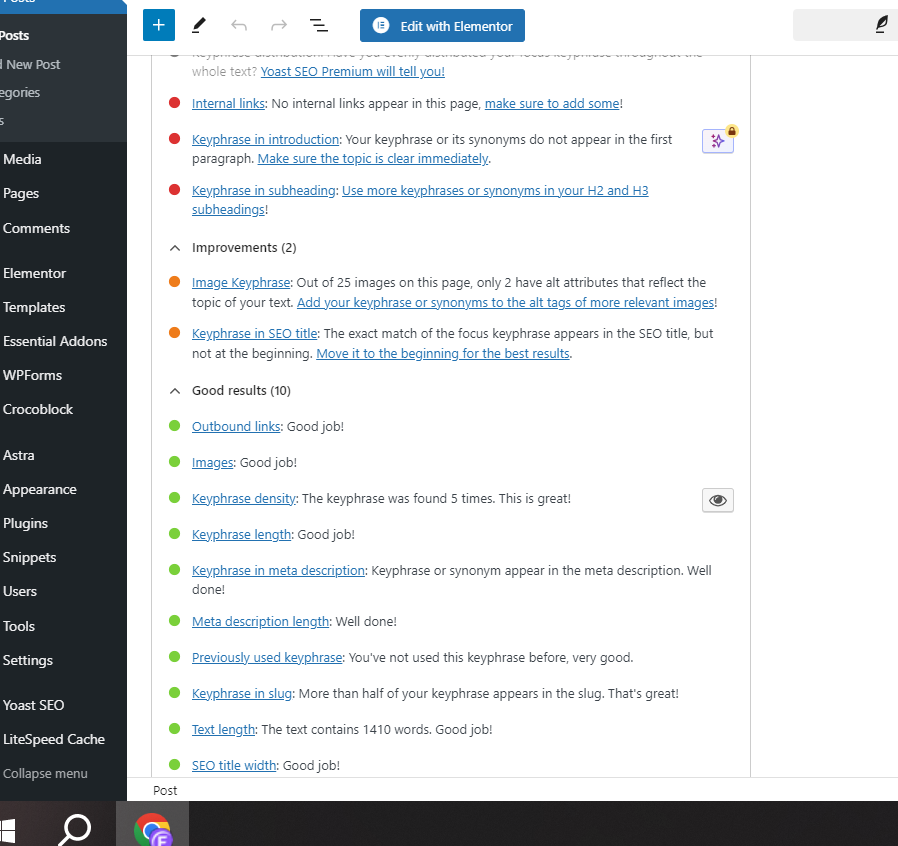
Here’s a detailed analysis of your blog post in terms of SEO.
There are some issues; you have to fix them.
I hope.
You can fix them yourself.
If you have any problems, please watch the video tutorial or get in touch with me.
Well done.
You have successfully optimized your blog post for SEO.
Chapter Eleven
Promote Your Blog Website
Promoting your blog ensures that
your content reaches the right audience.
and gains the visibility it deserves.
Effective promotion strategies can
increase traffic, engagement, and
ultimately, your blog’s growth.
With that…
Utilizing social media
Social media platforms are powerful tools for blog promotion.
They help you reach a broader audience and engage with readers in real-time.
Here are some key strategies:
- 1. Create dedicated profiles: Establish profiles for your blog on platforms like Facebook, Twitter, Instagram, and LinkedIn.

- 2. Share your posts: Regularly share your blog posts with a short description.
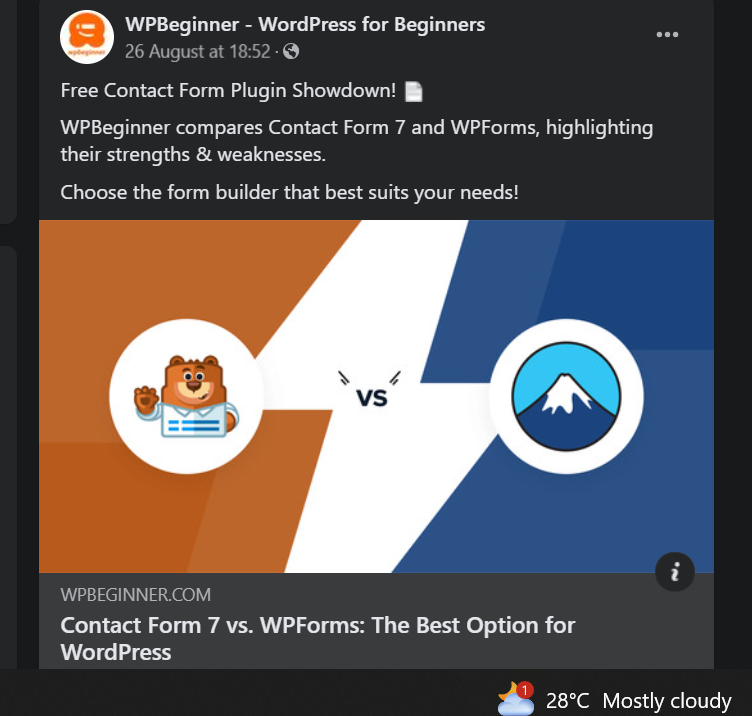
- 3. Engage with followers: Respond to comments, ask questions, and participate in discussions to foster a community.

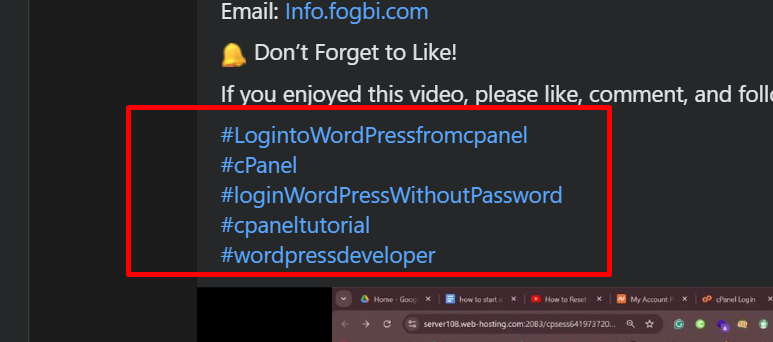
- 4. Use hashtags: Incorporate relevant hashtags to increase the visibility of your posts.
- 5. Leverage stories and live videos: Use Instagram Stories, Facebook Live, or Twitter Fleets to share behind-the-scenes content and interact directly with your audience.

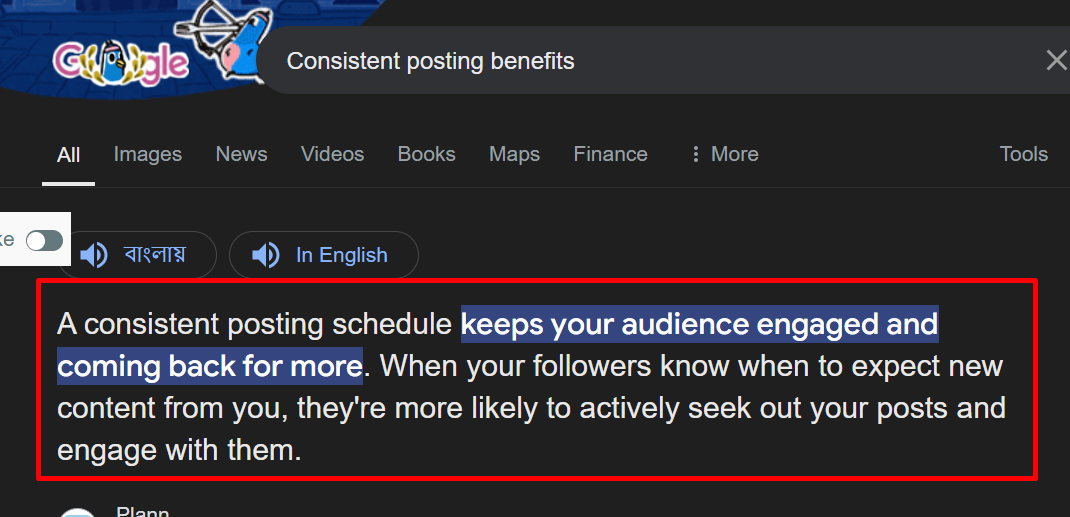
- 6. Staying Consistent: Consistent posting keeps your audience engaged and informed about your latest content.
Search Engine Optimization (SEO)
SEO is vital for improving your blog’s visibility on search engines. By optimizing your content, you can attract organic traffic.
Here are some key SEO strategies:
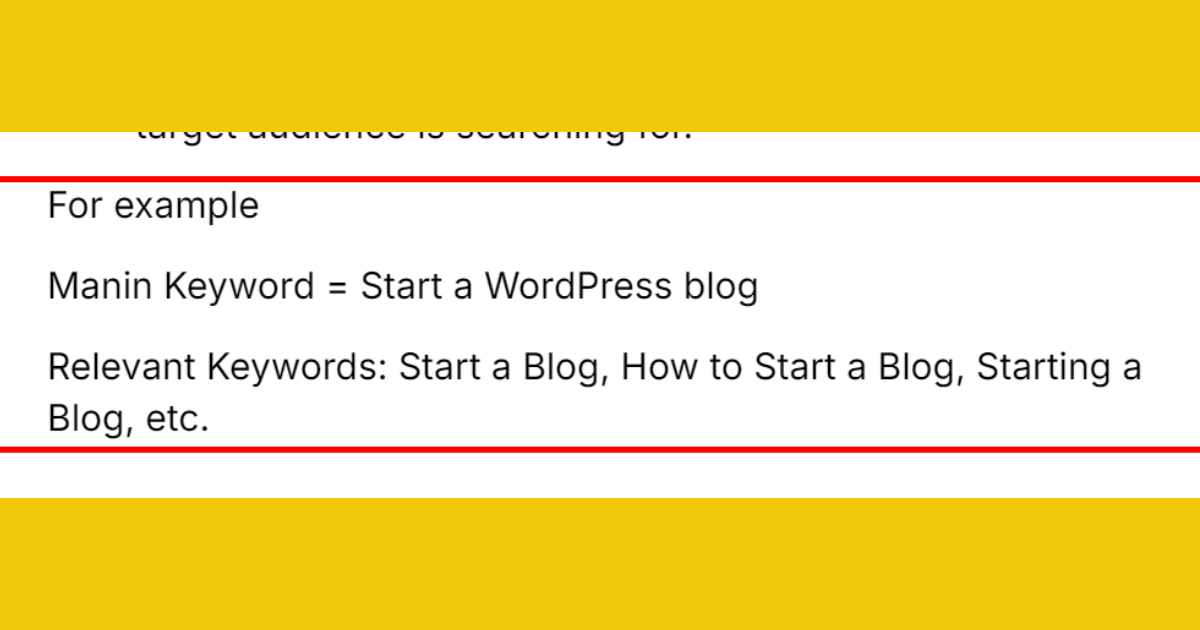
- 1. Keyword research: Identify relevant keywords that your target audience is searching for.
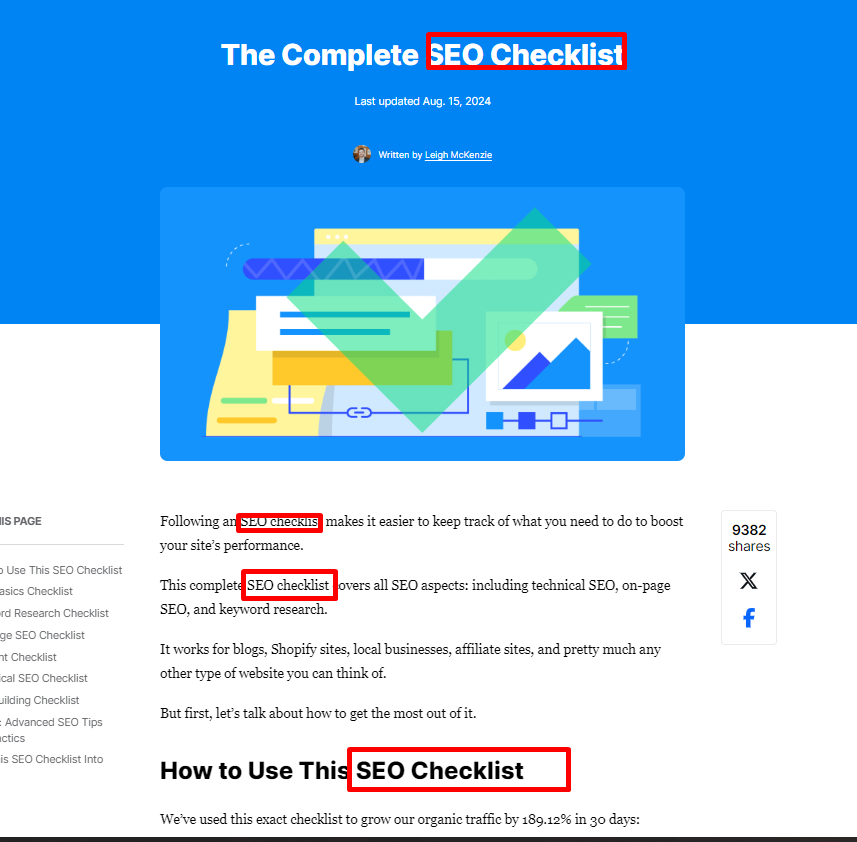
- 2. On-page SEO: Use keywords in titles, headers, and throughout your content naturally.
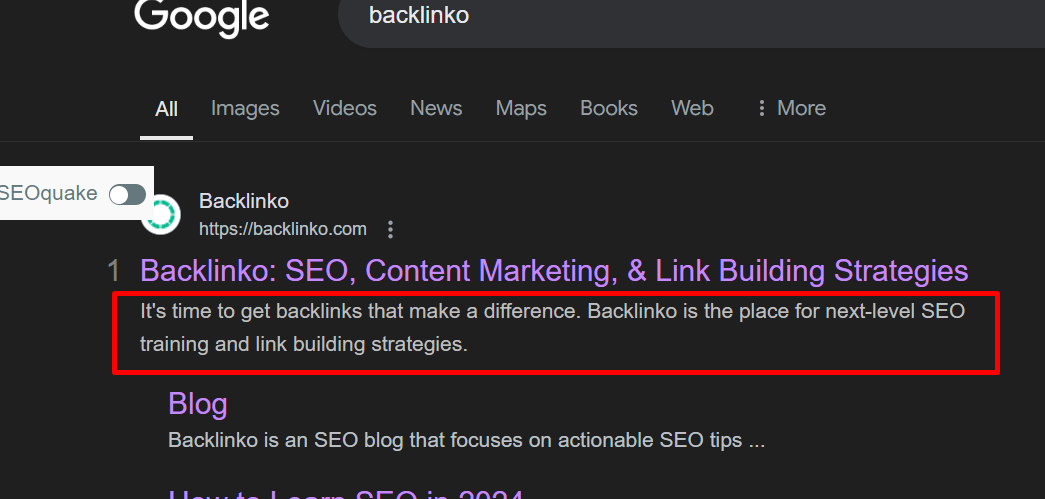
- 3. Meta descriptions: Write compelling meta descriptions that encourage users to click on your links.
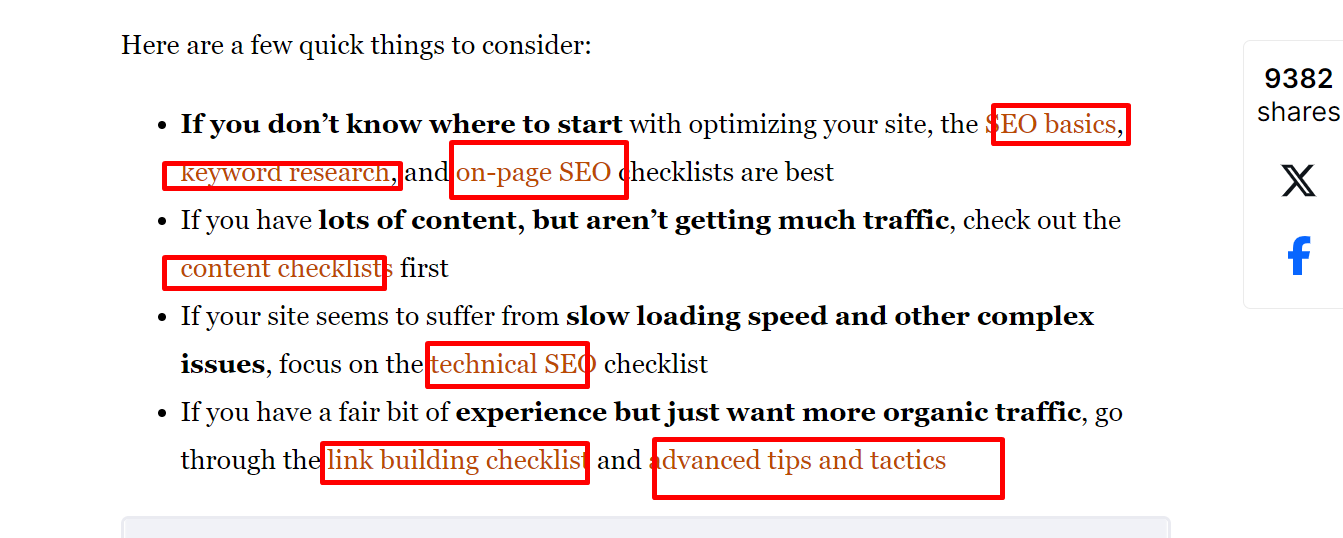
- 4. Internal linking: Link to other relevant posts within your blog to keep readers engaged longer. In 1000 words, 2 to 4 links are sufficient.
Below is an example of how the internal link looks.
- 5. Mobile-friendly design: Ensure your blog is optimized for mobile devices for a better user experience.
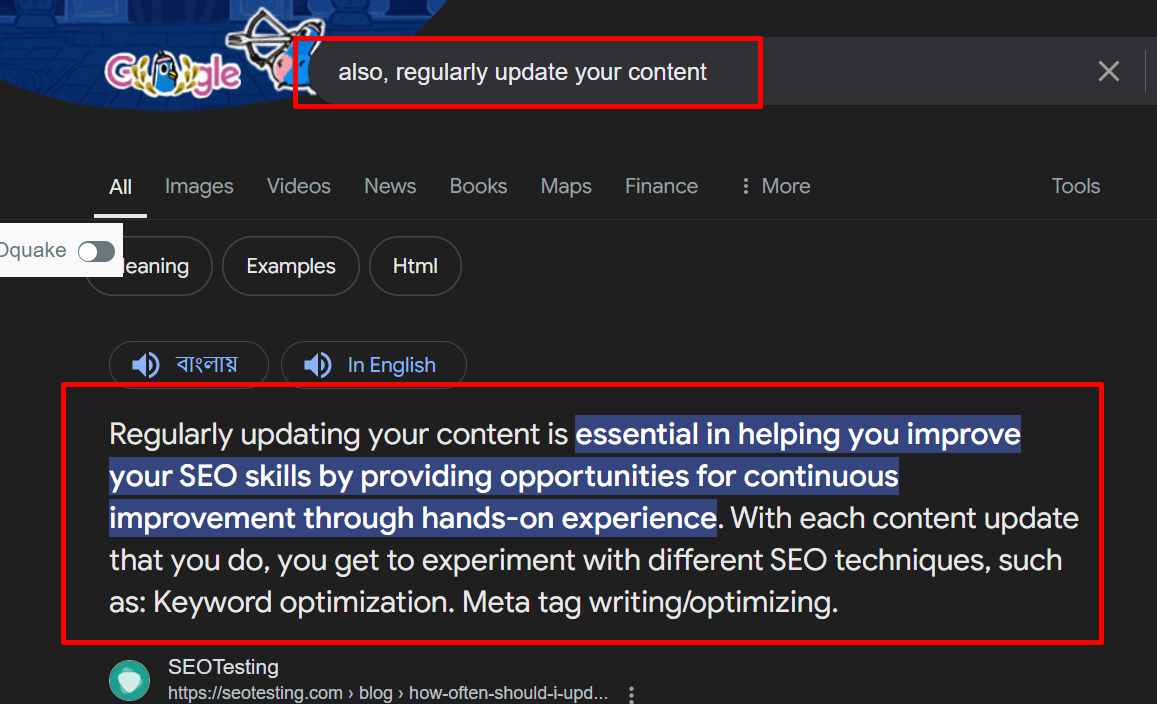
also, regularly update your content to keep it relevant. Search engines favor fresh, up-to-date content, which can improve your ranking.
Another effective method is…
Networking With Other Bloggers

Building relationships with other bloggers can significantly boost your blog’s exposure.
Here are some ways to network effectively:
- Comment on other blogs: Leave meaningful comments on blogs within your niche to build rapport.
- Guest posting: Write guest posts for other blogs to reach a wider audience.
- Collaborations: Partner with other bloggers for joint projects or cross-promotions.
- Join blogging communities: Participate in online forums and groups where bloggers share tips and support each other.
- Attend blogging events: Attend webinars, workshops, or conferences to connect with like-minded individuals.
Building a network of supportive bloggers can open opportunities for collaboration and mutual growth.
Engaging with other bloggers creates a sense of community and can lead to valuable partnerships.
A Big Bonus of Chapter Eleven
Build A Community Around Your Blog
This section will guide you
on how to build a strong
community around your blog.
Let’s dig deeper in…

Engage With Readers
Engaging with readers is essential for a thriving blog.
Interaction makes readers feel valued.

Here are some tips to engage with your readers:
- Respond to comments: Take time to reply to comments on your blog posts. Acknowledge their thoughts and questions.
- Social media presence: Share your blog posts on social media. Interact with your followers. Answer their queries.
- Personalize your content: Use a friendly tone. Share personal stories and experiences related to your niche.
- Email newsletters: send regular newsletters. Include updates, exclusive content, and personal notes.
Engagement can be measured in different ways.
Engagement Type | Example |
Comments | Readers leaving feedback or questions |
Social Media | Likes, shares, and retweets |
Email Responses | Replies to newsletters |
Encourage Comments And Feedback
Comments and feedback are vital for improving your blog. They provide insights and foster interaction.

Here’s how to encourage them:
- 1. Ask questions: End your posts with questions. Encourage readers to share their opinions.
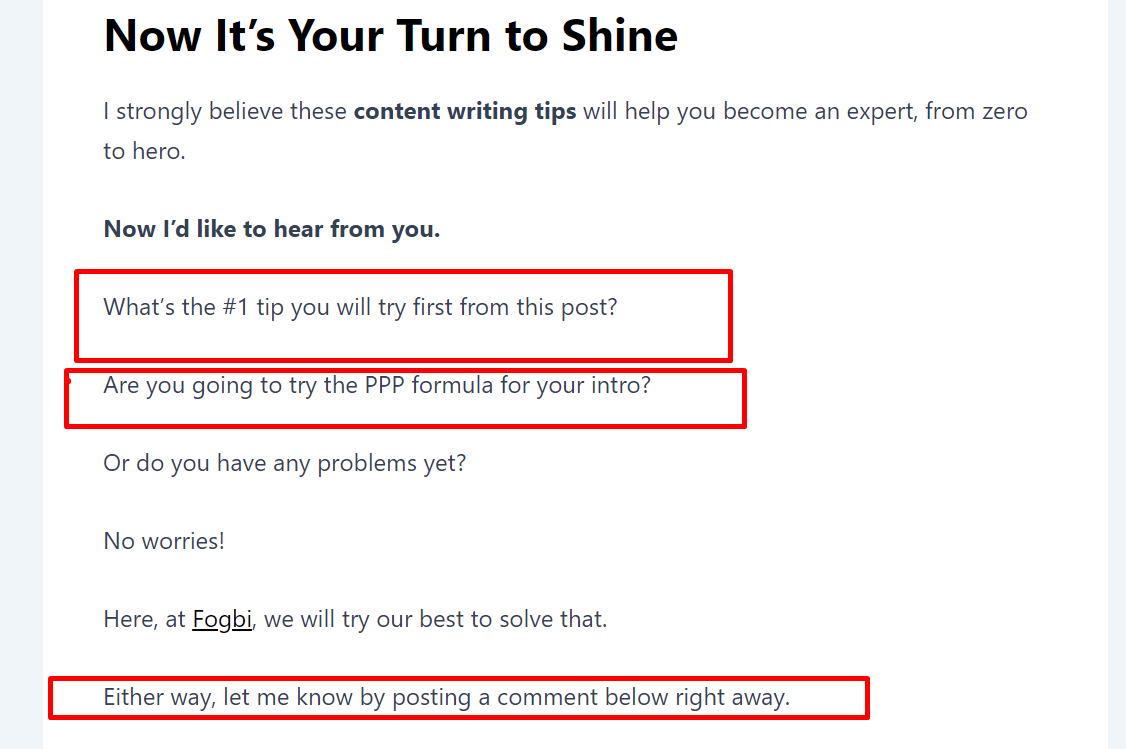
- 2. Be approachable: Write in a conversational tone. Make readers feel comfortable sharing their thoughts.
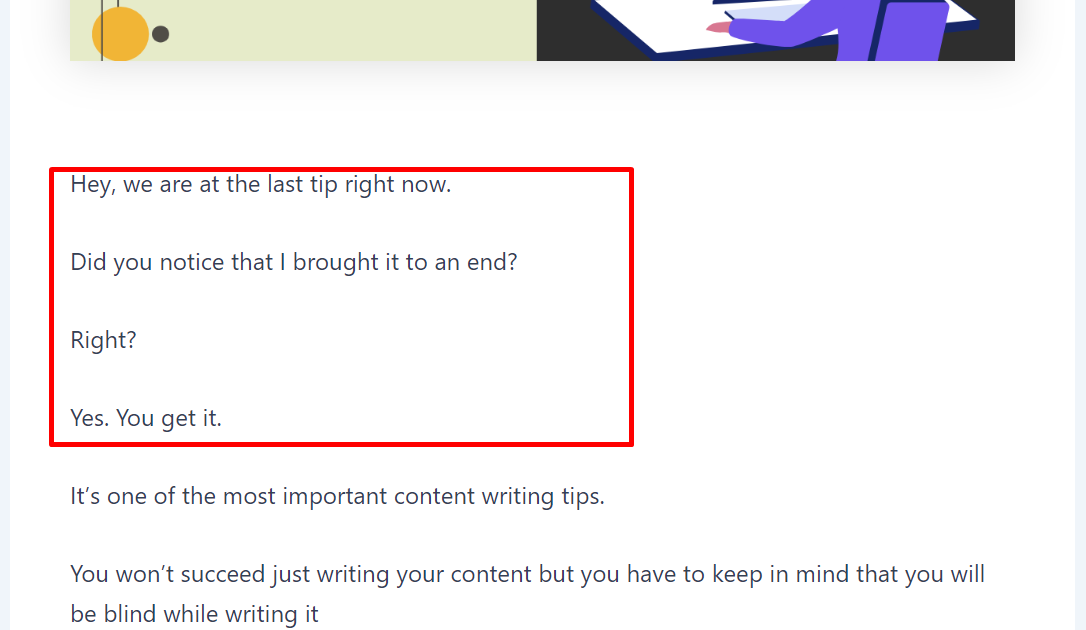
- 3. Use call-to-actions: prompt readers to leave comments. Use phrases like “What do you think?” or “Share your thoughts below.”
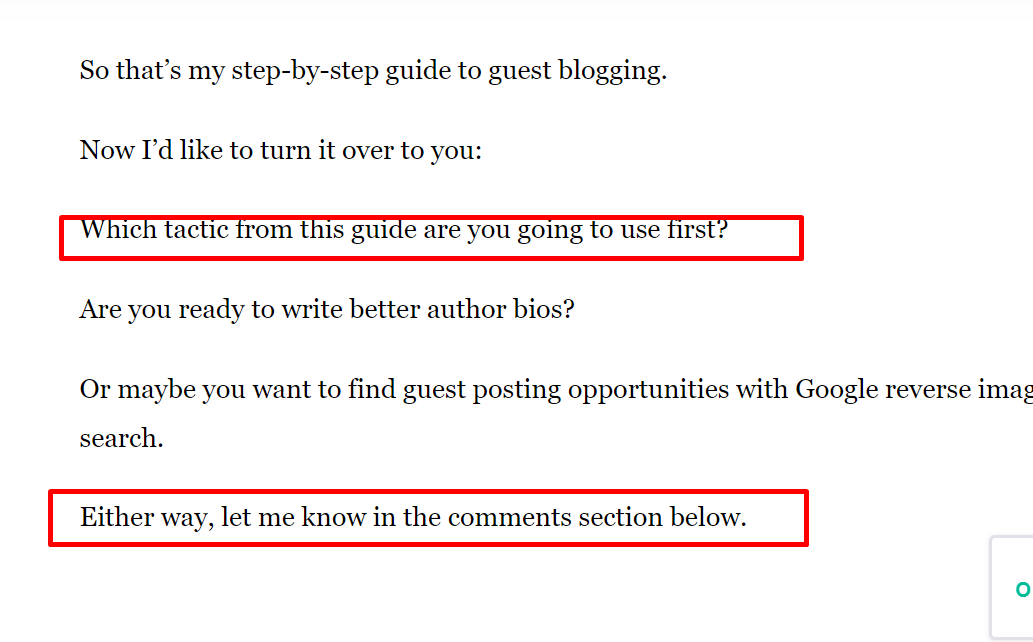
- 4. Highlight comments: Feature thoughtful comments in your posts. This shows you value reader input.
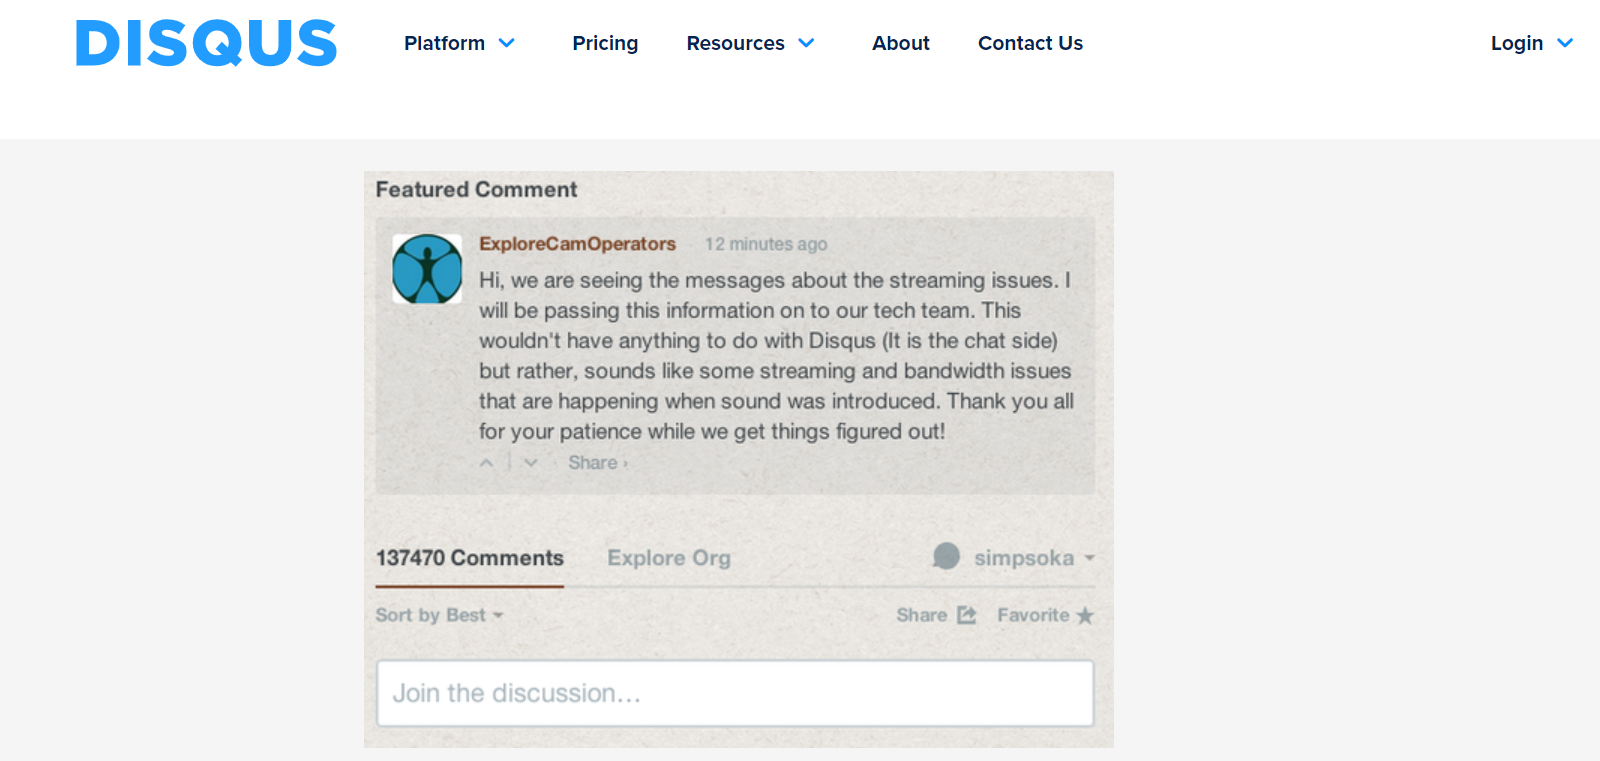
Here are some benefits of encouraging comments and feedback:
Benefit | Description |
Improved Content | Gain insights to create better posts. |
Increased Engagement | Active comment sections attract more readers. |
Community Building | Fosters a sense of belonging among readers |
Hosting Giveaways And Contests
Giveaways and contests are exciting ways to build community. They attract new readers and reward loyal followers.

Here’s how to host them:
- Set clear rules: ensure participants understand how to enter and win. Outline the rules and eligibility clearly.
- Choose relevant prizes: Select prizes that appeal to your audience. Ensure they align with your blog’s niche.
- Promote your giveaway: Use social media, email newsletters, and blog posts to spread the word.
- Engage participants: Encourage participants to share the giveaway. Respond to their questions and comments.
Here are some tips for successful giveaways and contests:
Tip | Description |
Timing | Choose a duration that keeps interest high. |
Promotion | Regularly remind your audience about the giveaway. |
Transparency | Announce winners publicly to build trust. |
Wow,
You have done everything successfully.
Now it’s time to generate income.
Speaking of making money…
Chapter Twelve
Monetize Your Blog
Monetize your blog with
Displaying ADs,
Affiliate Marketing.
Selling your products
Without any further ado, let’s jump

Displaying Ads
Displaying ads is one of the most common ways to monetize a blog.
It is simple and can be very effective.
Google AdSense is a popular choice for many bloggers.
It allows you to place ads on your blog and earn money based on clicks or impressions.
Here’s how you can get started:
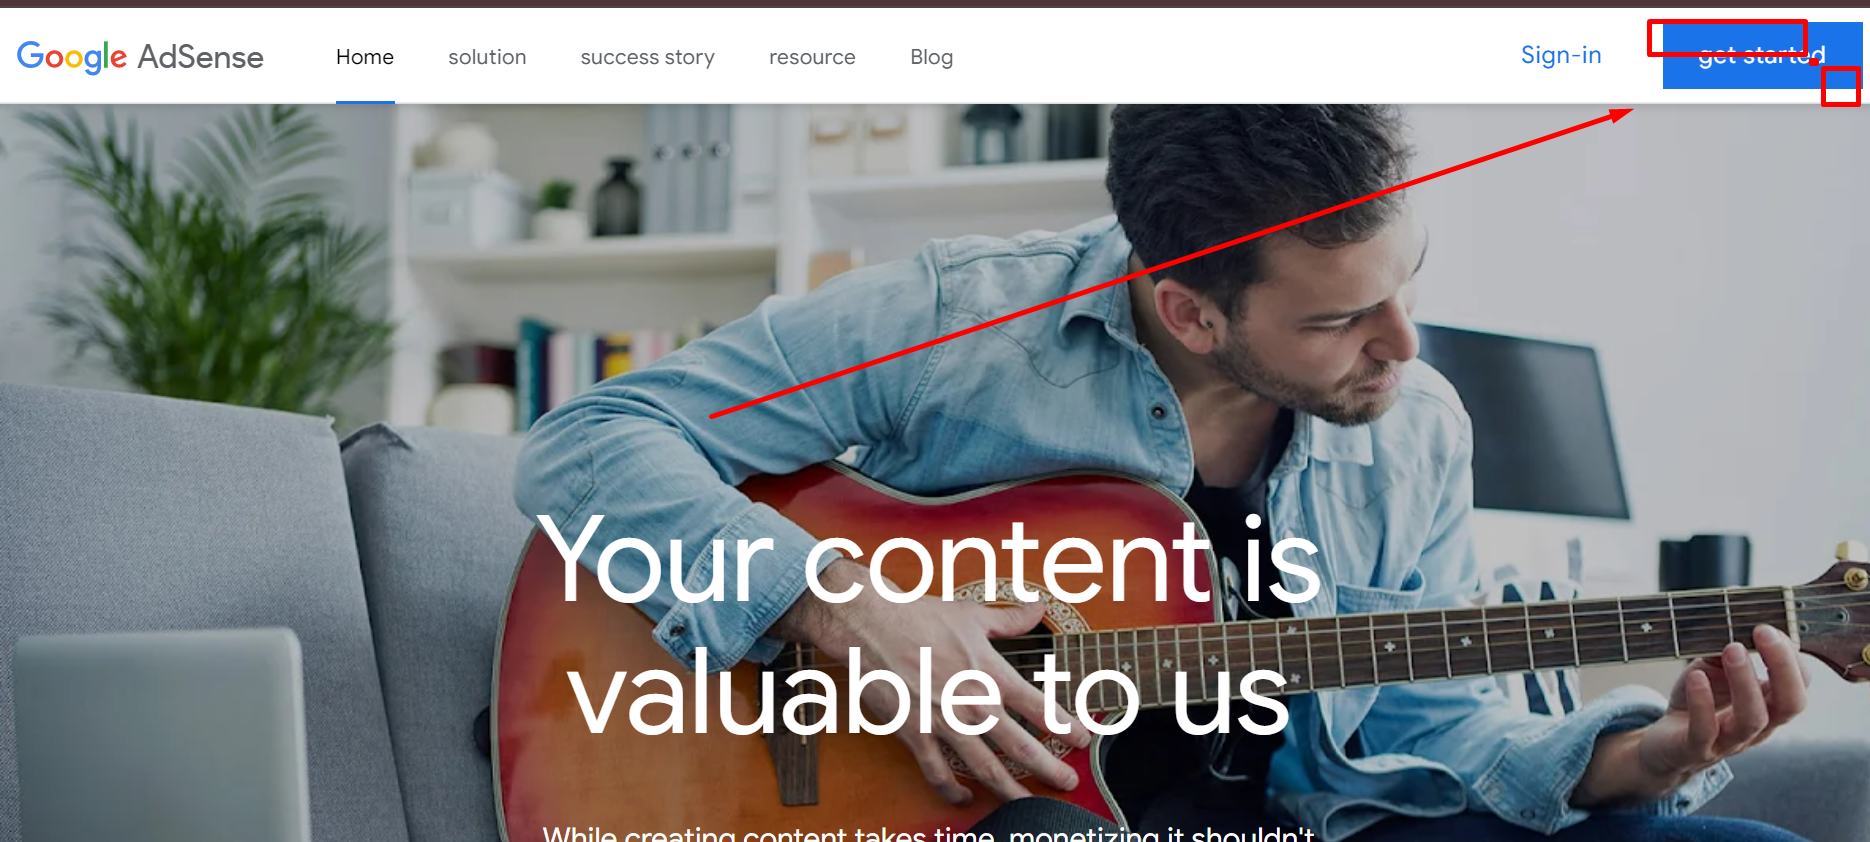
Go to Google Adsense and click on the Get Started button to sign up.
Now you see this page, and here, select your email.
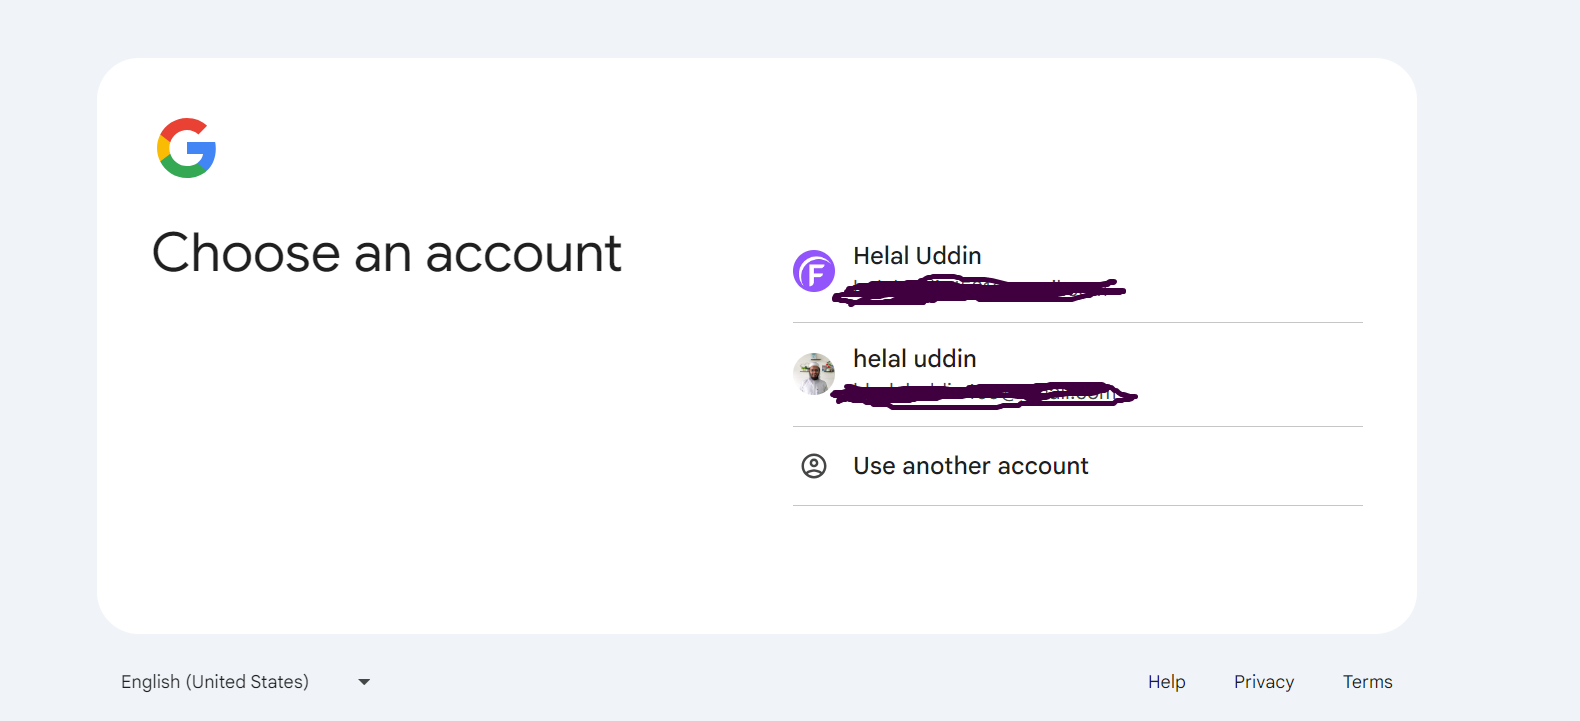
After selecting your email, you can see the page.
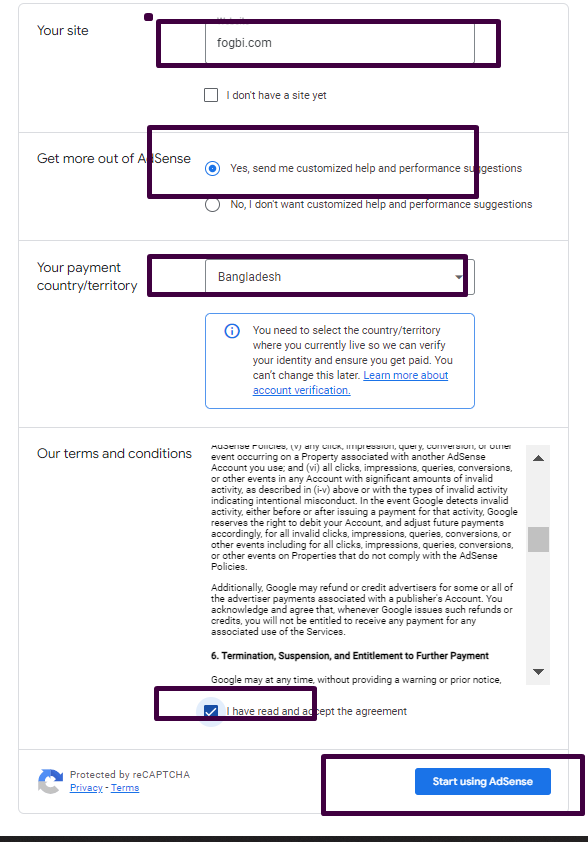
Now fill in the blanks with your real information. Finally, click on the Start Using AdSense button.
Hey.
Boom
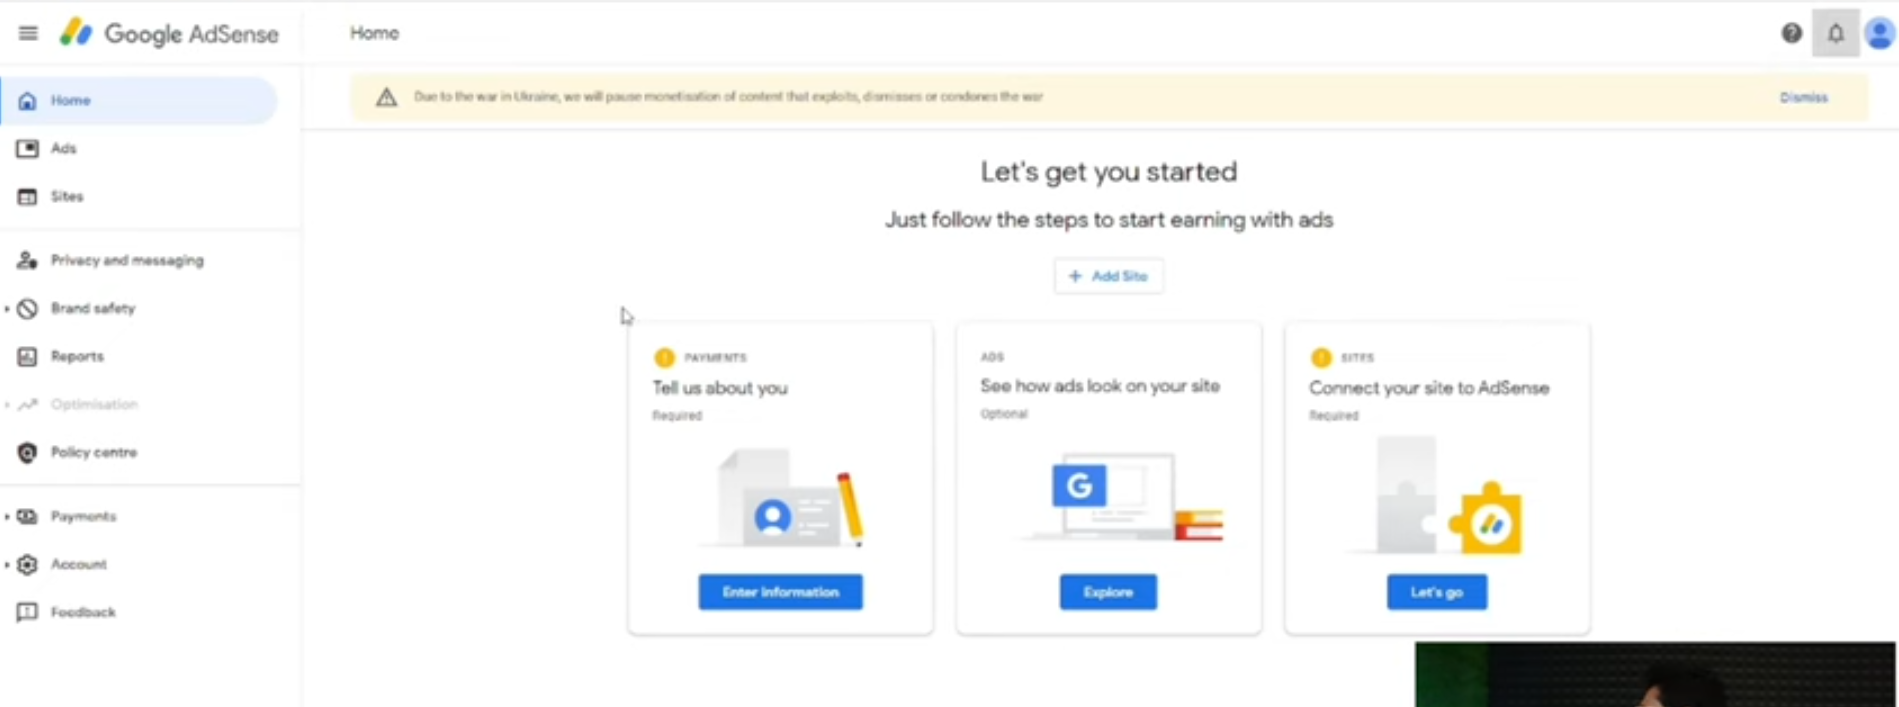
After clicking on the Start Using AdSense button, you can see this page.
this means you have successfully created your AdSense account.
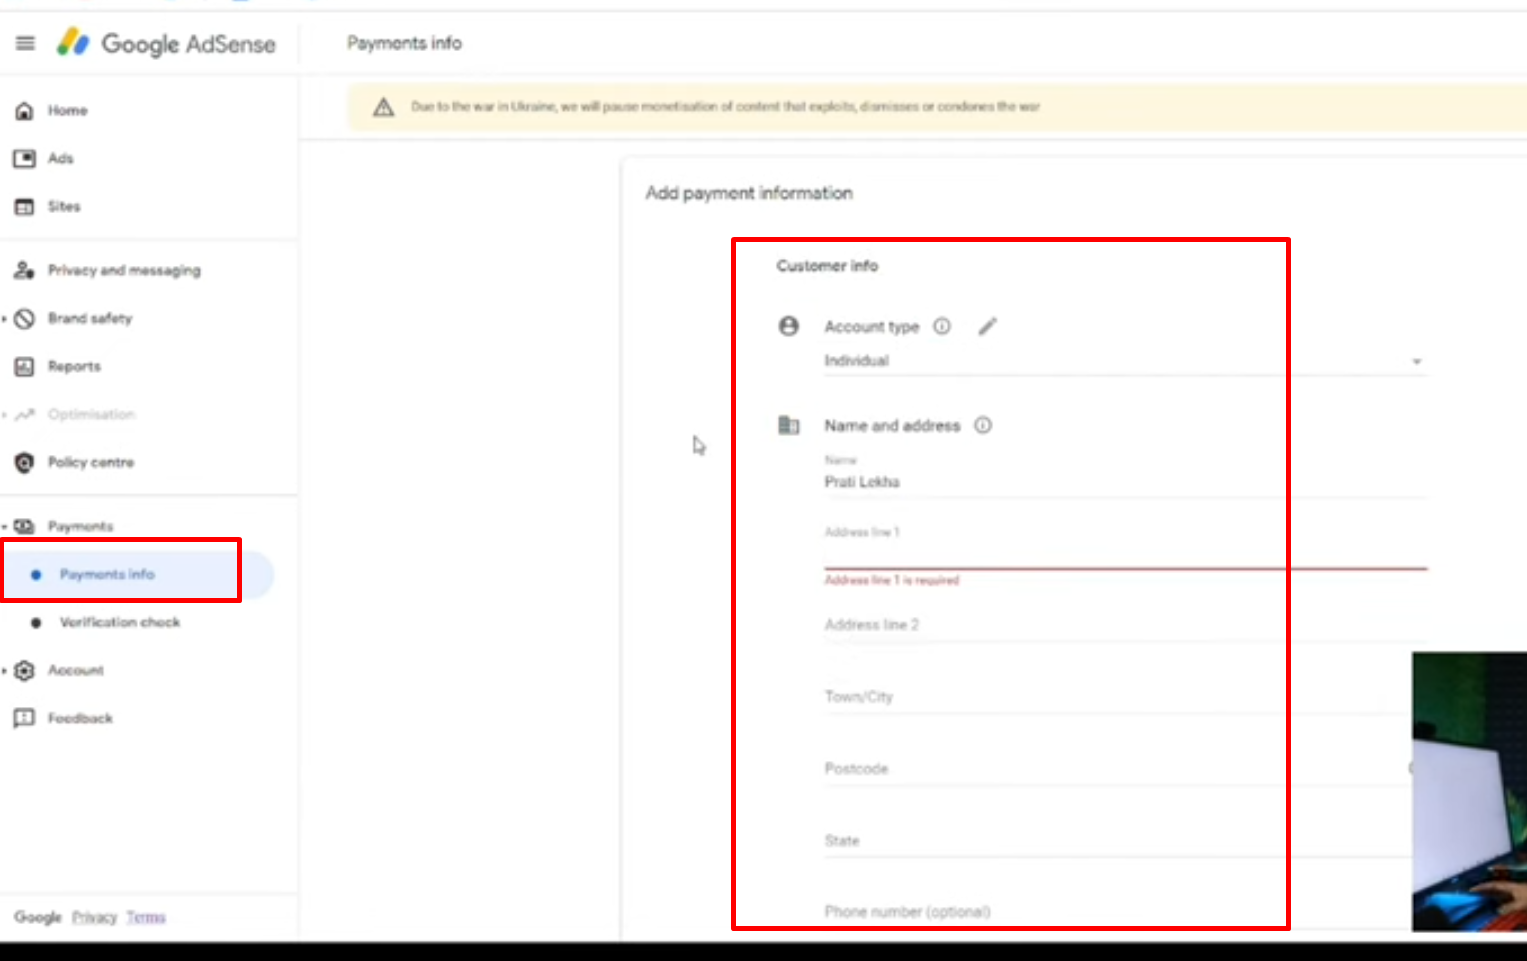
Now click on payment info and add your real individual payment information. And save the configuration.
Then go to ads and click on this pen.
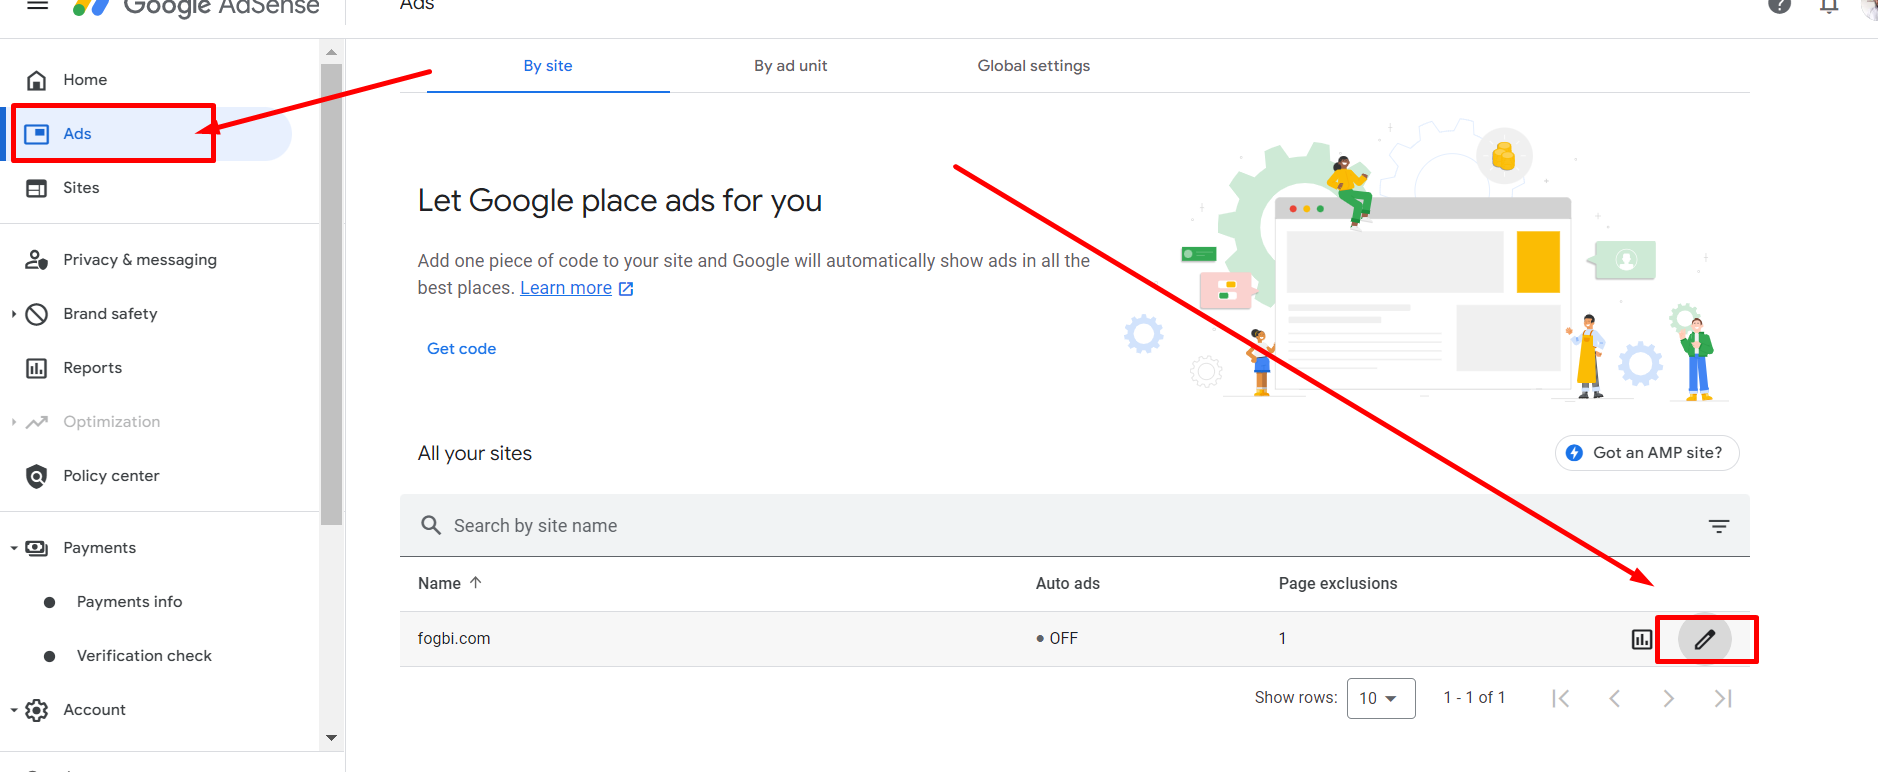
You can see this page; now check it out by clicking on it like this.
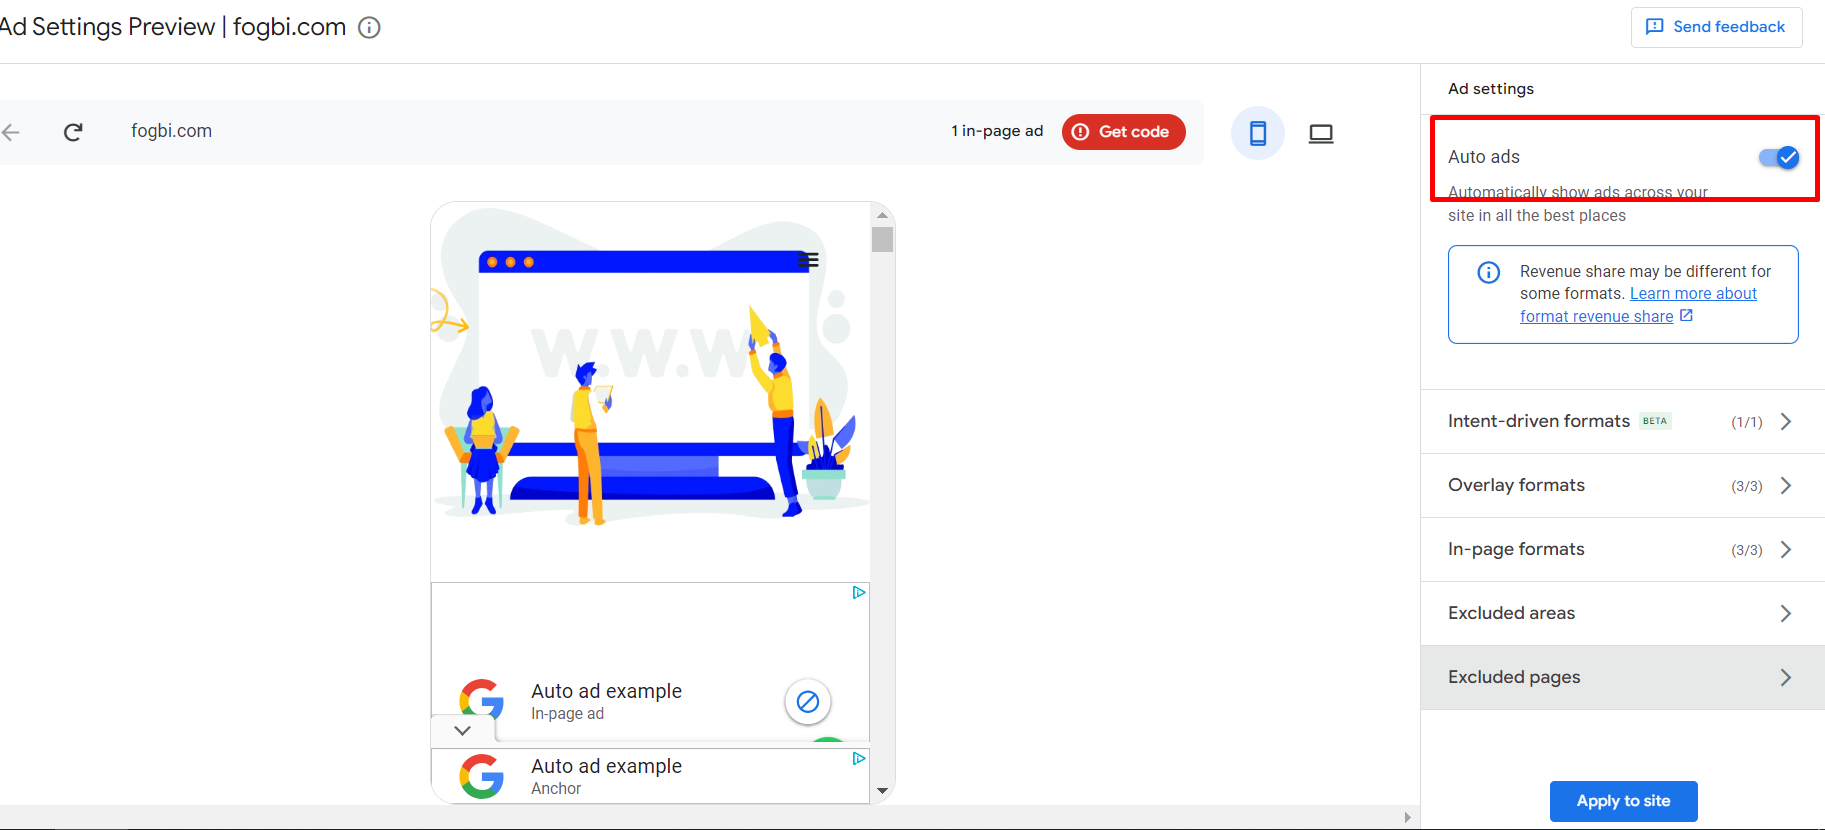
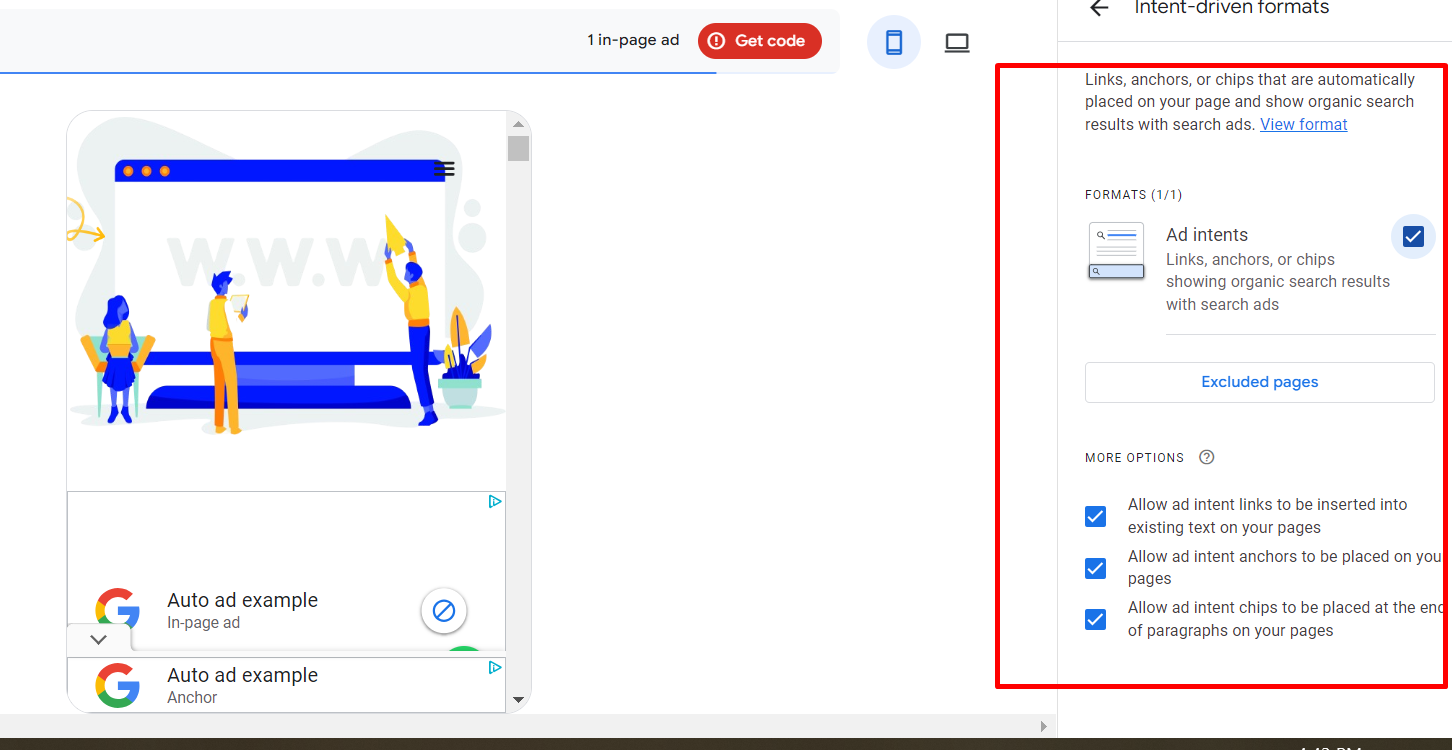
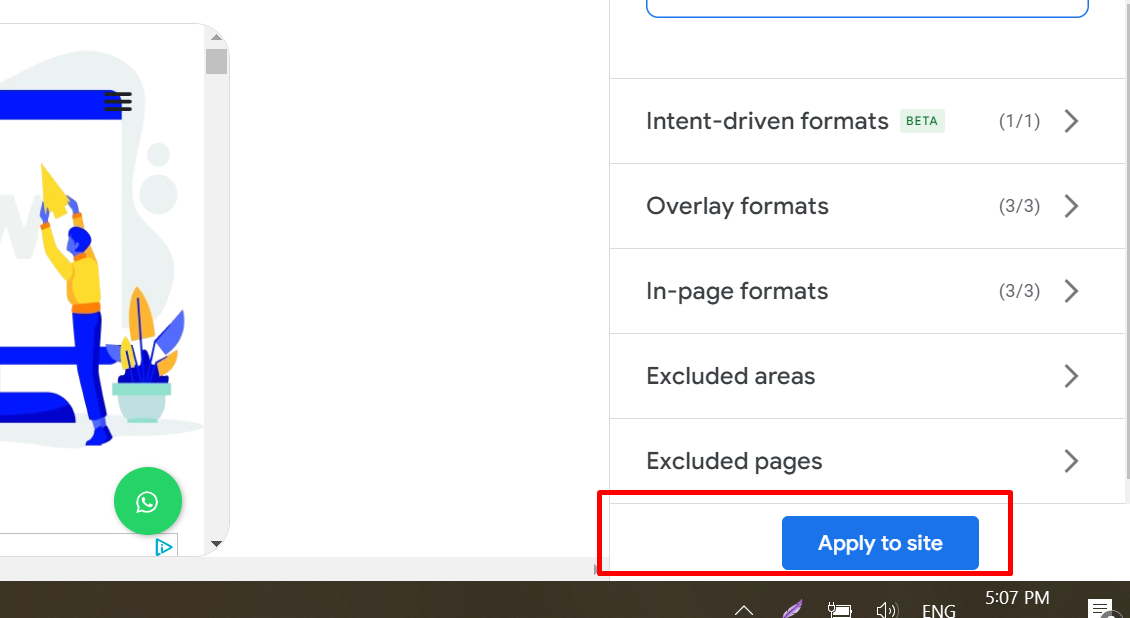
Now, click on intent-driven formant and do what I did, like in the image below.
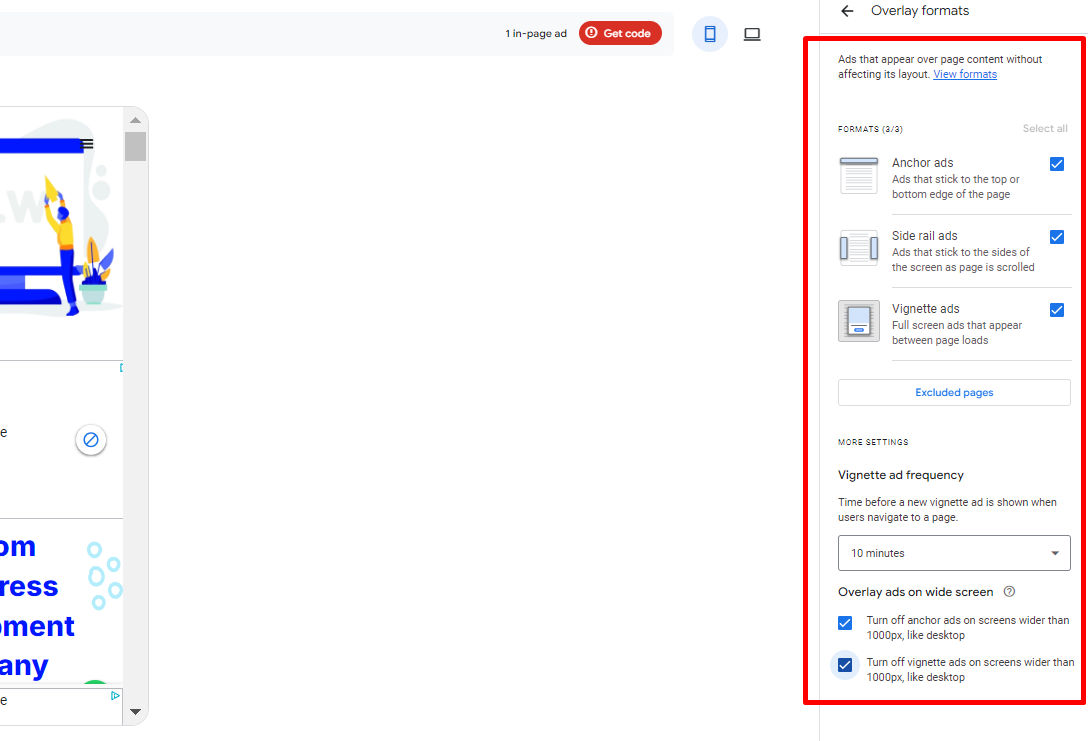
Now click on overlay format and do what I did.
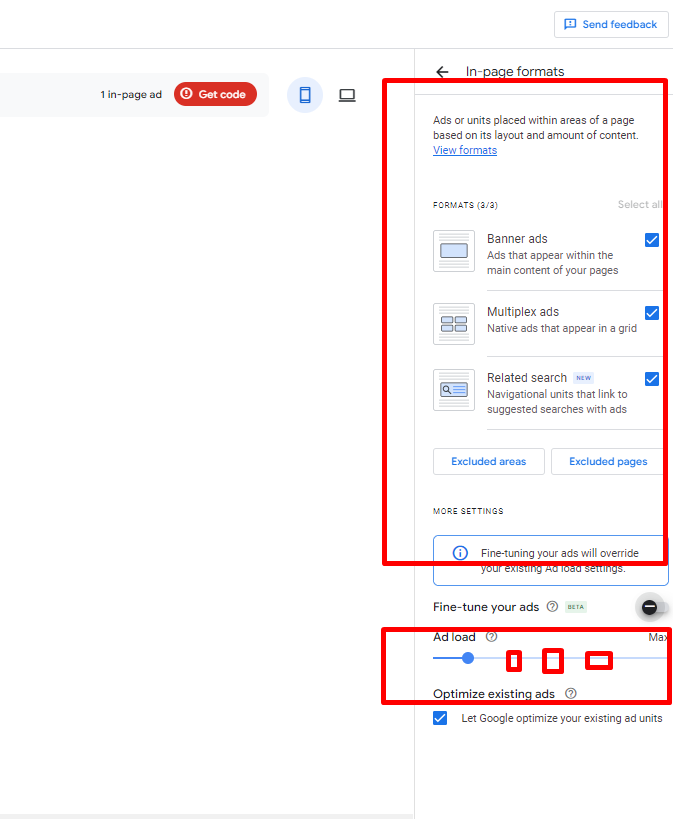
Now do what I did in page format. But you can increase or decrease the ad load. It depends on you, but the medium is good.
Lastly, click on the Apply Site button.
Ok,
Now go to sites and click on your blog website url, like this:
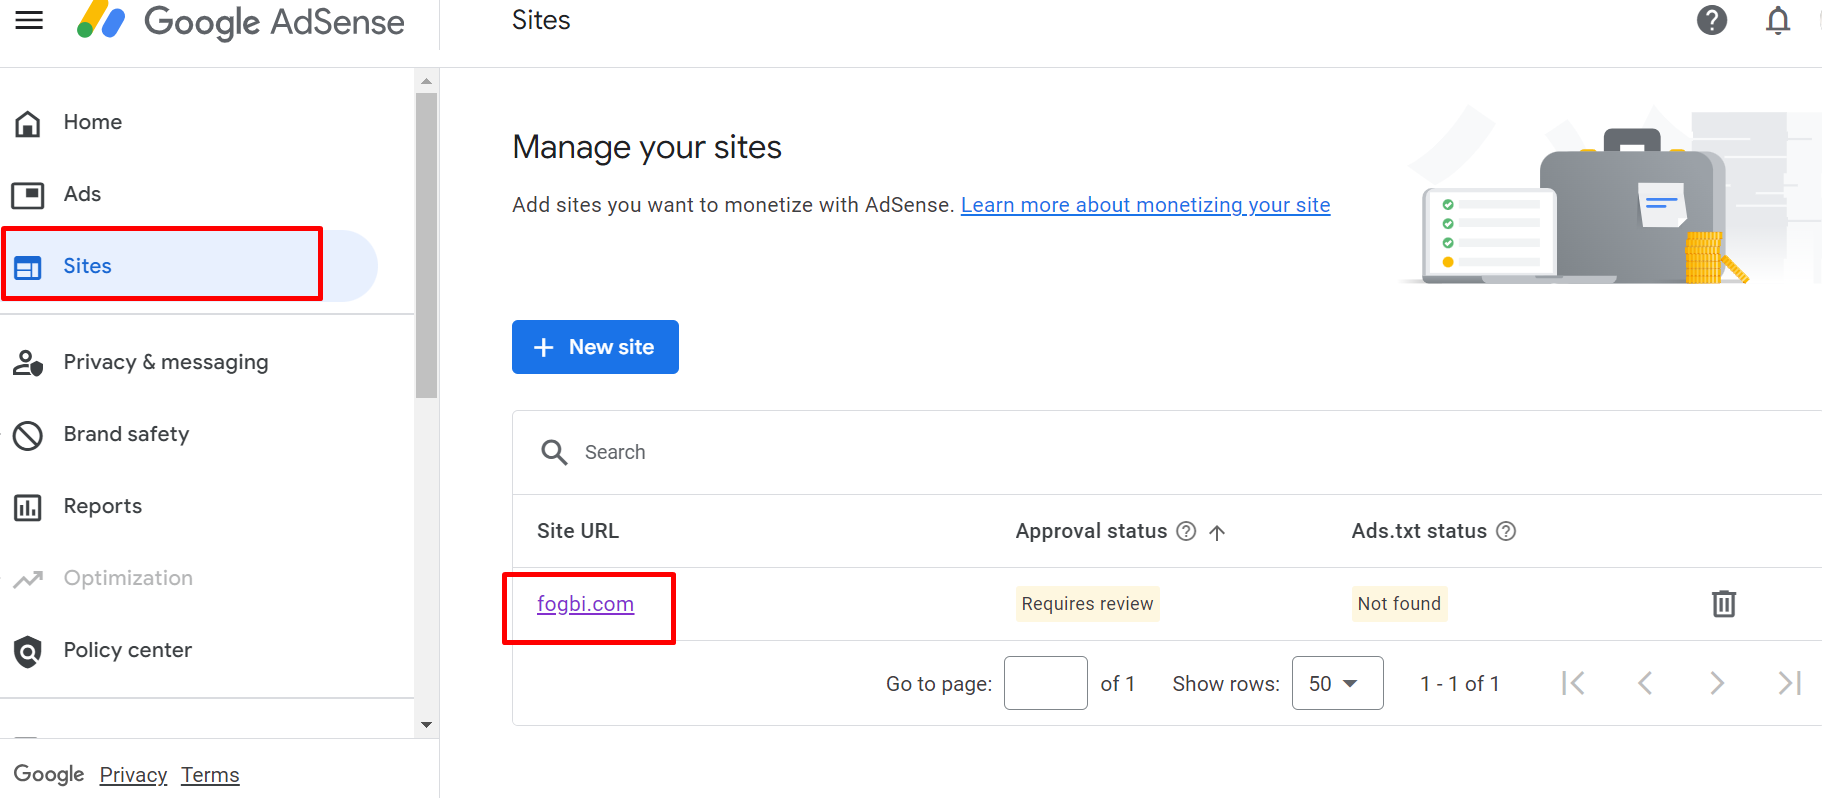
Here, you can see this page. And here Click on copy like this.
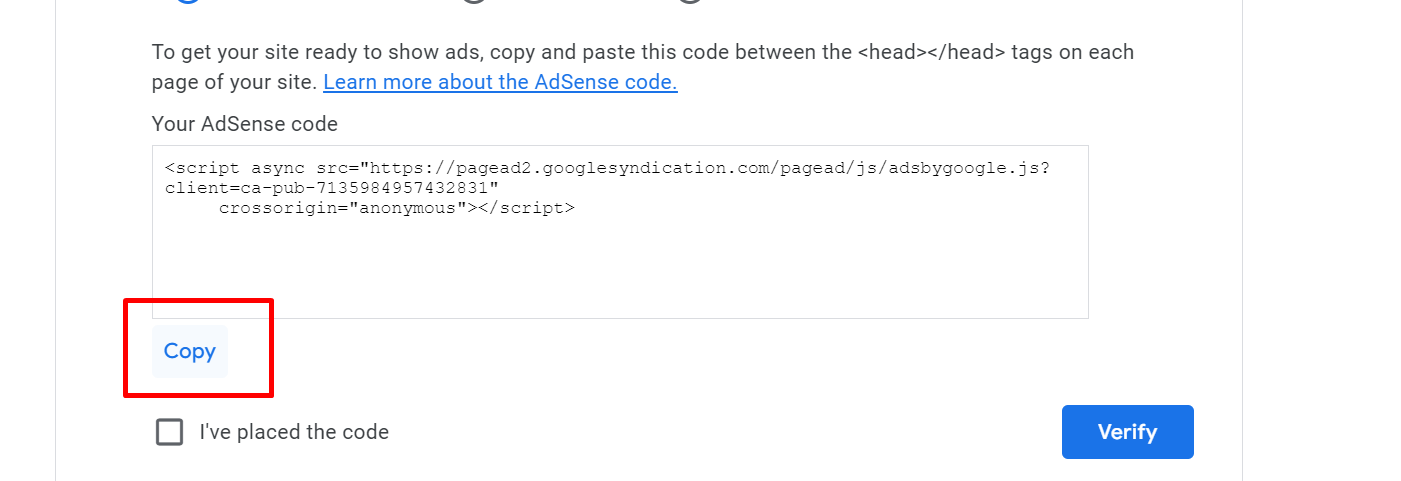
Go to your blog’s website and log in.
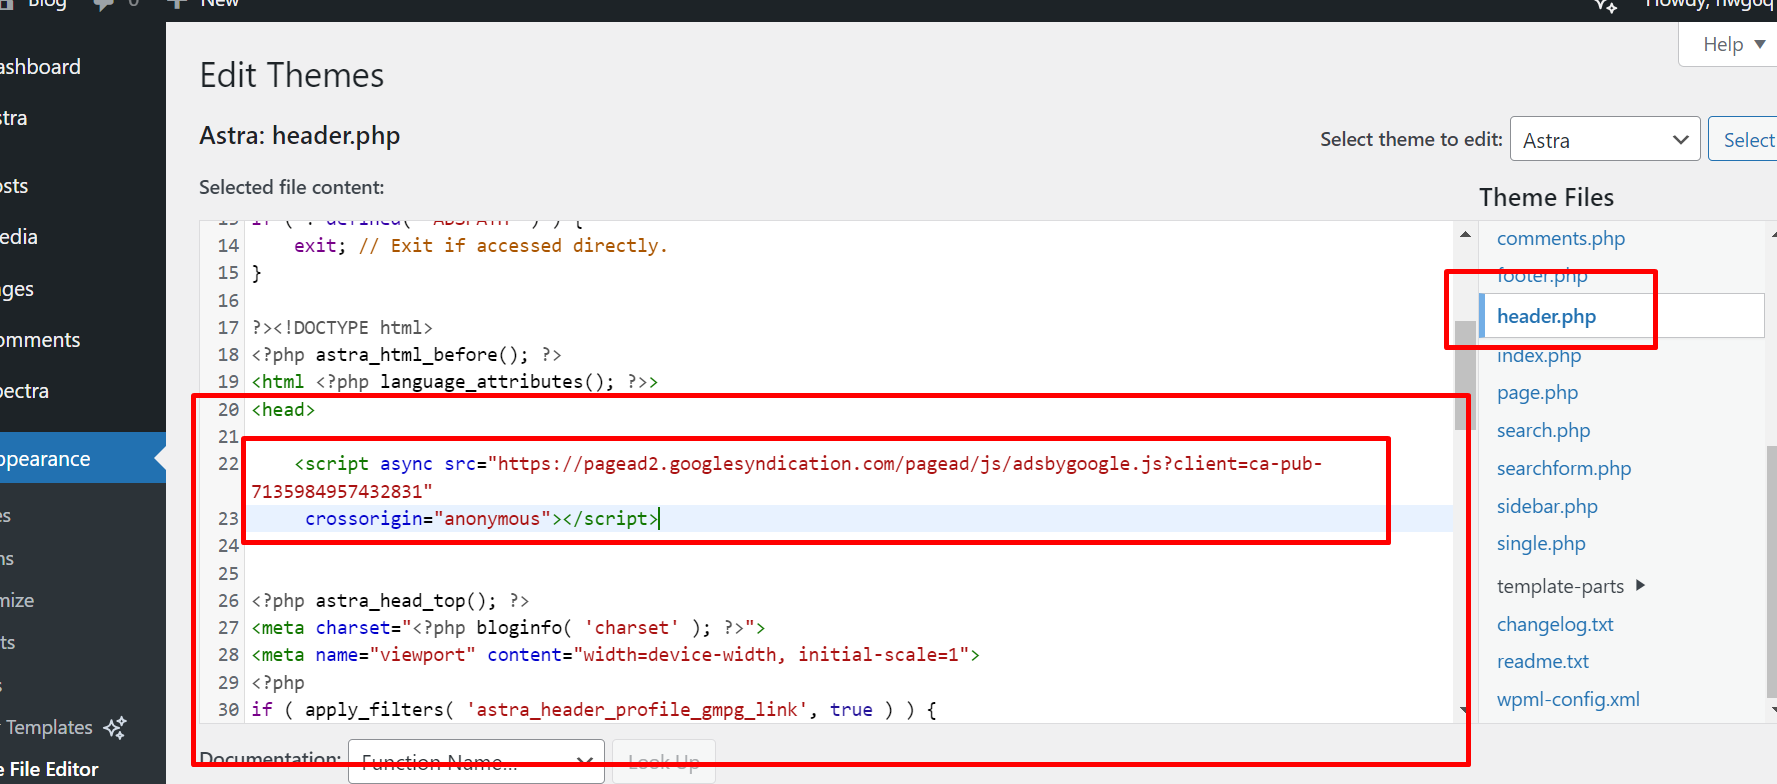
Then, go to the appearance and theme file editor, like in this screenshot.
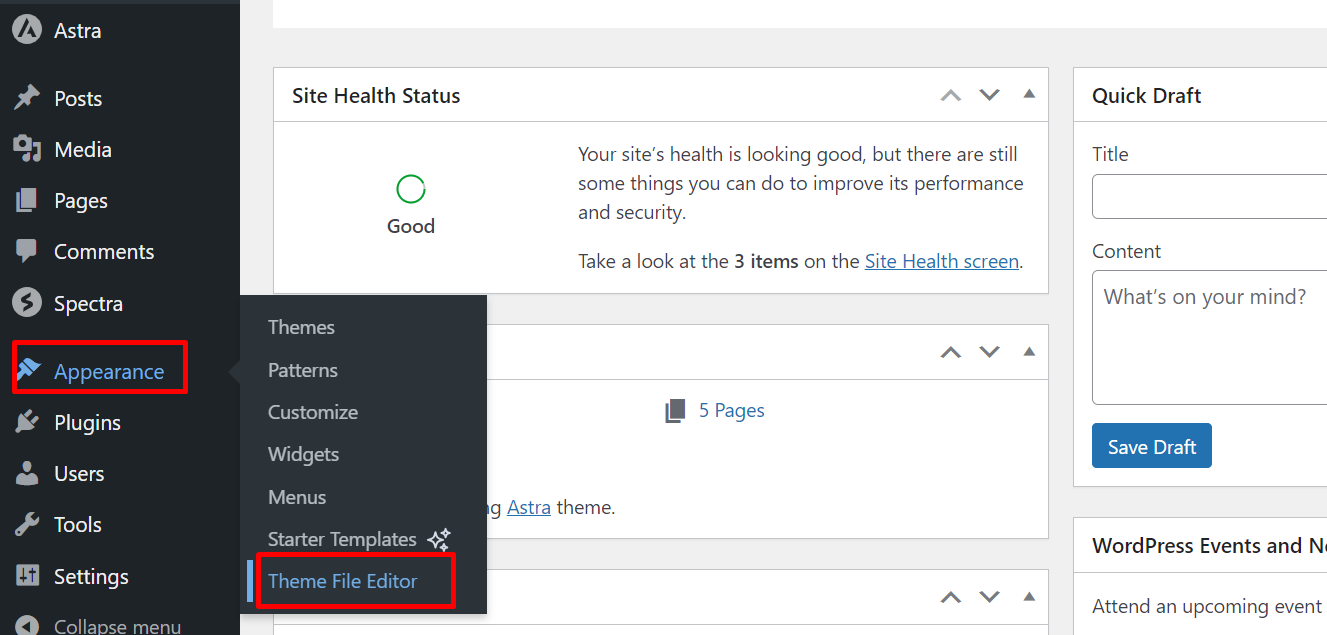
Now look for header.php and click on it, then look for <head> and make some spaces, then paste your code here like I did in the screenshot.
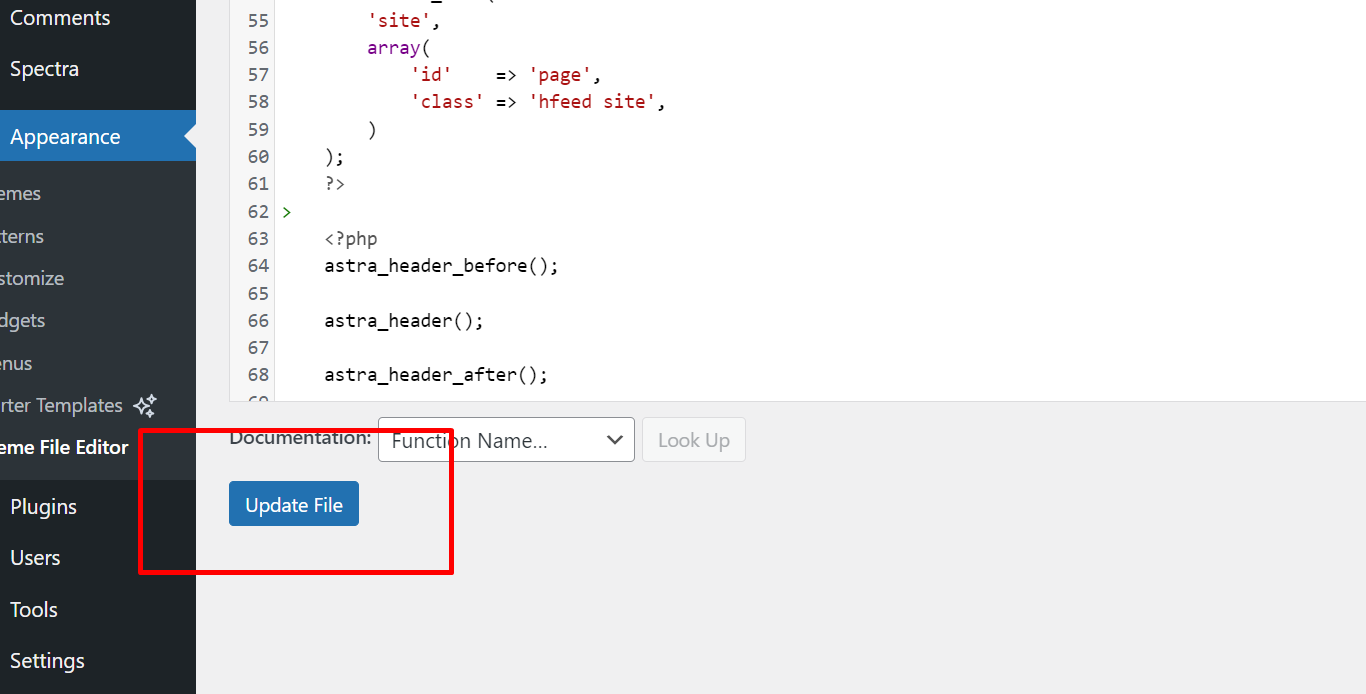
Update file
Now go to your AdSense account and do what I did.

Bro, well done.
You have completed your AdSense account successfully.
Now start earning revenue from clicks and impressions.
Direct Ad Sales
Another option is to use direct ad sales.
This involves negotiating directly with advertisers.
You can charge a flat fee to display their ads on your blog.

Here’s a quick comparison between Google AdSense and direct ad sales:
Google AdSense | Direct ad sales |
Easy to set up | Requires negotiation |
Automated payments | Manual payments |
Revenue based on clicks and impressions | Flat fee or CPM rates |
Affiliate Marketing
Do affiliate marketing in three ways.
- Finding affiliate programs
- Building Your Audience
- Promoting Affiliate Products Ethically
Below is the detailed explanation.

Finding Affiliate Programs
Look for affiliate programs that align with your interests.
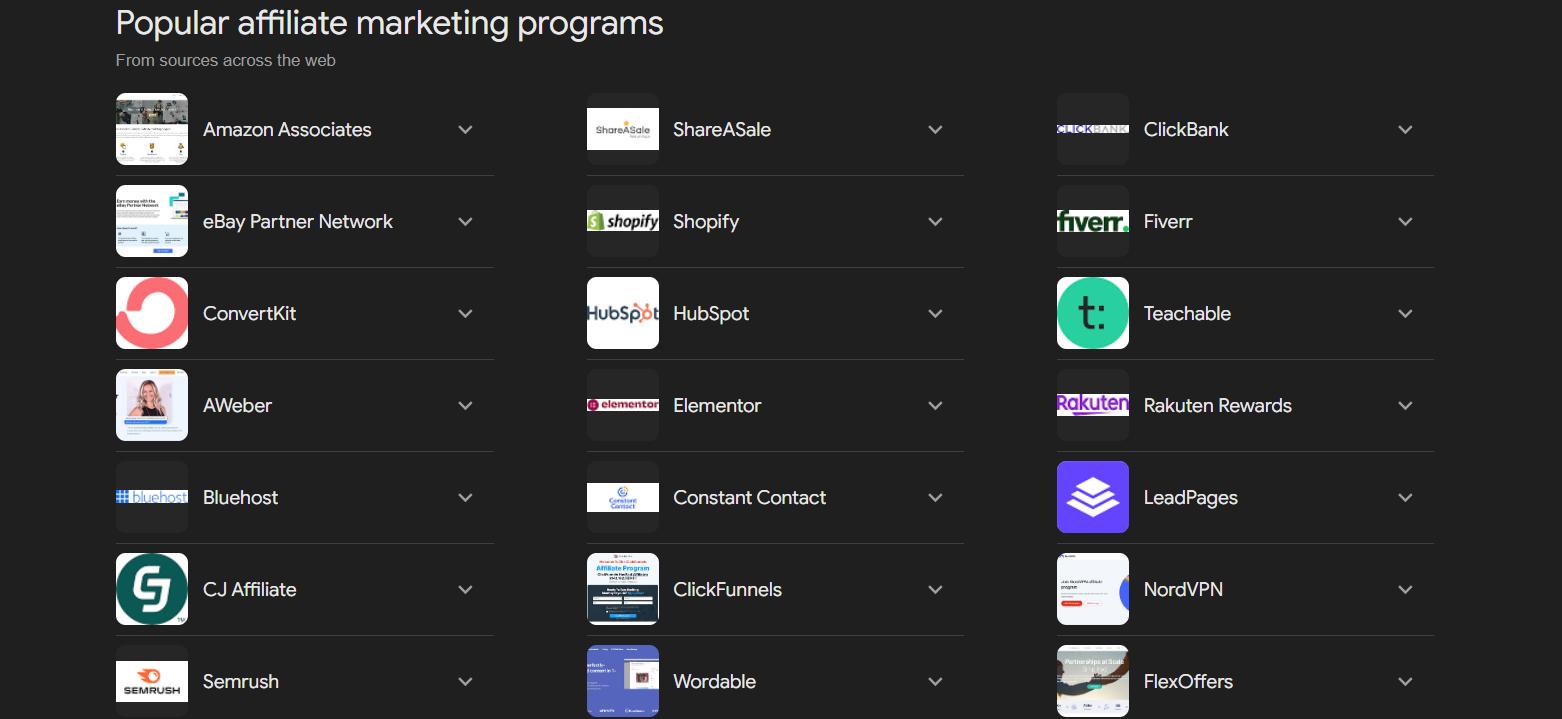
Here are some popular and largest affiliate platforms in the world:
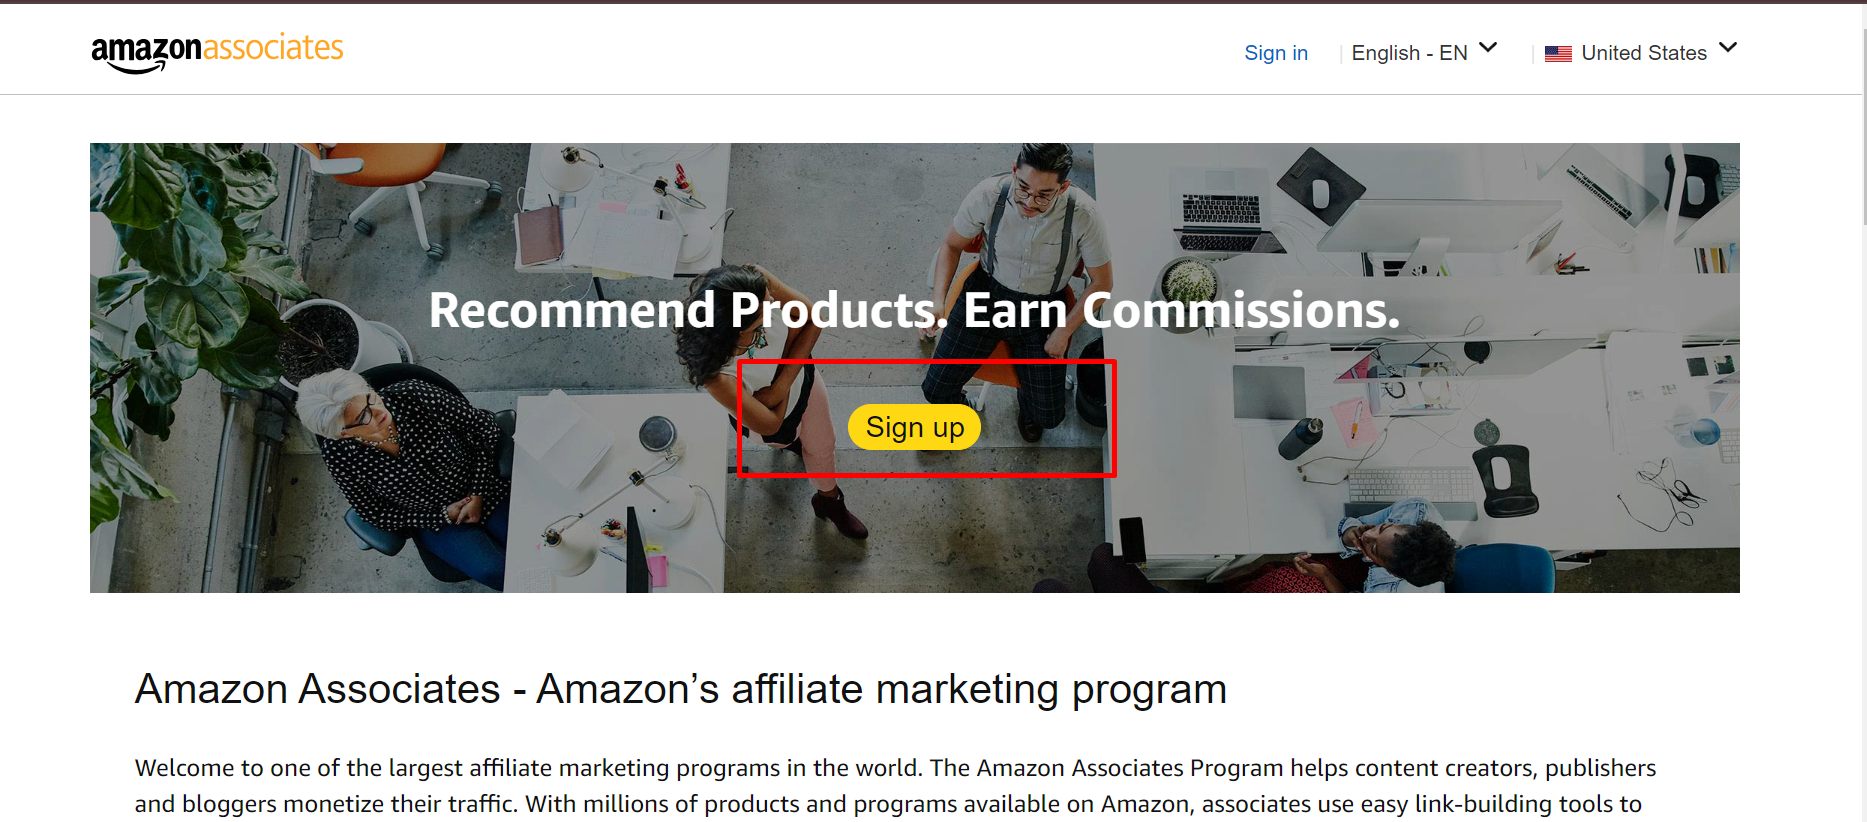
- Amazon Associates: Offers a wide range of products to promote.
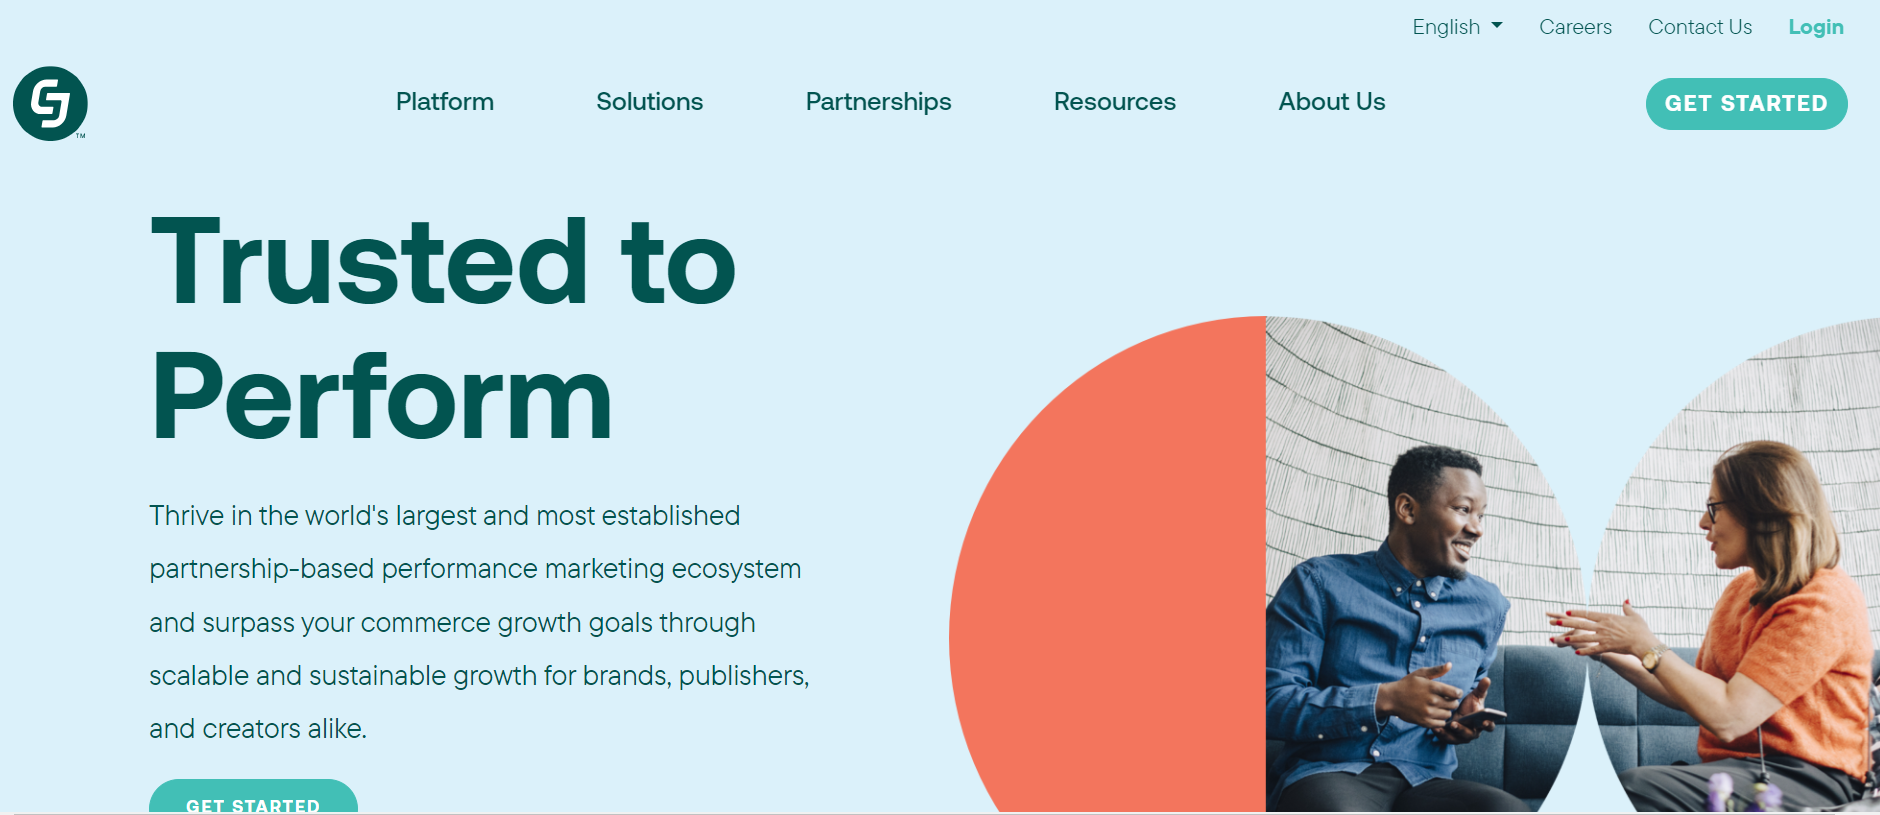
- Commission Junction (CJ Affiliate): connects you with various merchants and offers competitive commission rates.
- ShareASale: Another popular affiliate network with a diverse selection of products and services.
- ClickBank: Focuses on digital products like ebooks, courses, and software.
- Direct affiliate programs: Many companies have their affiliate programs.
Sign up for affiliate programs.
After signing up, they will provide you with a unique link for every product.
Then you can start promoting that product with the link.
Building Your Audience
To successfully promote affiliate products, you need to build an audience.
This can be done through various methods:
- Content creation: Create high-quality content like blog posts, videos, or social media posts to attract and engage your target audience.
- Email marketing: Build an email list and send regular newsletters to nurture your audience and promote affiliate products. It is not mandatory at the beginning. Keep waiting, and when you have a big list, then start
- Social media: Use platforms like Instagram, Facebook, and Twitter to connect with potential customers and share your affiliate links.
- Paid advertising: Consider using paid advertising platforms like Google Ads or Facebook Ads to reach a wider audience. But at the beginning, it is not mandatory.
Promoting Affiliate Products Ethically
It’s essential to promote affiliate products ethically and transparently.
Here are some tips:
- Provide honest reviews: Share your genuine opinions and experiences with the products you’re promoting.
Here’s the status of how WPbeginner creates content.
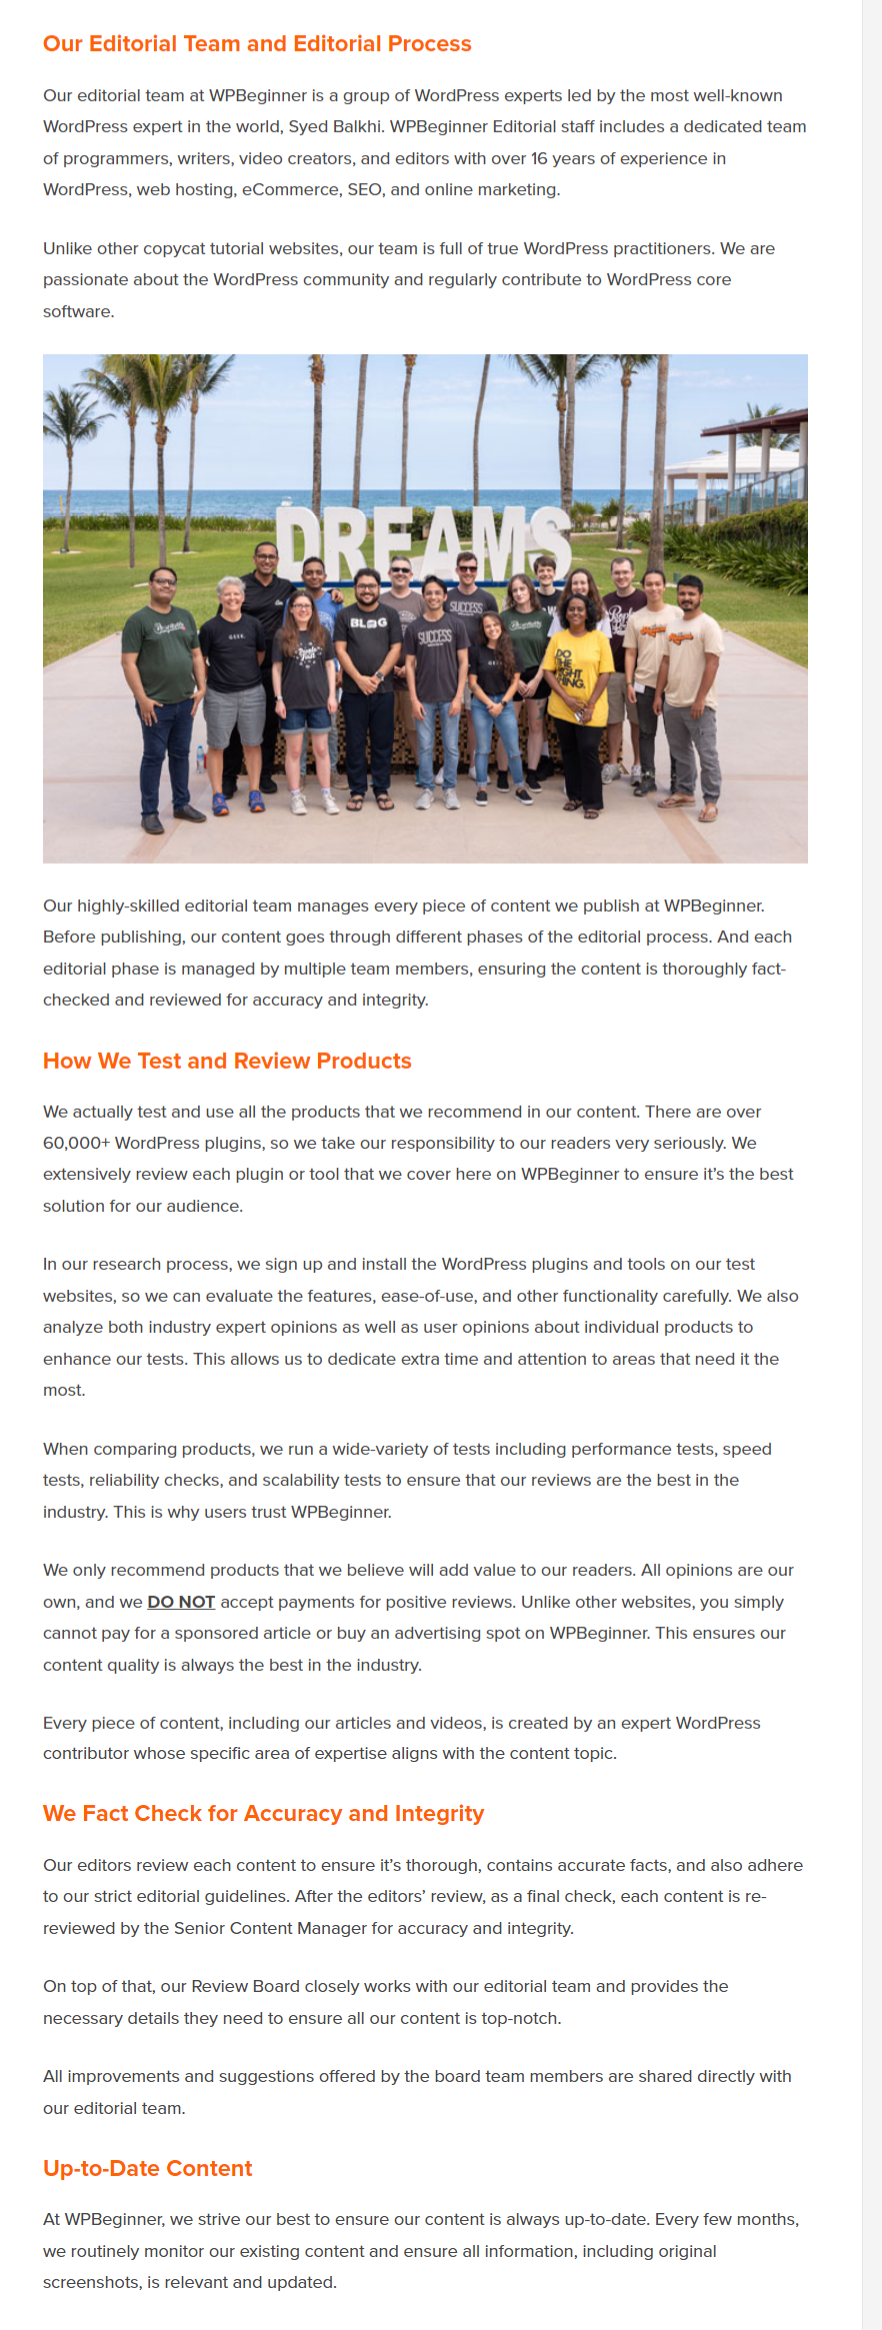
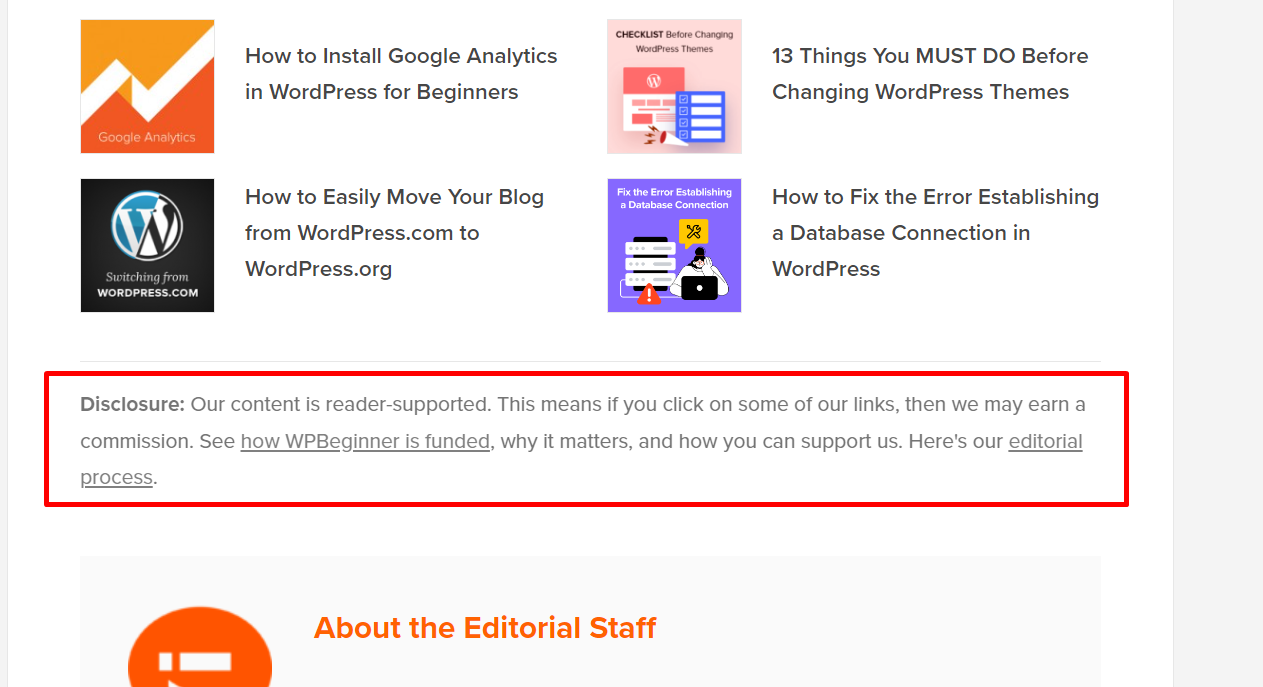
- Disclose your affiliate status: Indicate that you’re an affiliate and that you may earn a commission from sales.
Here’s an example of the affiliate status of WPbeginner.
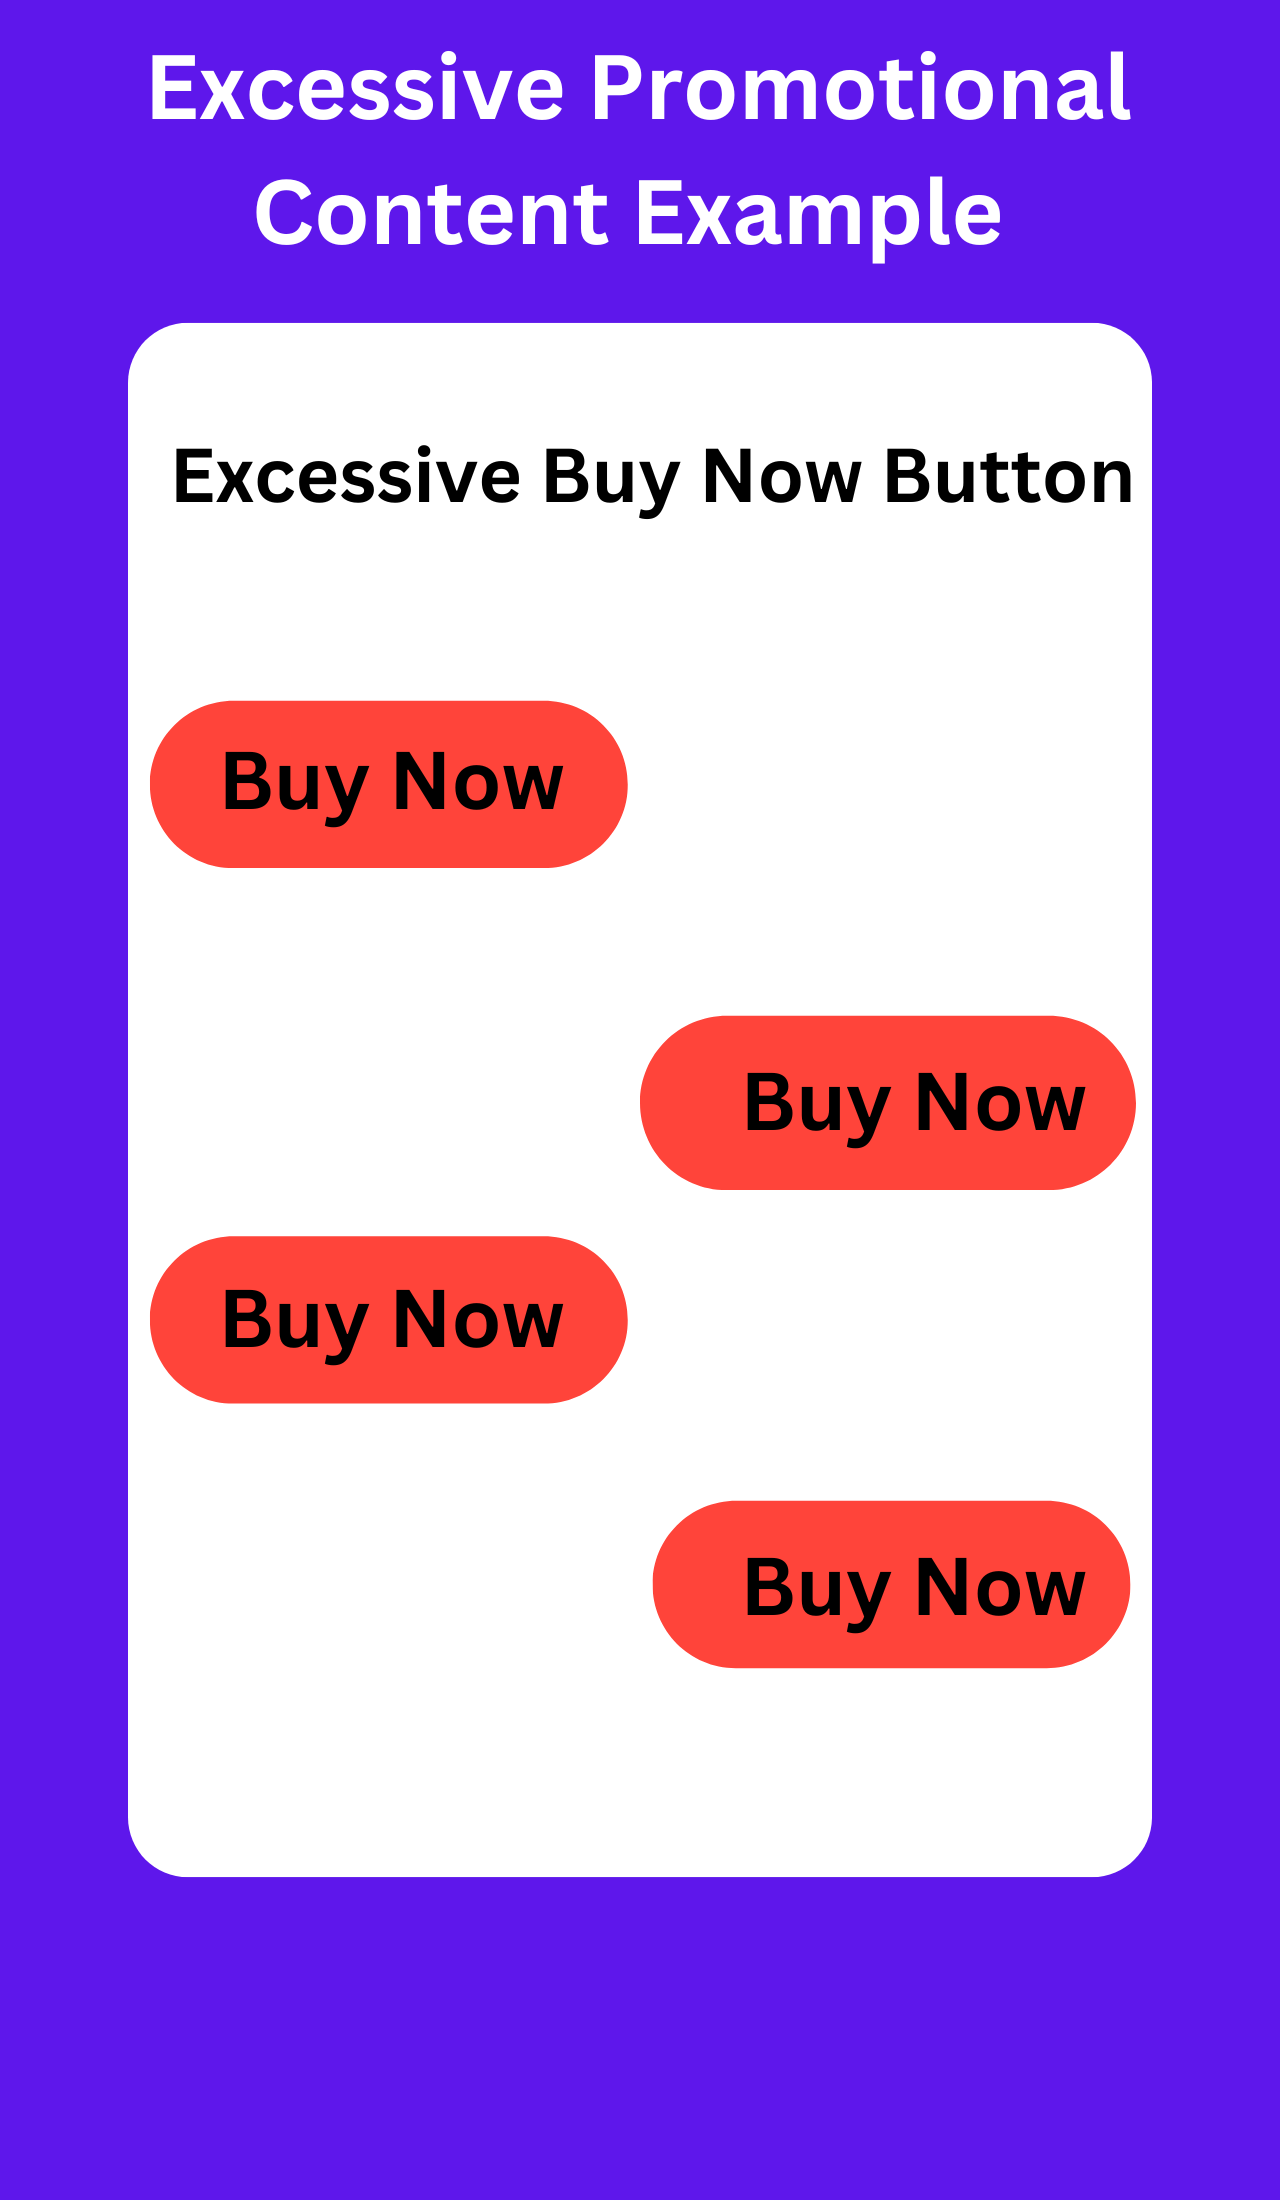
- Don’t spam: Avoid spamming your audience with excessive promotional content.
Here’s an example.
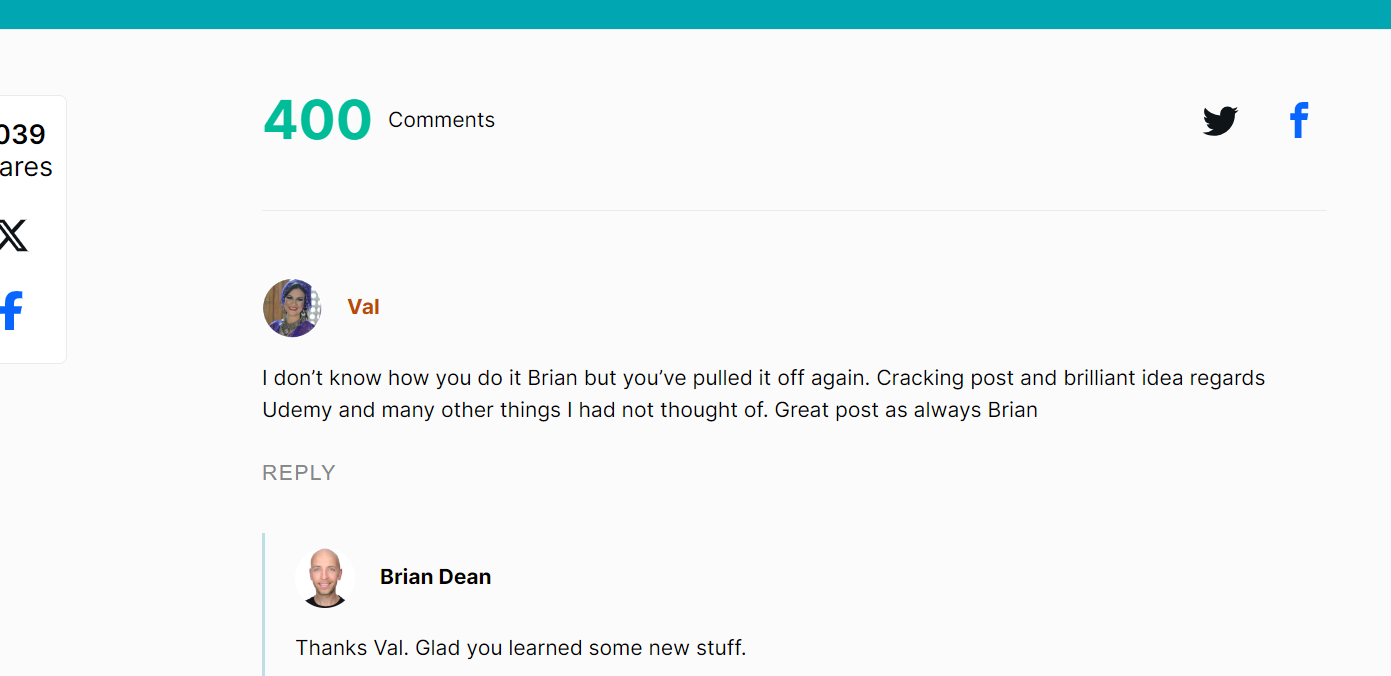
- Build trust: try to build relationships with your audience by providing valuable content and genuine recommendations.
Brien Dean built trust with his audience.
A Small Bonus of Affiliate Marketing
Track your performance
To measure your success and optimize your affiliate marketing efforts, use tracking tools to monitor your performance.
This includes:
- Affiliate network tracking: Most affiliate networks provide detailed analytics of clicks, conversions, and earnings.
Here’s an example from impact.com.
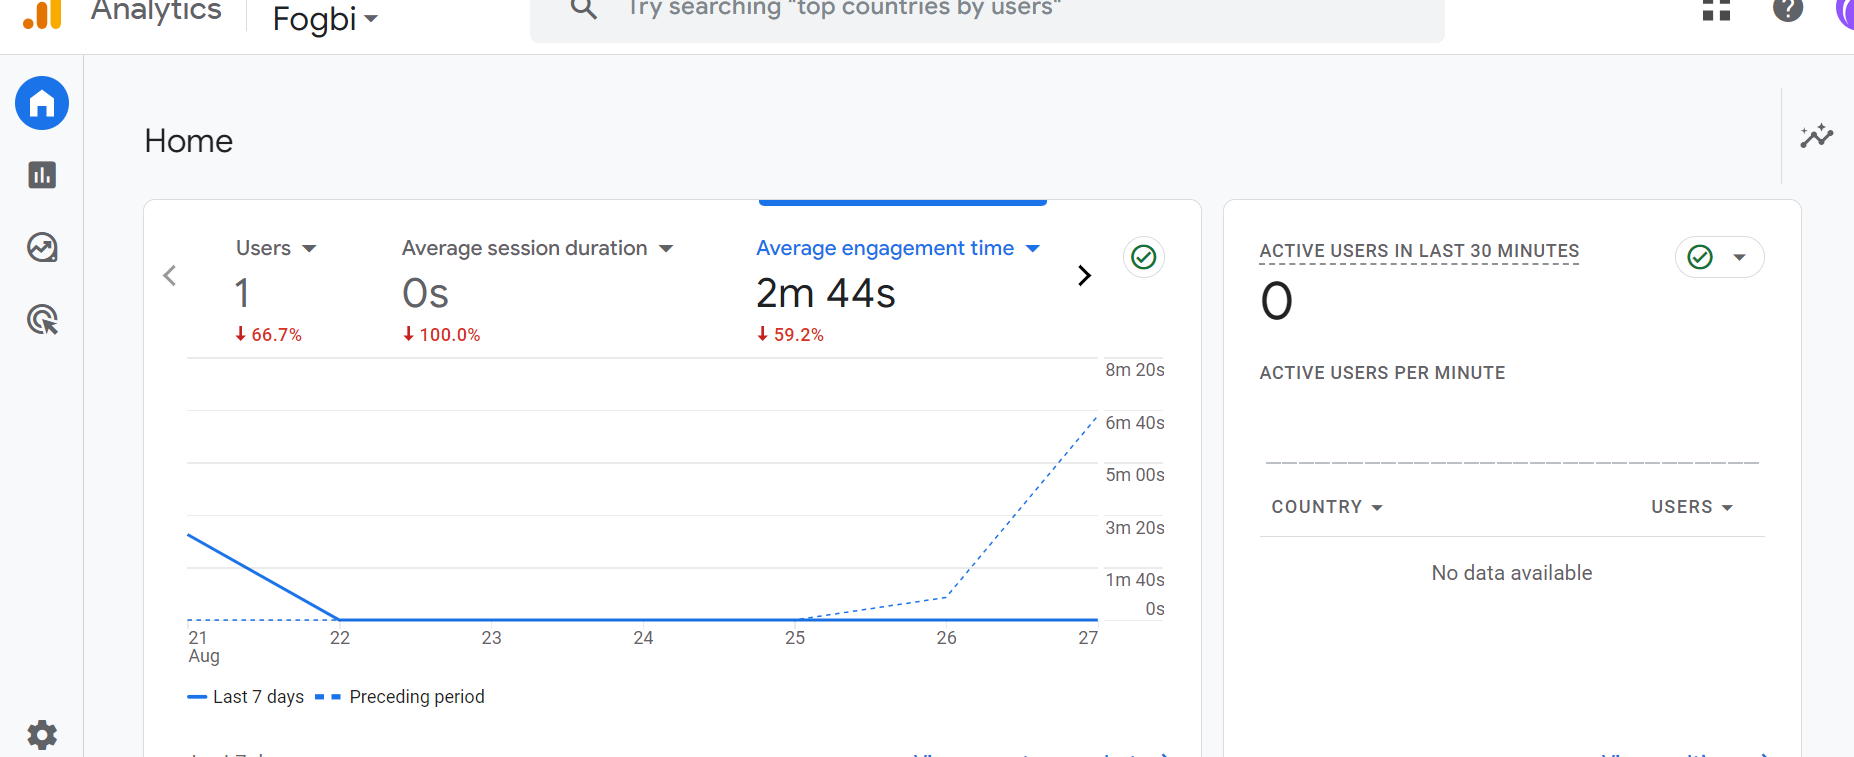
- gle Analytics: Track website traffic, user behavior, and conversions. I’ll show you it later in its own space.
Remember, patience, persistence, and a focus on providing value to your audience are keys to long-term success.
Selling Your Products And Services
Here are some ideas:
- Ebooks: Write and sell ebooks on topics related to your blog.
Here’s an example of the world’s best blogger, Darren Rowse.

Darren Rowse of ProBlogger skillfully combines blogging with selling eBooks to enhance his income and support other bloggers.
His blog offers valuable blogging tips, while eBooks like 31 Days to Build a Better Blog provide in-depth, actionable advice.
By leveraging the trust built through his blog, Darren effectively promotes his eBooks, creating a successful blend of free content and paid resources.
- Online Courses: Create and sell online courses to teach a skill that is related to your blog.
Here’s an example of the world’s best blogger, Ramit Sethi.

Ramit Sethi, creator of *I Will Teach You to Be Rich*, expertly combines his blog’s personal finance advice with online courses like Earnable and Find Your Dream Job.
His blog builds trust with actionable content, while his courses offer deeper, results-driven guidance.
This approach has allowed him to successfully monetize his platform and help thousands achieve financial and personal success.
- Consulting Services: Offer your expertise to help others.
Here’s an example of Ann Handley, one of the highest-paid bloggers in the world.

Ann Handley has successfully combined blogging with consulting to build a prominent career in content marketing.
Her blog, AnnHandley.com, provides valuable insights into content creation and strategy, drawing a large audience.
Leveraging this authority, she offers consulting services that deliver personalized content marketing strategies to businesses.
Her approach effectively integrates free content with paid consulting, establishing her as a leading expert in the field.
- Physical Products: Sell merchandise or handmade items.
Here’s an example of Tim Ferris, one of the world’s highest-paid bloggers.
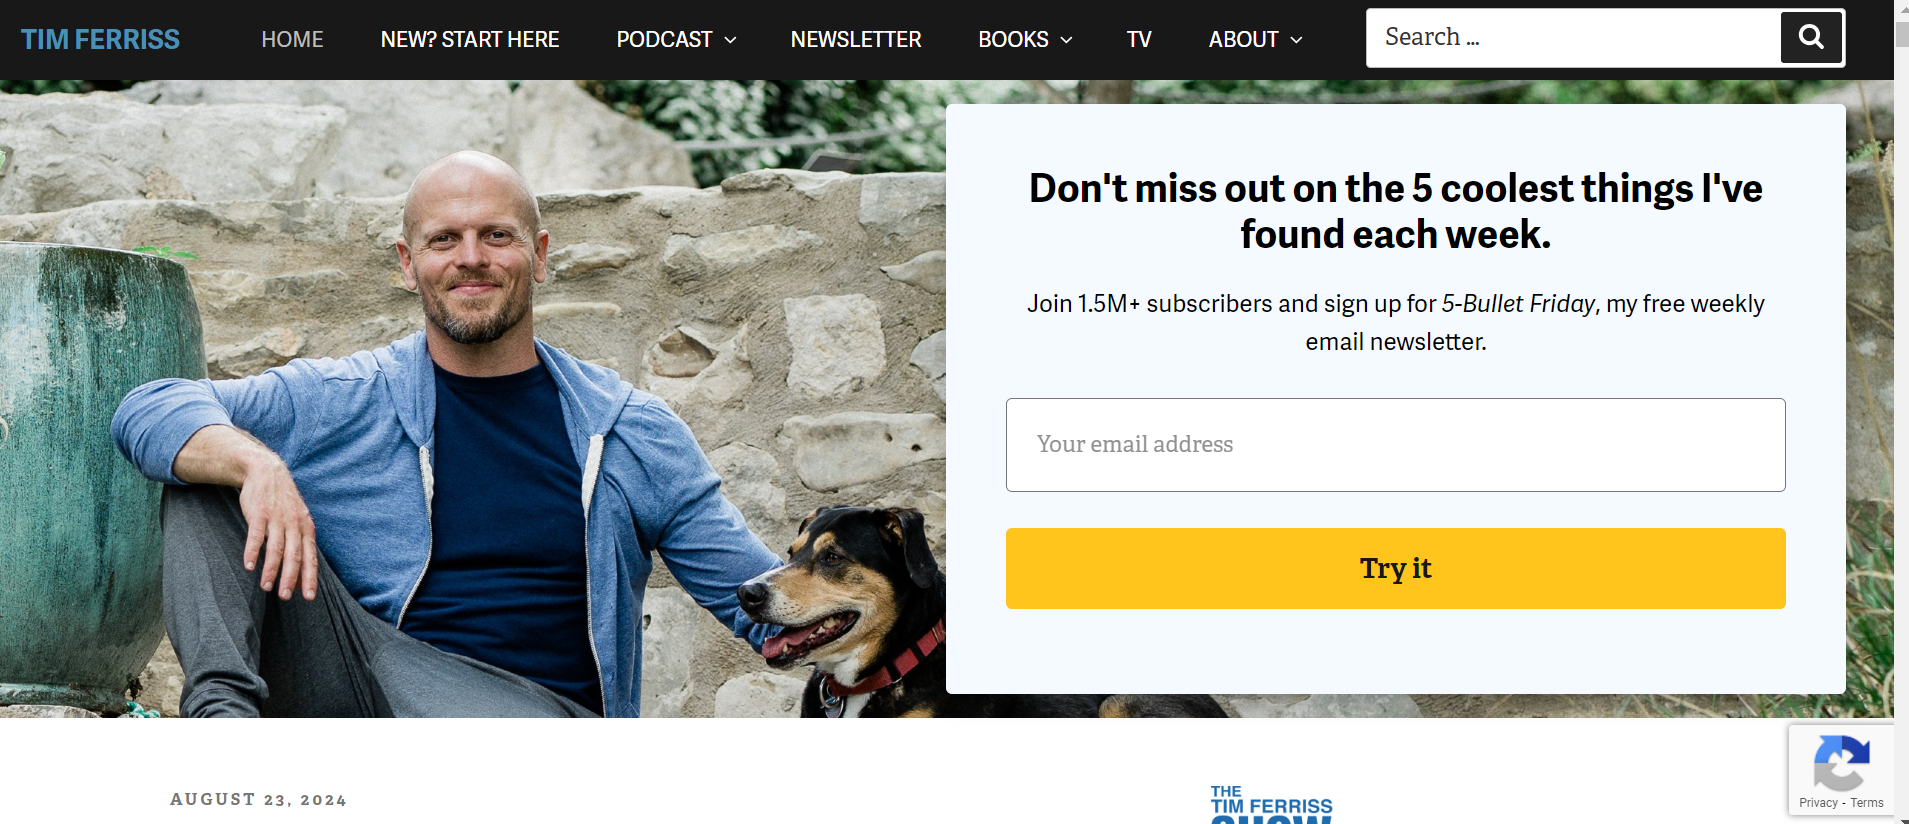
Tim Ferriss has effectively combined blogging with selling his products to build a successful career. His blog, The Tim Ferriss Show, provides valuable content on productivity and personal development, attracting a large audience.
He complements this with physical products related to his books and themes, such as fitness gear and merchandise.
By integrating his blog with product sales, Tim has created a strong brand that offers both insightful content and practical solutions.
Creating your products or services takes time and effort, but the rewards can be significant.
Chapter Thirteen
Track Your Website’s Performance With Google Search Console and Google Analytics
Learn Google Search Console
Google Analytics: what these are,
and their importance for SEO and
a website.
Let’s delve right in.

What Is Google Search Console?
Google Search Console is one of the free tools that can be used by website owners to monitor the site’s performance in Google searches.
It is useful for understanding search traffic, the condition of the site, and the possibility of optimization in some aspects.
Why is Google Search Console Important?
Google Search Console is a tool that cannot be denied to website owners.
Its functions include site health checks and comparisons with competitors, analyzing search traffic and queries, preparing for optimization, and getting alerts.
It is crucial to analyze the ways Google covers your site view and enhance its effectiveness.
Setup Your Google Search Console
To set up your Google search console, visit it.
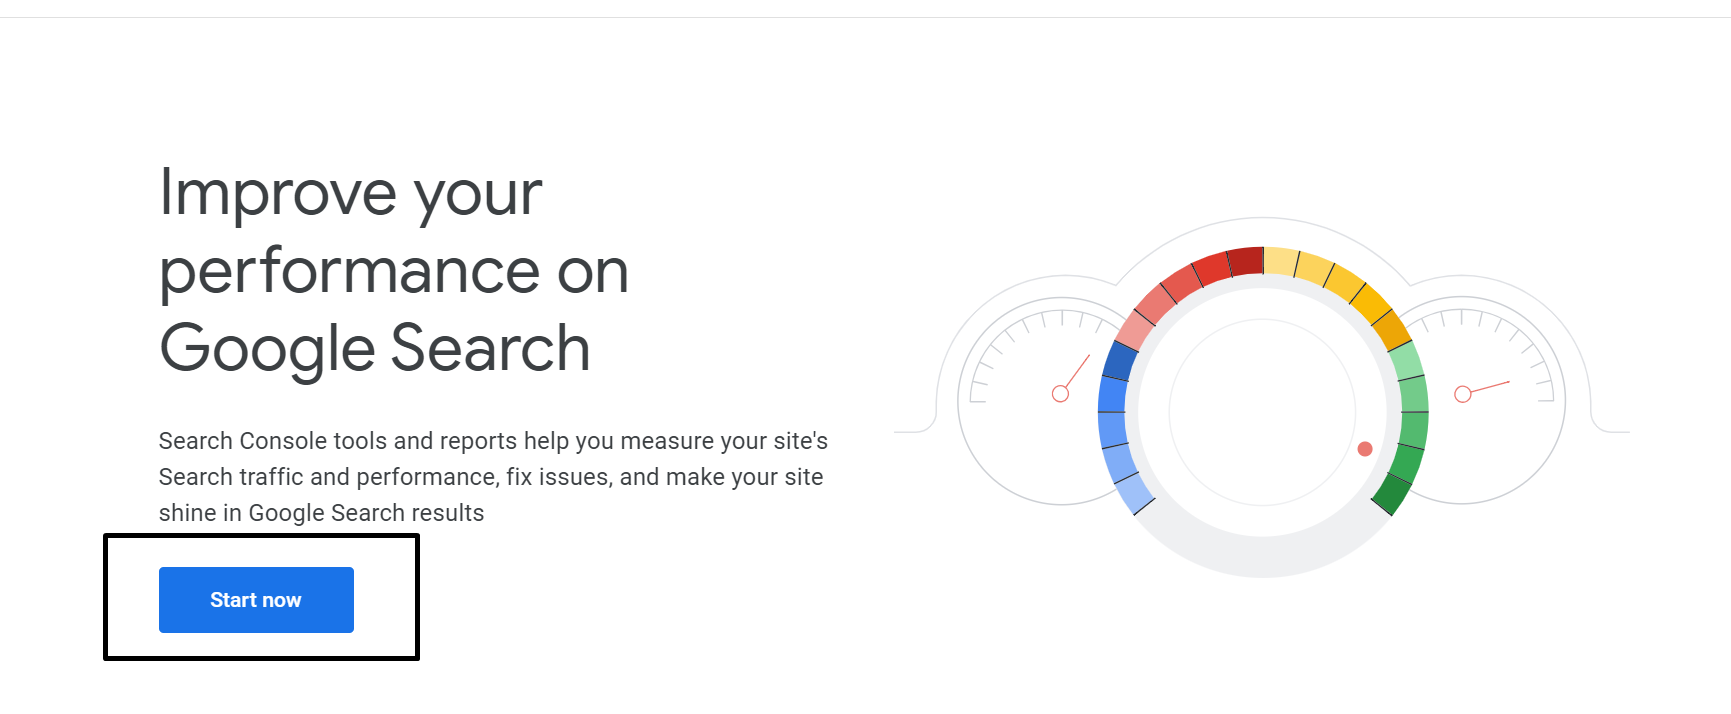
Then you can see this page like this and click on the Start Now button.
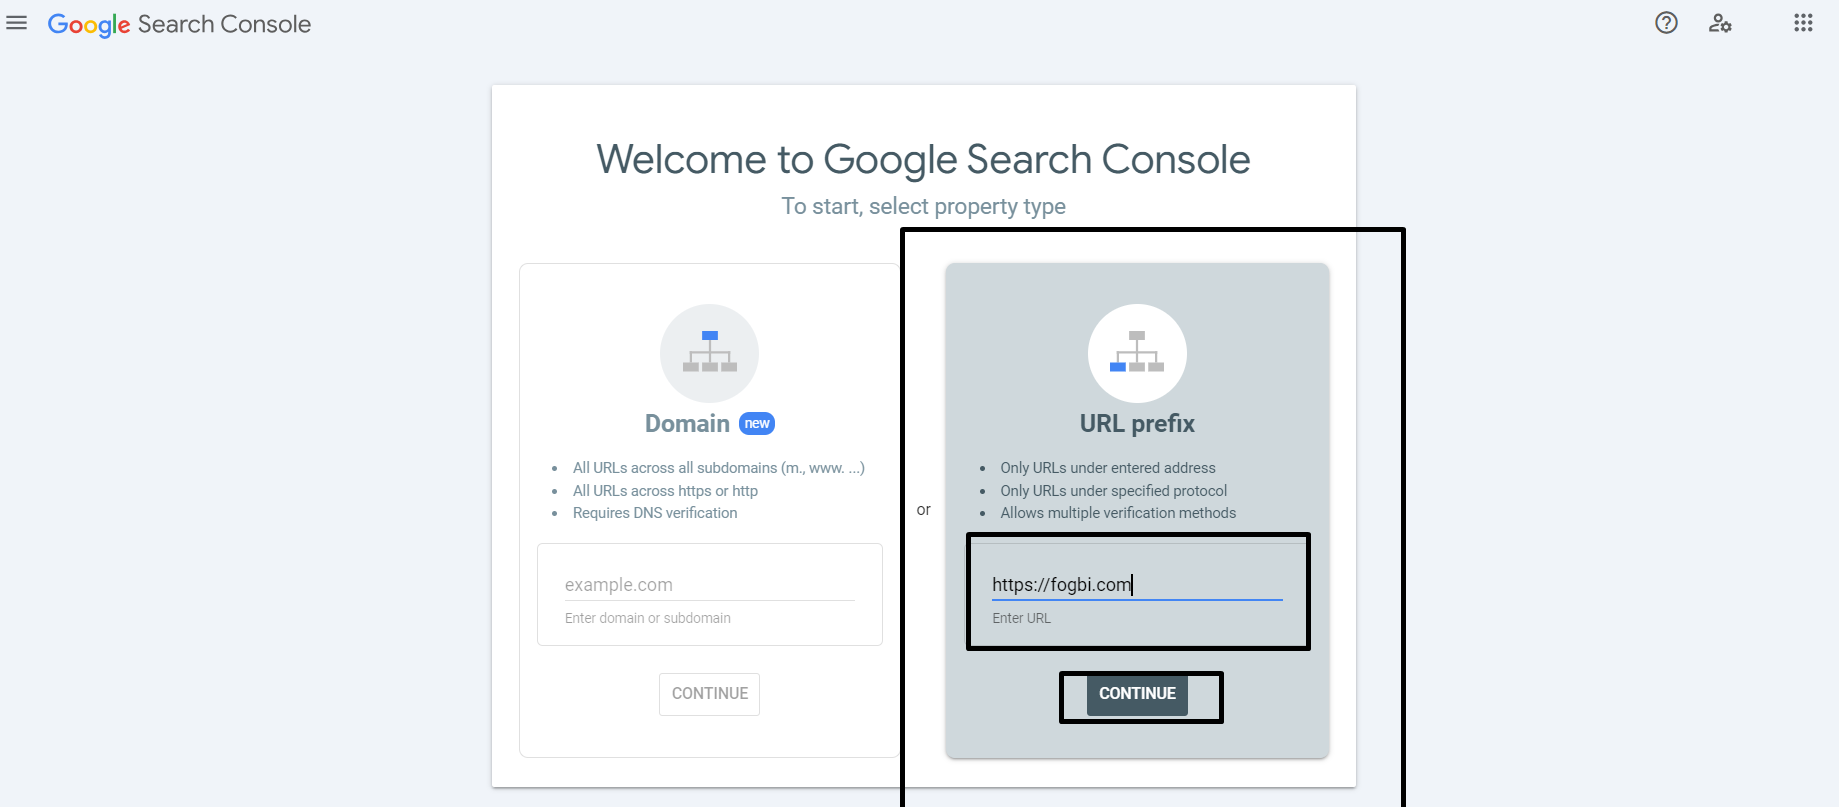
After clicking on it, you can see this page. Here, paste your website URL and click on continue.
Now this page comes.
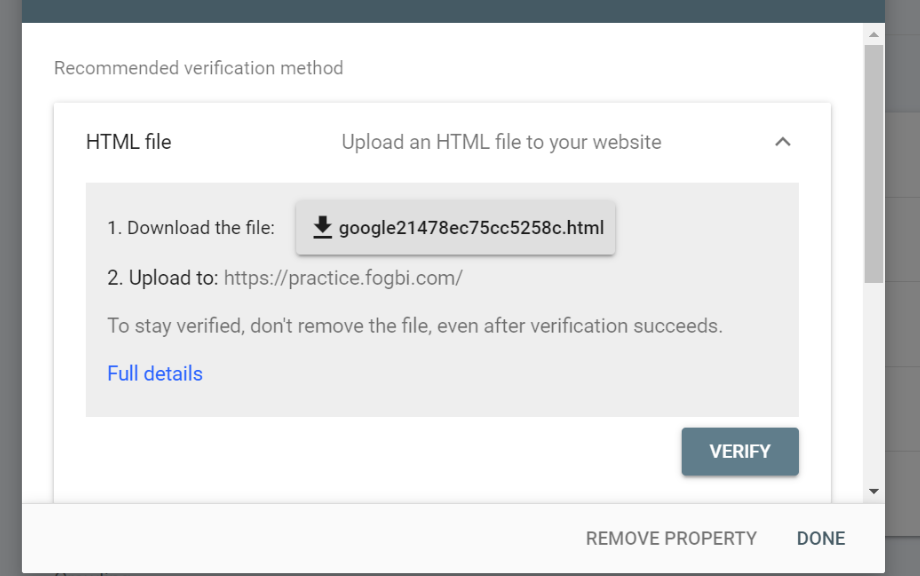
Just scroll down a little bit.
You can see it like this. Here, click on the HTML Meta.
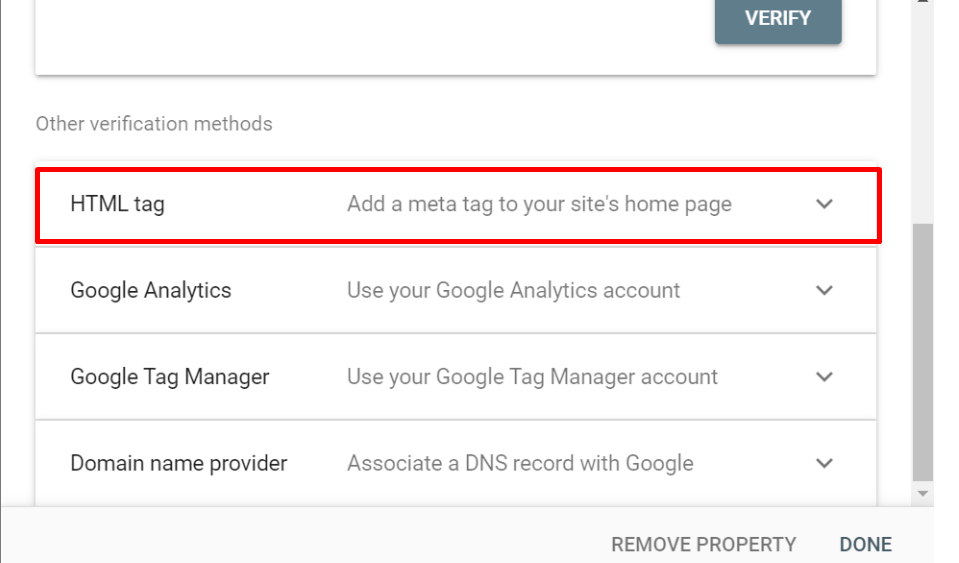
After clicking on it, you see something like this. Here, just click on the copy like this.
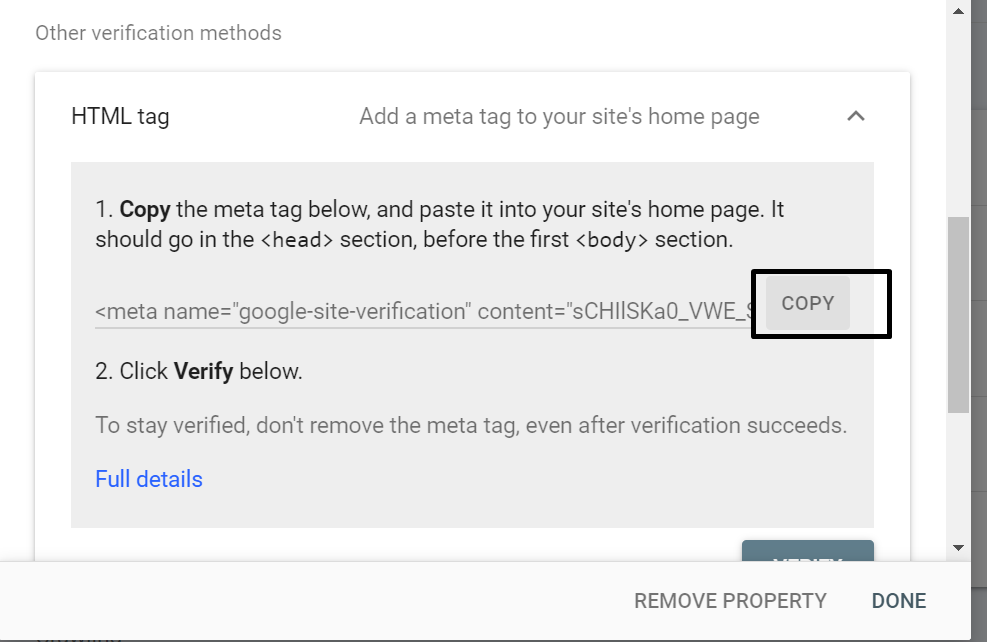
Then log in to your WordPress blog website.
Go to Appearance, then theme file editor like this.

Then look for header.php.
Next, look for the starting head on the left side. And paste your copied code here like I did.
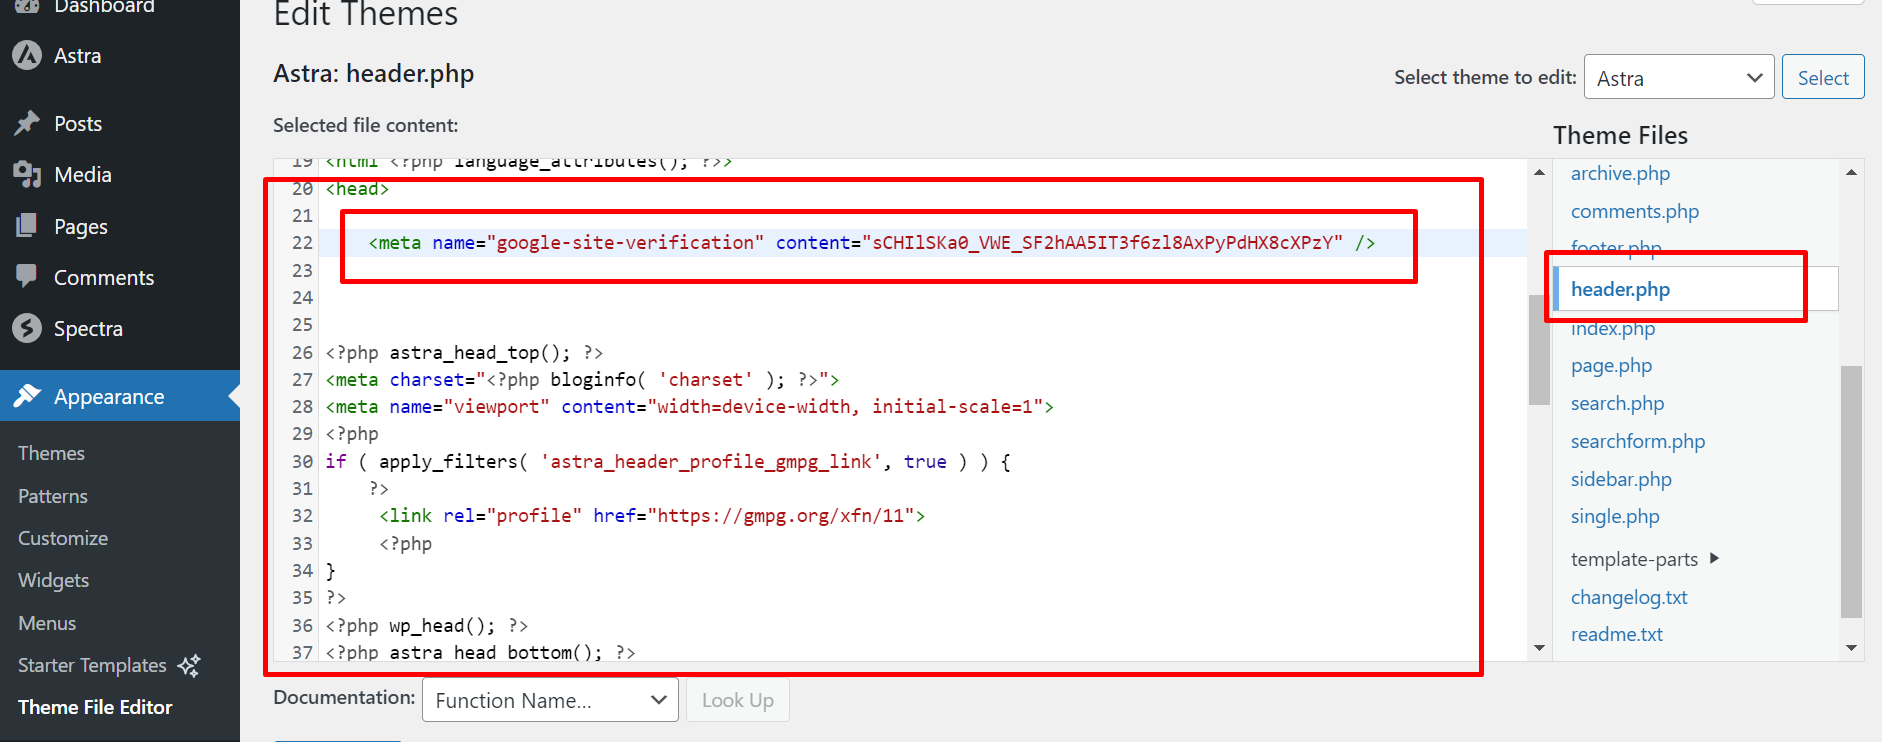
Then scroll down a bit and click on the update file button.

Now come back to the Google search console and click on the verify button.
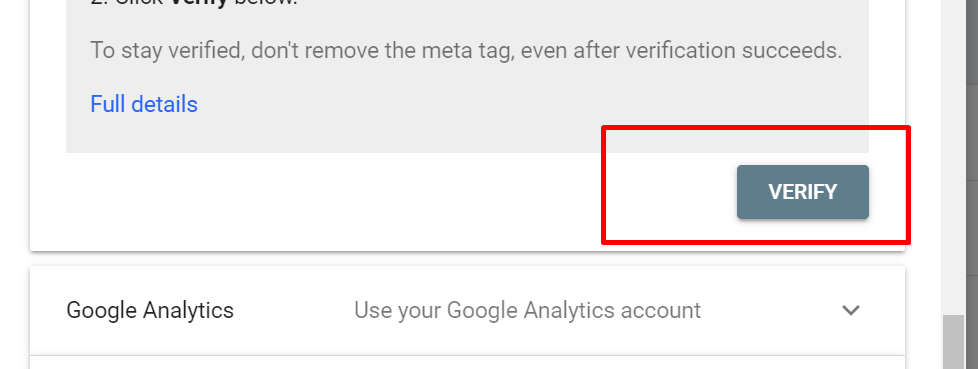
Boom,
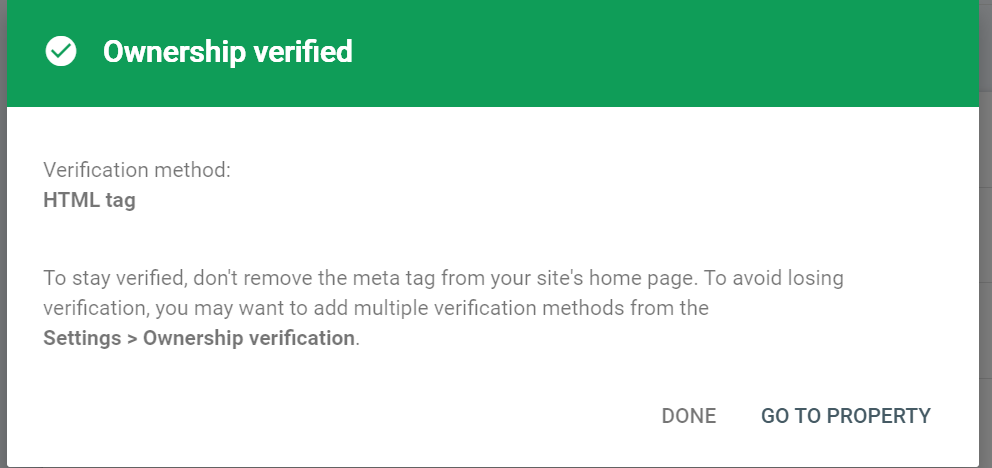
Your ownership is verified.
Just click on Go to Properties.
Here you can see everything about how your blog website is performing.
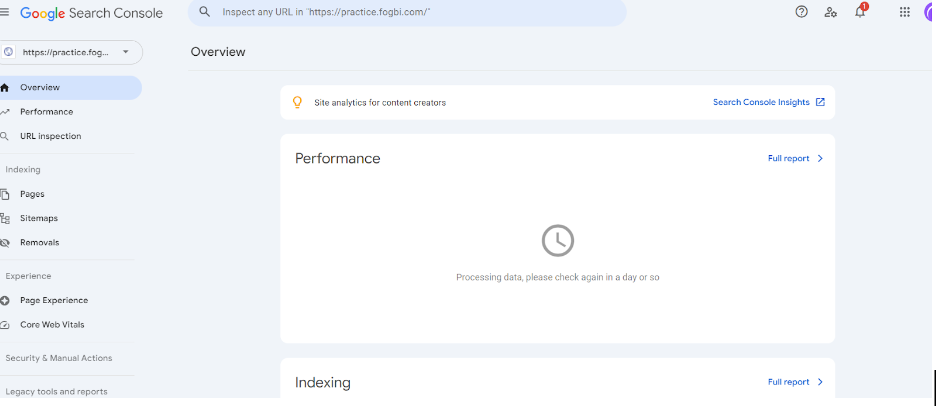
I will make videos about it in detail later.
But till now, it is enough to create and see the performance.
So keep updated with me.
Well done
That’s it all about Google Search Console.
You have successfully set up your Google search console.
Now it is time for…
What Is Google Analytics?
Google Analytics is a web analytics tool that stats and analyzes website traffic based on user actions.
It assists with evaluating audience demographics and even how your website is functioning.
Why Is Google Analytics Important?
Google Analytics is an essential tool that allows you to track your audience and enhance your site.
It monitors traffic, user behavior, and marketing success.
Set up Google Analytics
To set up Google Analytics, visit it.
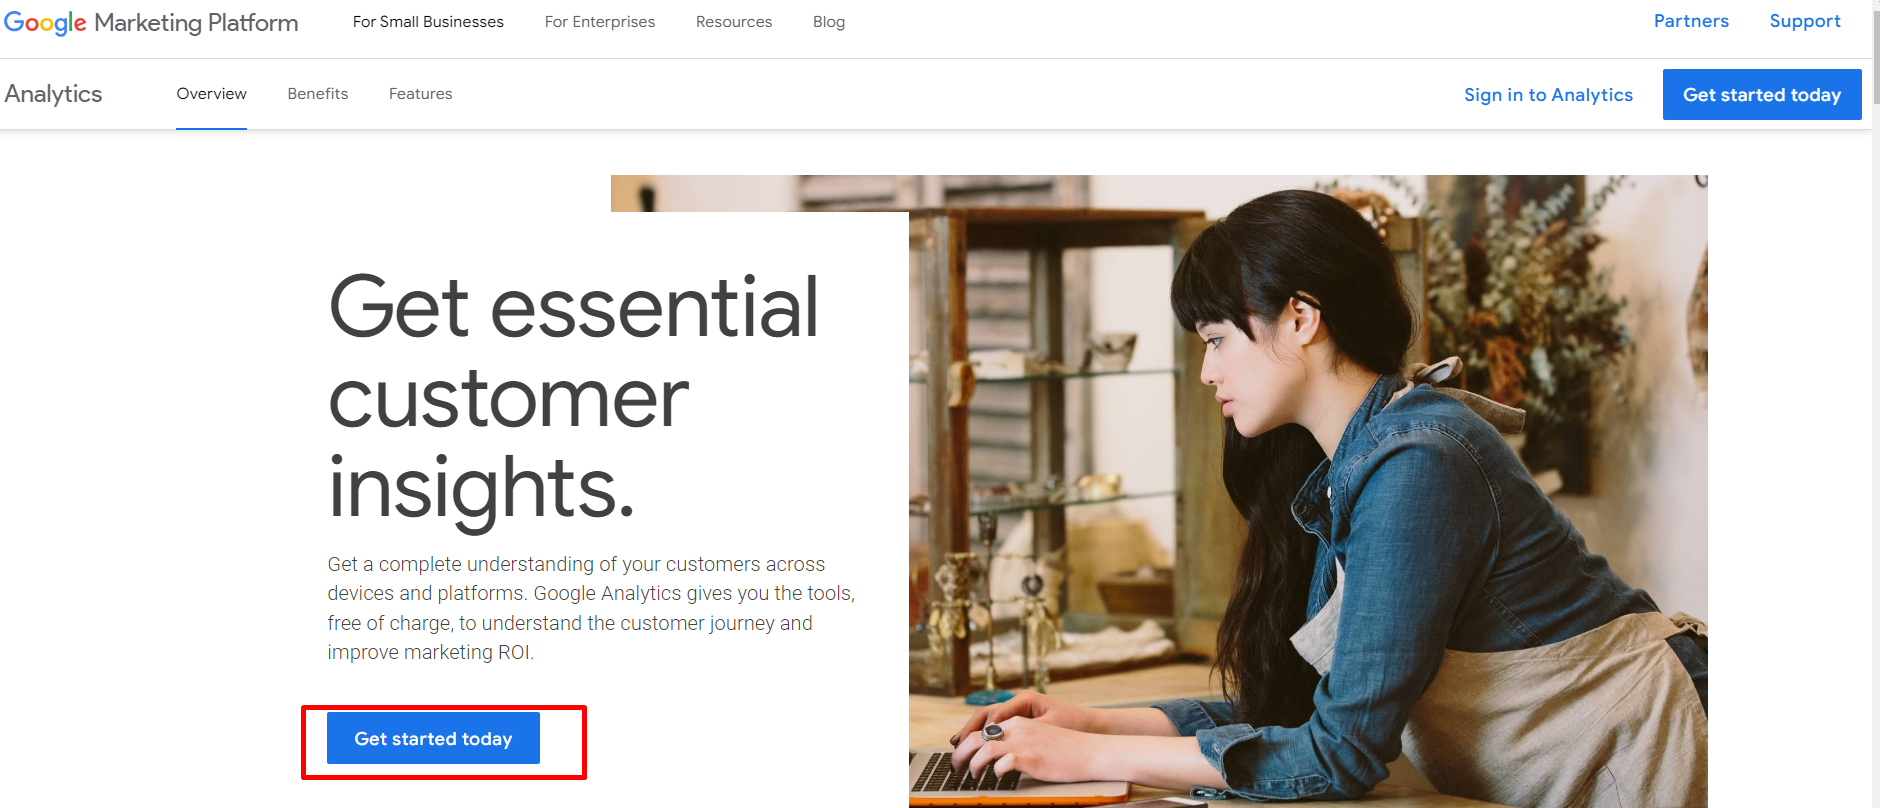
Here you see something like this.
Click on the Get Started Today button.
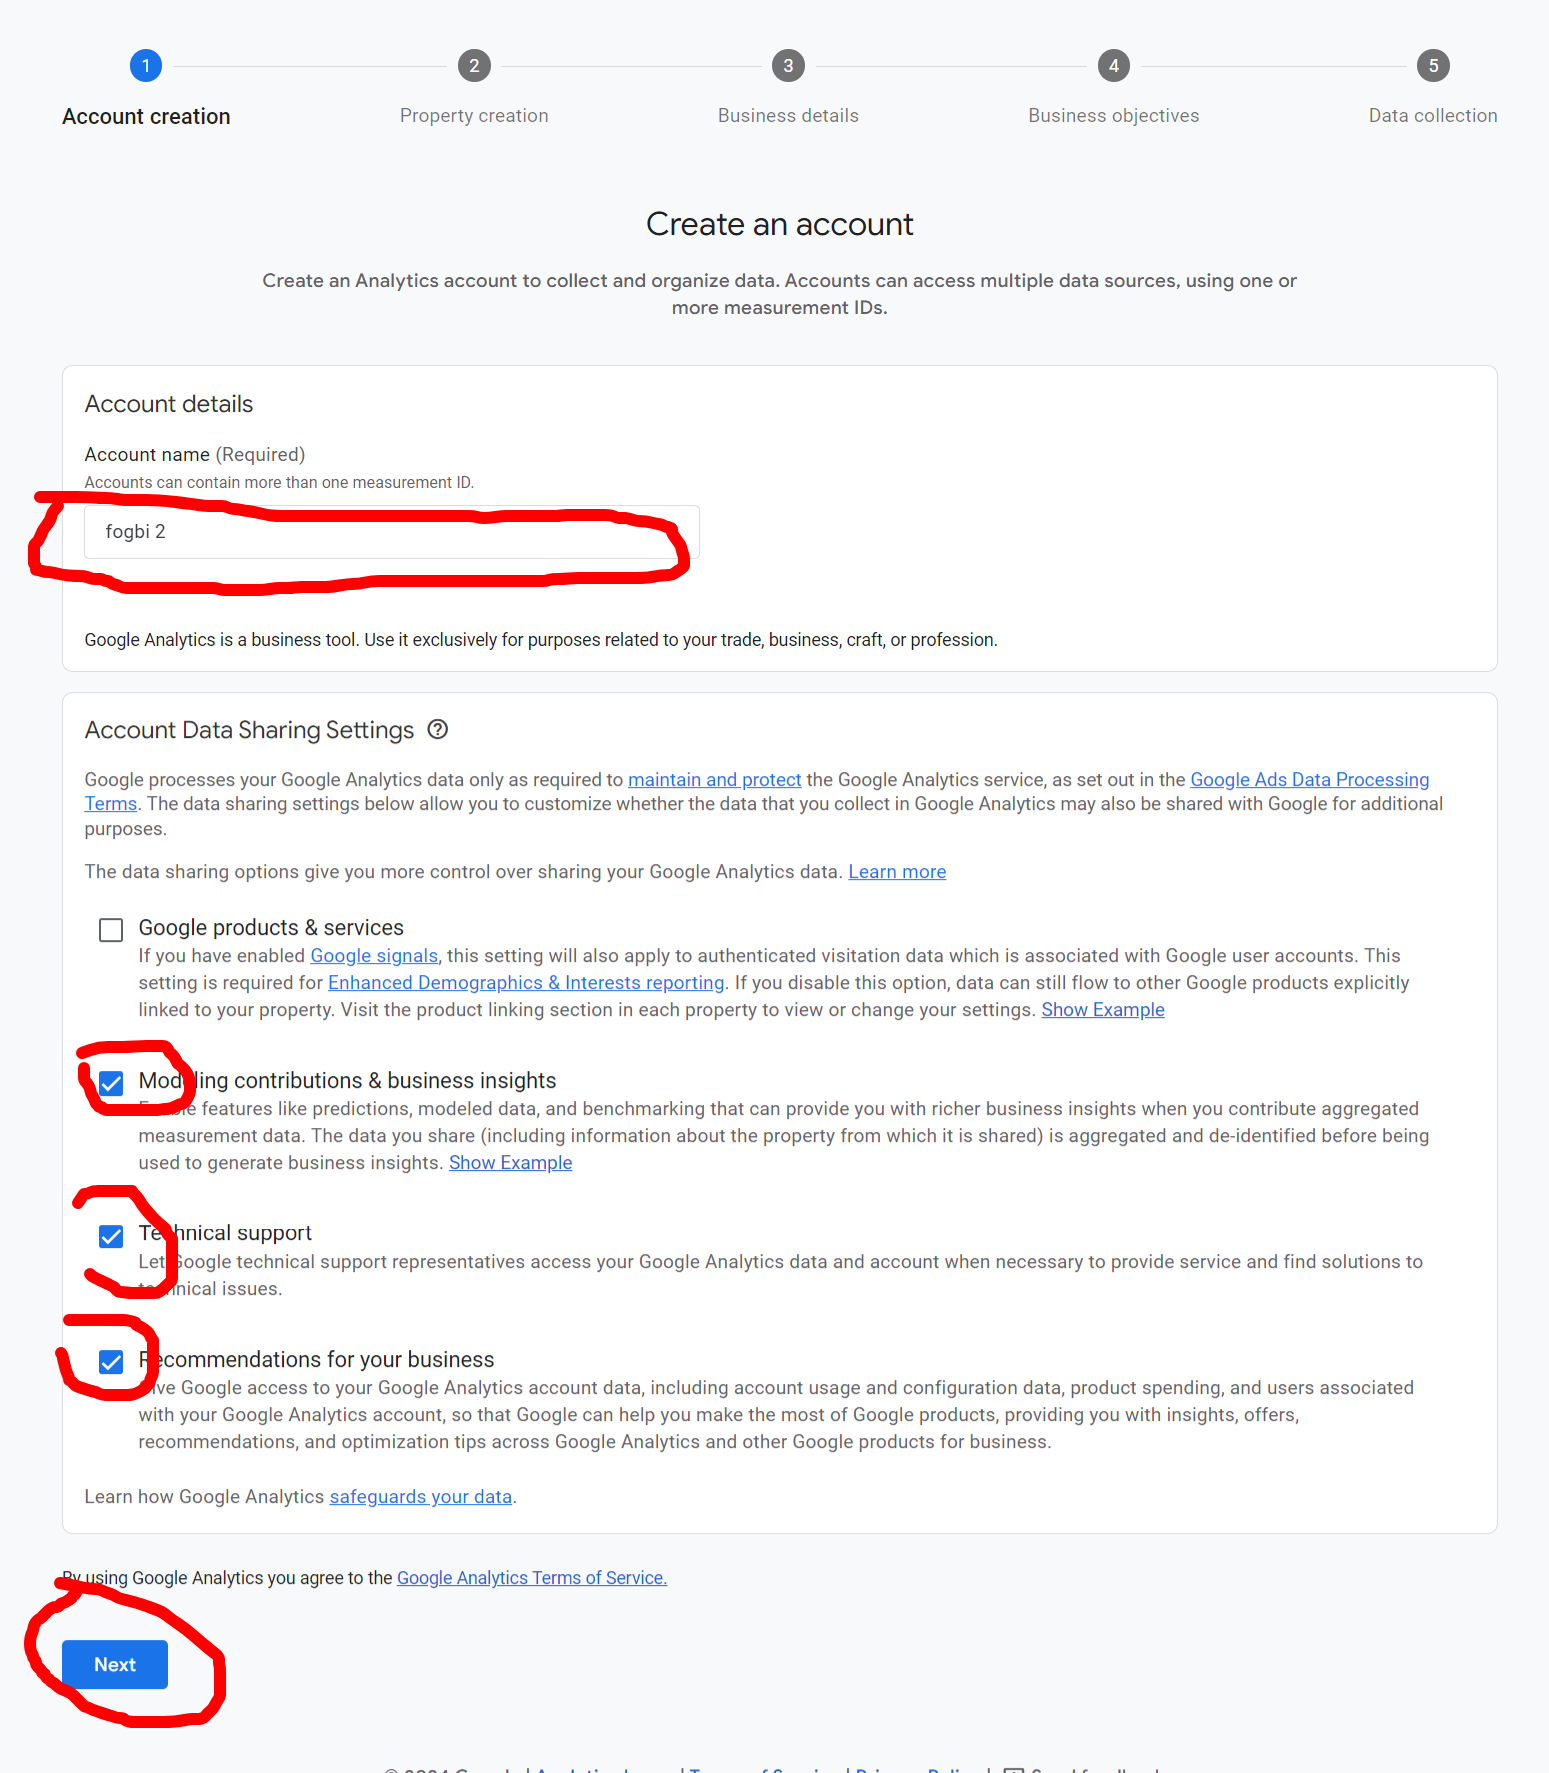
You can see this page here. write an account name (anything), check the boxes, and click on the Next button.
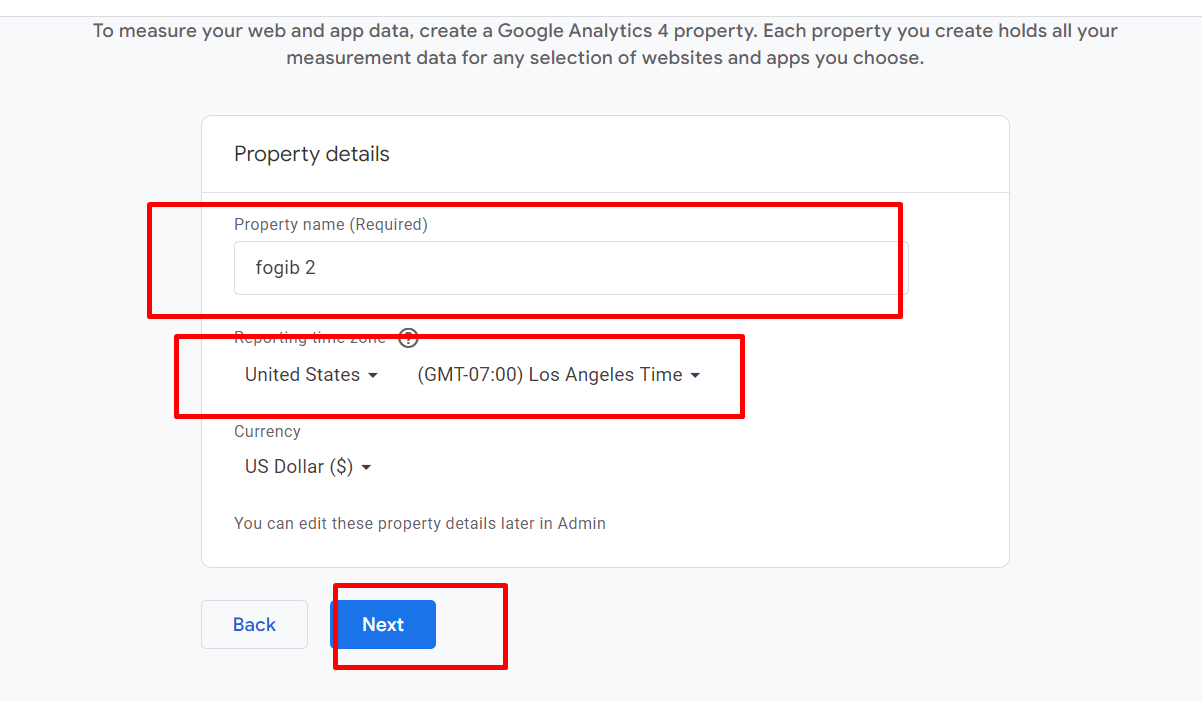
Now this page comes. Here, write your property name (anything) and click on next.
Now describe your business.
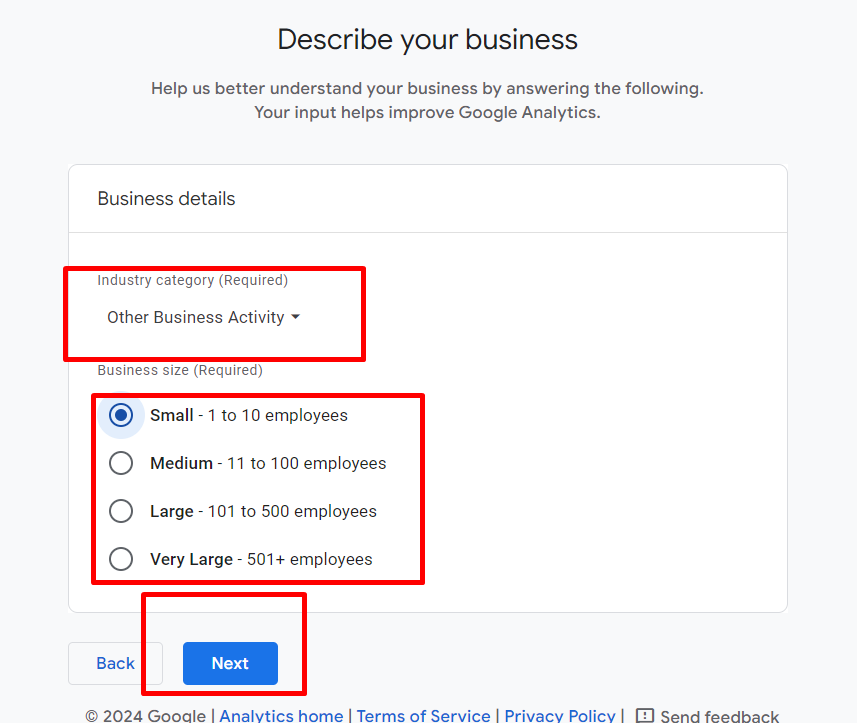
Then select and click on Create.

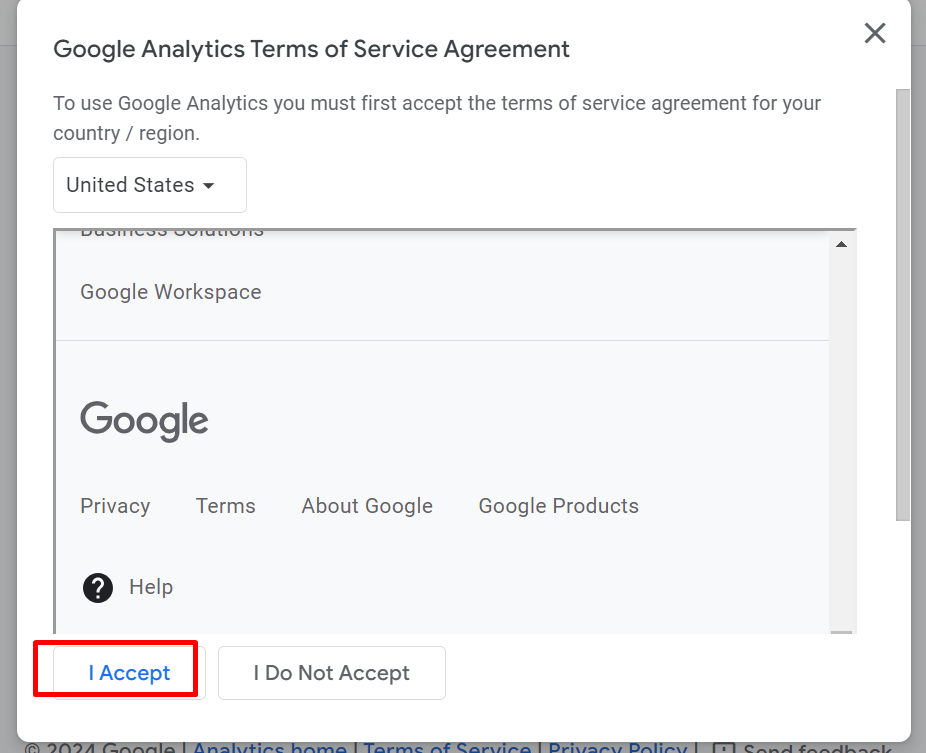
Accept the terms and conditions
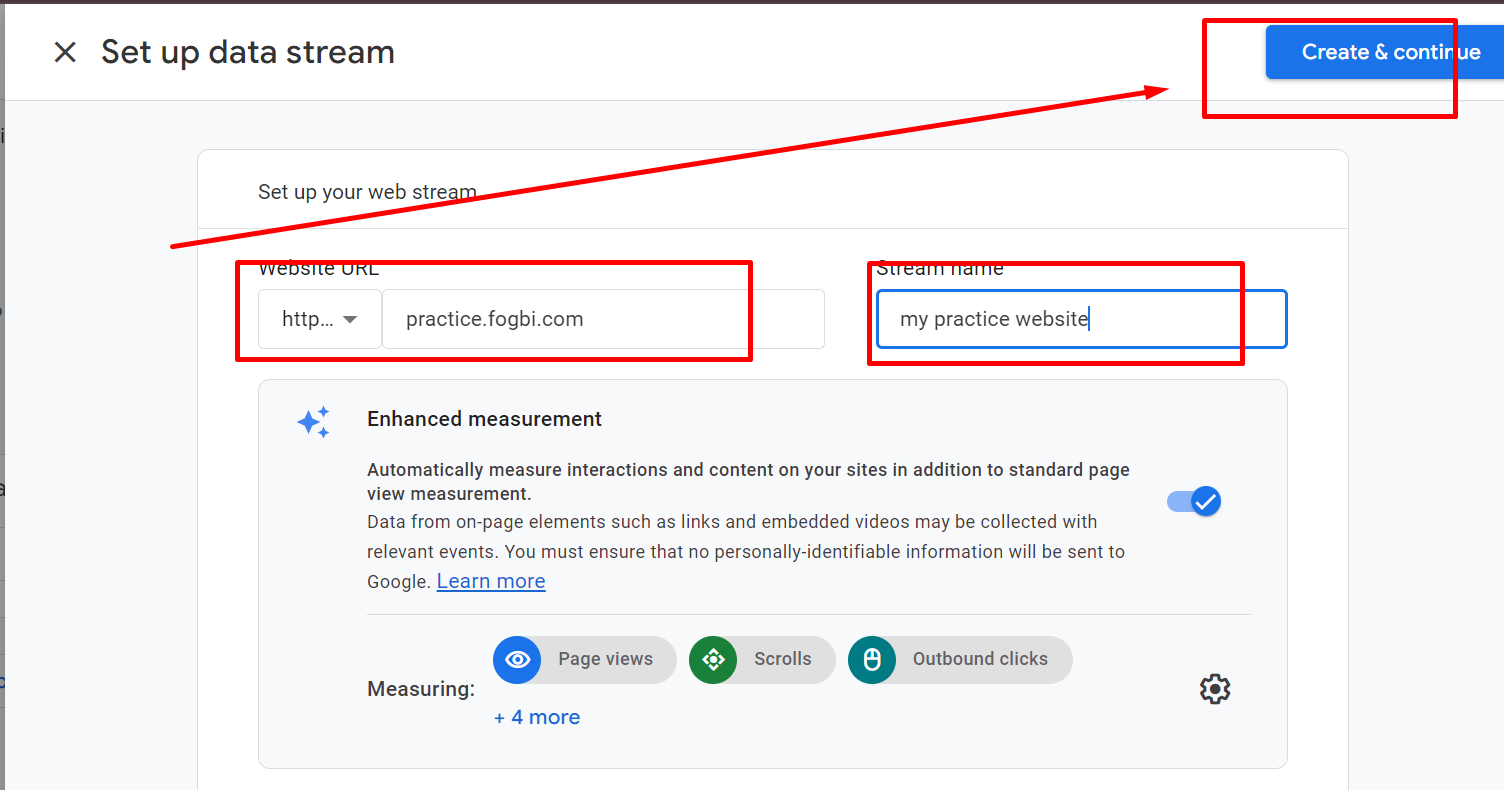
Click on the Web button.

You see, I have added my website and named my site, then clicked on the Create and Continue button.
Now you can see this page. Here, click on the Copy button.
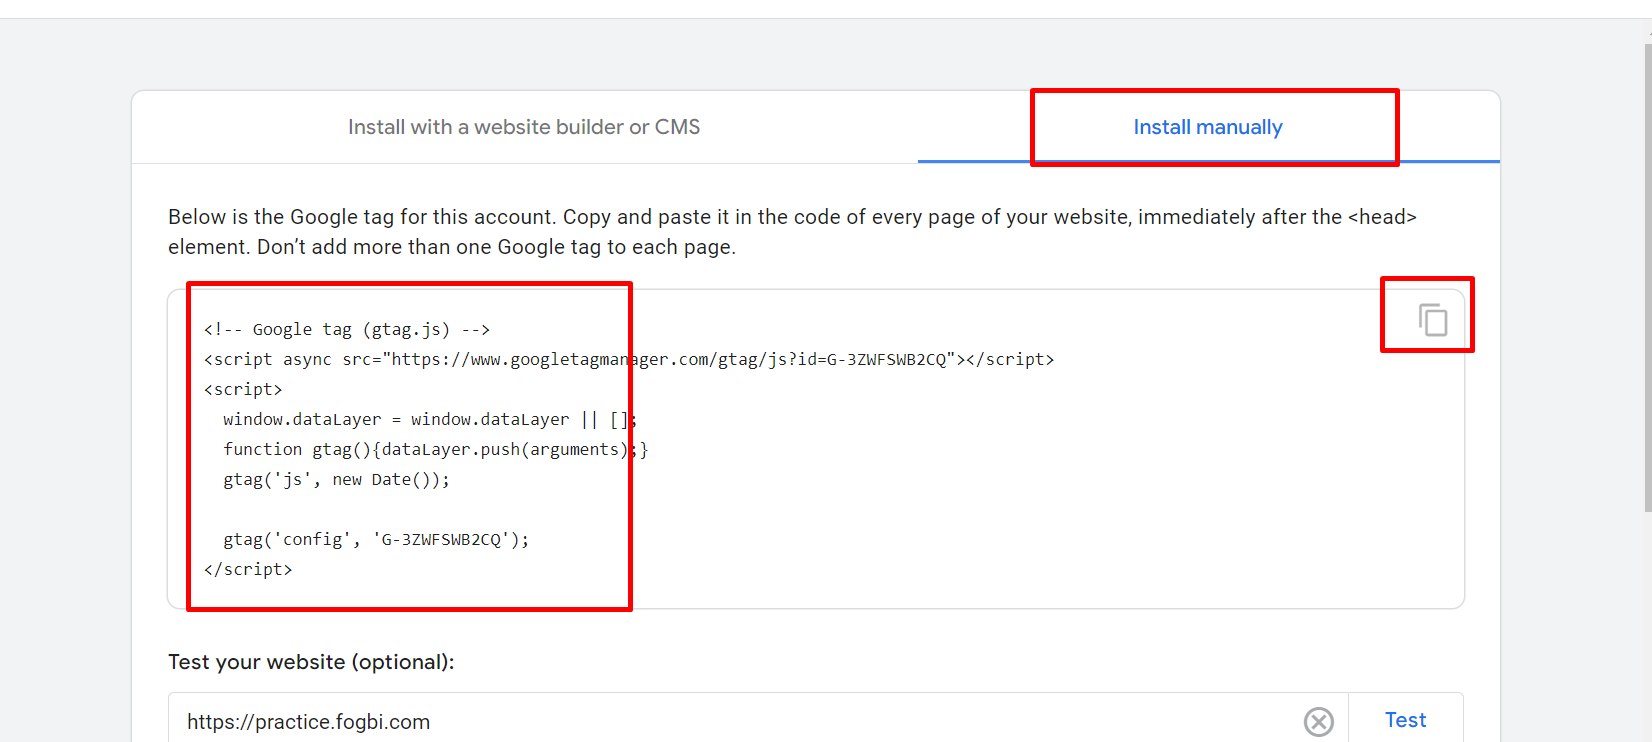
Then, like Google Search Console, you have to paste this code in the head section under the header.php. Next update file.
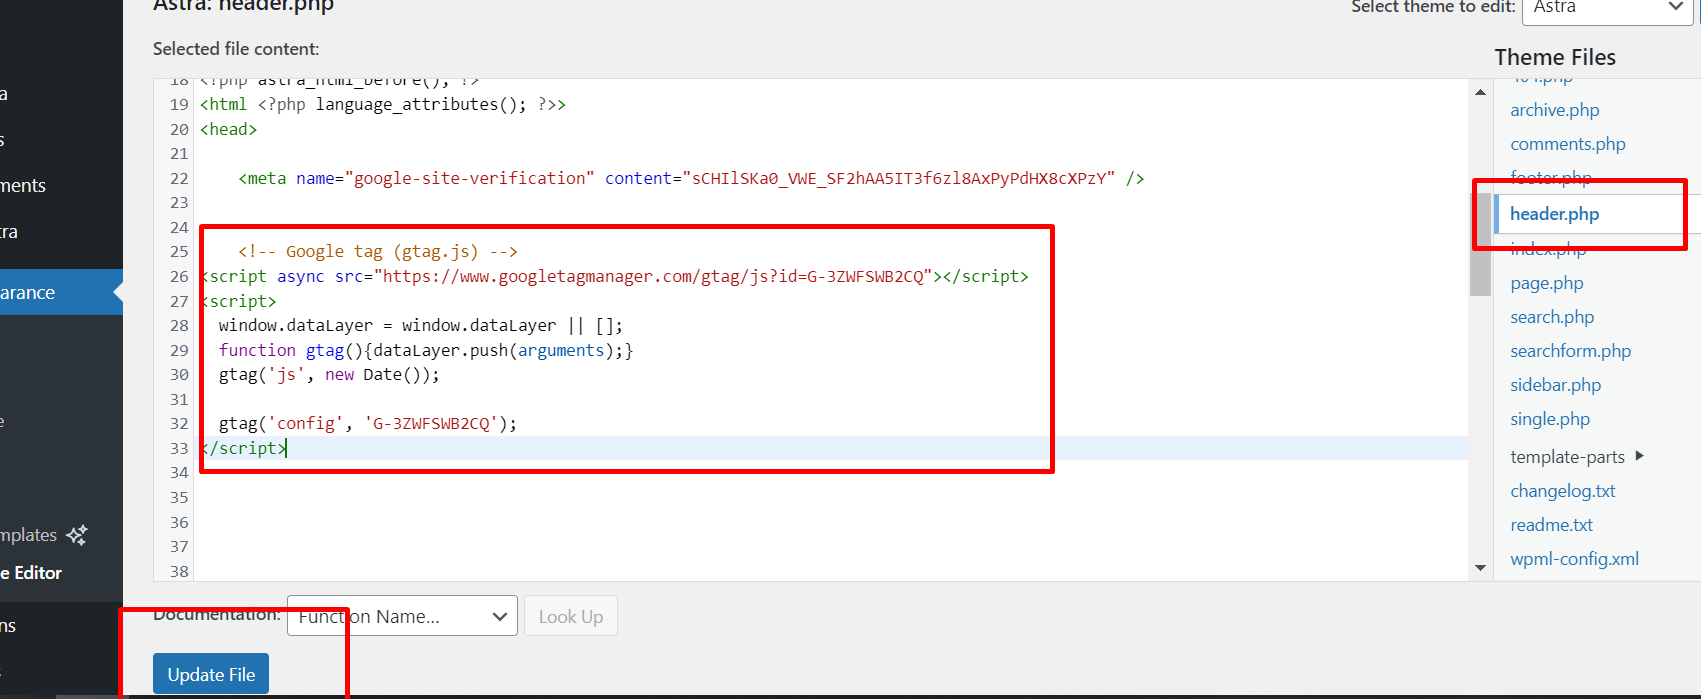
That’s all about Google Analytics.
Now you can track everything on your website in Google Analytics like this.

Hey, well done.
You have successfully set up Google Analytics.
Now it is time to know
The Difference Between Google Search Console and Google Analytics
- Google Analytics monitors and reports demographic information of the user on your site, origin leads to that page, and much more.
- Google Search Console helps in viewing how your site is ranked on the search engine, the search queries by users, and other related behaviors of the users on the site.
Chapter Fourteen
Best Practices For A WordPress Blog Website
You need to know these must-require
strategies and tactics.
It helps you grow your blog Fast.
Staring with…

Analyzing Traffic and Engagement
Understanding your blog’s performance starts with analyzing traffic and engagement.
Use tools like Google Analytics to monitor key metrics.
These metrics will guide your decisions and highlight areas for improvement.
- Pageviews: Track the number of times visitors view your pages. High page views indicate popular content.
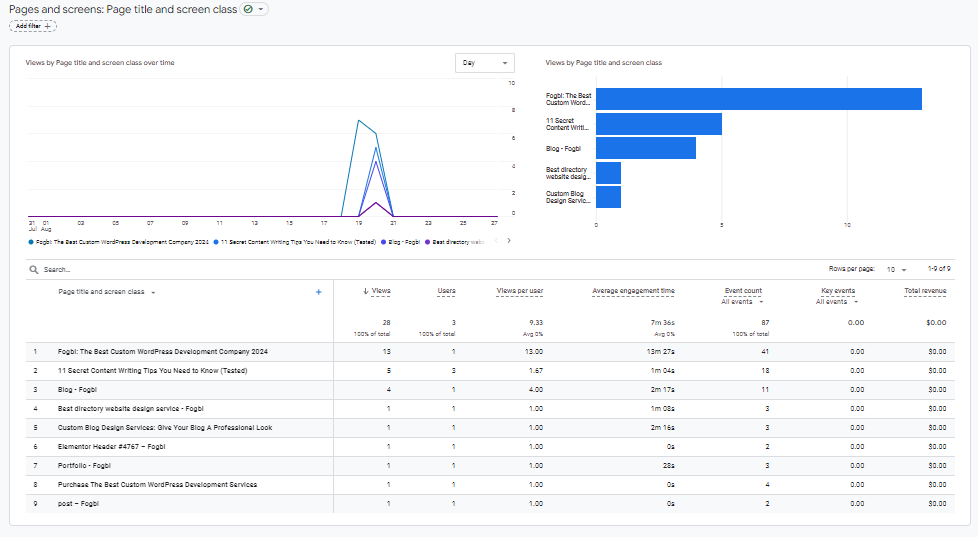
- Unique Visitors: Count the number of distinct individuals visiting your site. More unique visitors mean a broader reach.
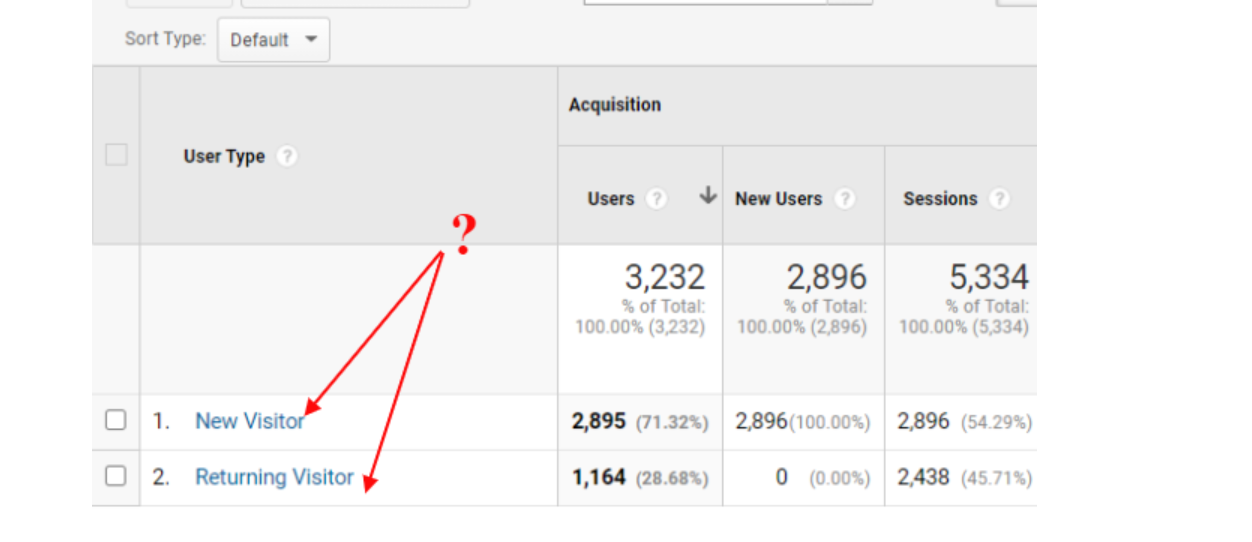
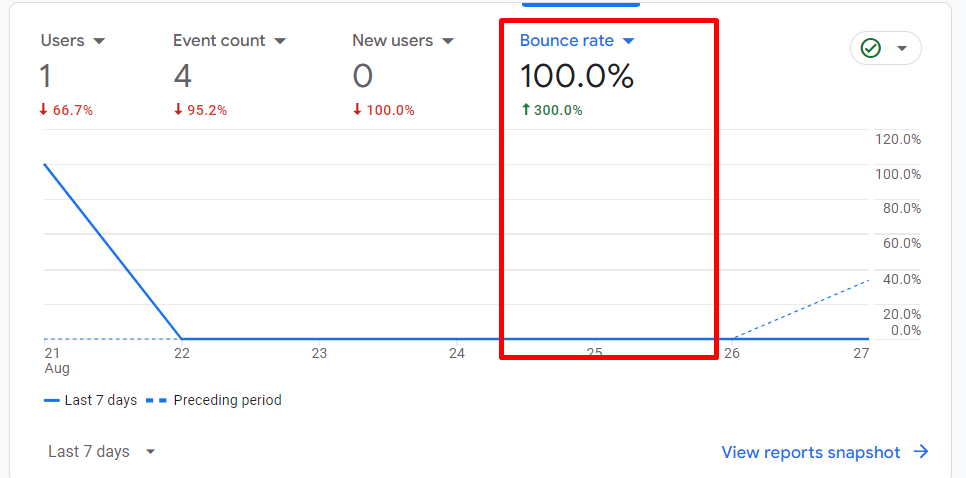
- Bounce Rate: Measure the percentage of visitors who leave after viewing just one page. A high bounce rate suggests that your content may not be engaging.
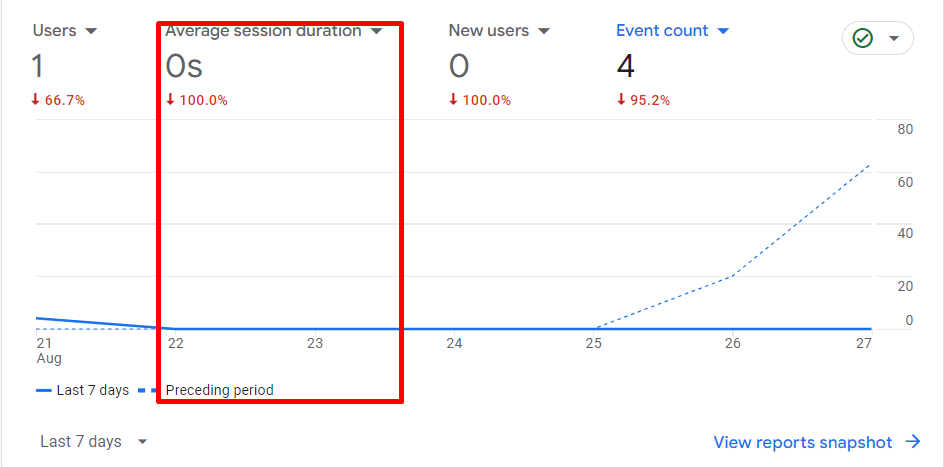
- Average Session Duration: Calculate the average time visitors spend on your site. Longer sessions usually indicate more engaging content.
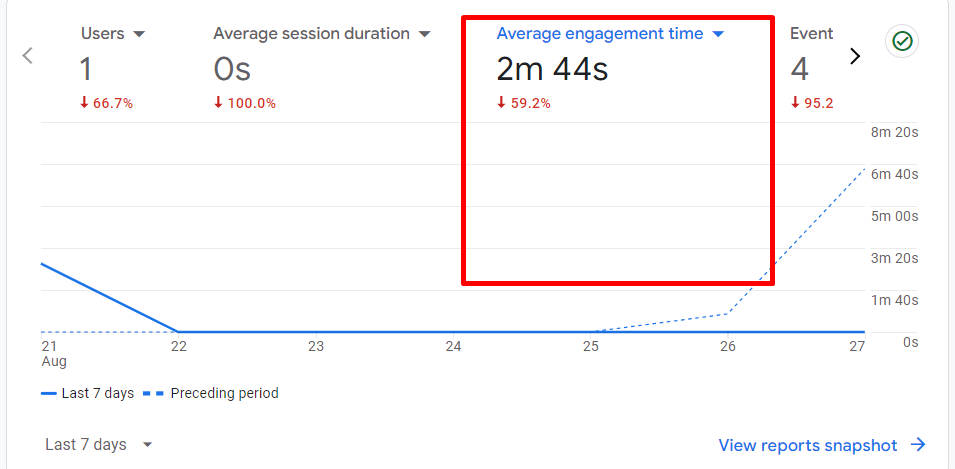
- Average Engagement Time: Track the average engagement time. More engagement time suggests good navigation and engaging content.
Engagement metrics are also critical:
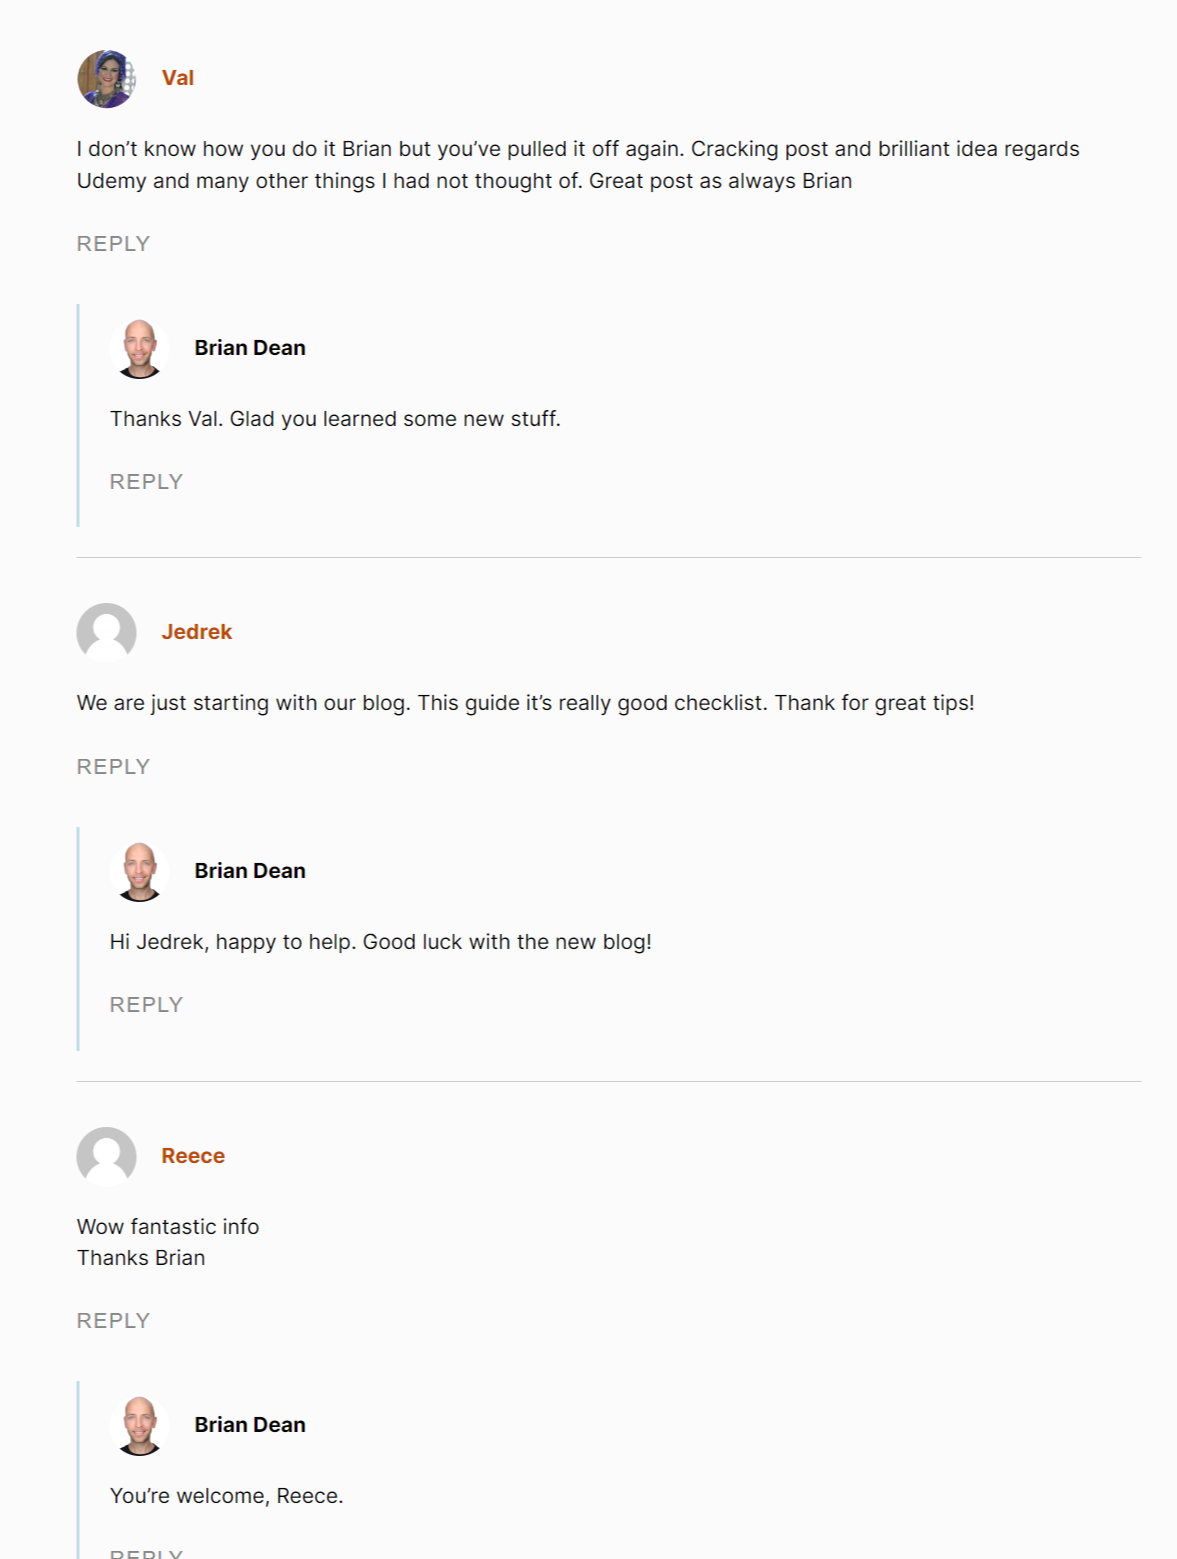
- Comments: Monitor the number and quality of comments on your posts. Active discussions show strong reader interest.
- Social Shares: Track how often your content is shared on social media. High shares expand your reach and boost credibility.

- Subscriber Growth: Measure how your email or RSS subscriber list grows. More subscribers mean more loyal readers.
This visual is from MailChimp.
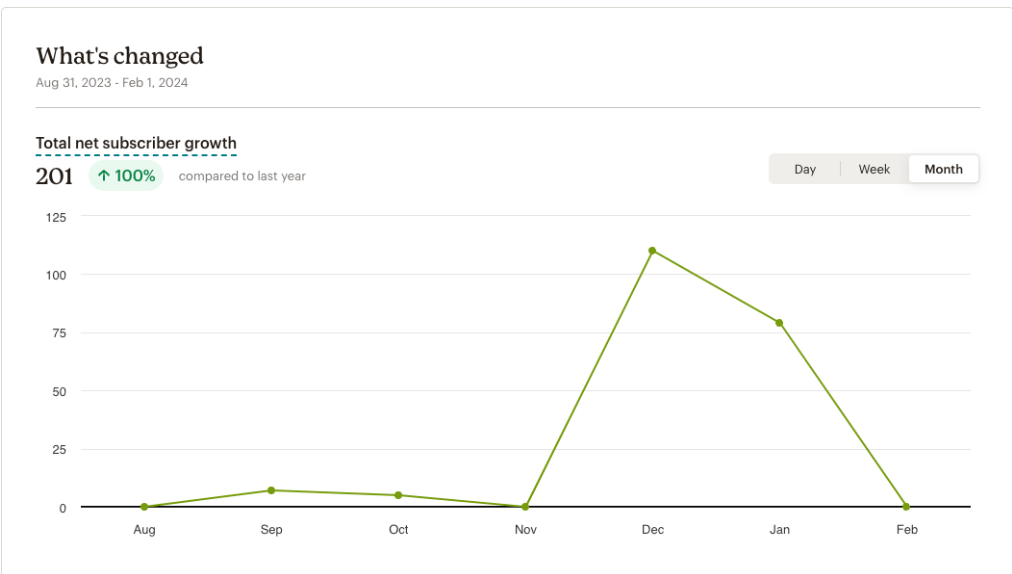
Regularly review these metrics to understand your audience better and improve your content strategy.
Setting Realistic Goals

Setting realistic goals is crucial for your blog’s success. Start by defining what you want to achieve and ensuring your goals are specific, measurable, achievable, relevant, and time-bound (SMART).
Here’s a table of sample goals:
Goal | Description | Timeframe |
Increase Traffic | Boost monthly visitors by 20%. | 3 months |
Engage Readers | Get 50 comments per post. | 6 months |
Grow Subscriber List | Add 500 new email subscribers. | 6 months |
Break down your larger goals into smaller, manageable tasks:
- Research Keywords: Find keywords that your target audience searches for.
- Create content: Write blog posts optimized for your chosen keywords.
- Promote Your Blog: Share your posts on social media and engage with readers.
- Analyze performance: Use analytics tools to track progress and adjust your strategy.
Regularly review and adjust your goals based on your blog’s performance and evolving objectives.
Adapting Your Strategy

Your initial strategy may need adjustments as you learn what works and what doesn’t.
Use your analytics data to identify trends and areas needing improvement.
Here are steps to adapt your strategy effectively:
- Review Performance: Look at your metrics to see which posts perform well and which don’t.
- Identify Trends: Spot trends in your data, such as topics that get more engagement.
- Experiment: Try different content formats, posting times, and promotional tactics.
- Listen to feedback: Pay attention to reader comments and suggestions.
- Update Content: Regularly refresh old posts with new information and updated SEO practices.
Adapting your strategy is an ongoing process.
Stay flexible and be willing to make changes based on your analysis and goals.
Continuously refine your approach to keep your audience engaged and grow your blog.
Managing Time And Resources

To stay consistent, you need to manage your time and resources efficiently.
Here are some tips to help:
- Create a content calendar: plan your posts to avoid last-minute stress.
- Set specific blogging hours: Dedicate certain hours of the day to writing, editing, and promoting your blog.
- Utilize tools: Tools like Trello, Asana, and Google Calendar can help you stay organized.
Here’s an example table to help you allocate your time effectively:
Task | Time Allocation |
Writing | 40% |
Editing | 20% |
Promoting | 30% |
Networking | 10% |
By following these tips, you can make the most of your time and resources, ensuring your blog stays on track.
Overcoming Challenges

Blogging is not without its challenges.
Here are some common obstacles and how to overcome them:
- Writer’s block: Take breaks, read other blogs, and brainstorm new ideas to get inspired.
- Technical issues: Keep your software updated and seek help from online communities when needed.
- Lack of motivation: Set small, achievable goals and reward yourself for meeting them.
Consider using an ordered list to tackle challenges step-by-step:
- Identify the challenge.
- Brainstorm possible solutions.
- Implement the best solution.
- Evaluate the outcome and adjust as needed.
By addressing challenges systematically, you can keep your blog moving forward.
Celebrating Milestones

Celebrating milestones can keep you motivated and engaged.
Here are some ways to celebrate:
- Share achievements: Post about your milestones on social media, and thank your readers.
- Reflect on progress: Look back at how far you’ve come and set new goals.
- Reward yourself: Treat yourself to something special when you reach a milestone.
Tracking milestones can be made easier with a simple table:
Milestone | Reward |
first 100 visitors | Coffee from your favorite cafe |
first 10 blog posts | Buy a new book. |
first guest post | Dinner out |
By celebrating your milestones, you stay motivated and enjoy the journey of blogging.
Chapter Fifteen
More Plugins You Need To Manage A WordPress Blog Site
Now I’m showing you which
Plugins you need to manage
A WordPress blog website
Easily.
The free version is more than enough.
Keep reading….

Backup: Updraftpluss
UpdraftPlus is indeed an effective and reliable plugin when it comes to the backup of WordPress. Freeware version with limited functionality. Premium begins at $70/year for superior features.
Security: Susuri Security

Elementor is a WordPress plugin that helps users create web pages through the use of a drag-and-drop interface. Design your layouts without having to write a line of code. Partially free with upgrade options to premium plans.
Traffic and Subscribe: PushEngage
PushEngage is a WordPress push notification service. It helps you to be able to send push notifications to the people who visited your site and who are now on other platforms. This can assist in raising participation and sales. The application is free to use, and there is also an option to upgrade to premium to unlock additional features.
EmailMarketing: Mailchimp
Mailchimp is one of the most effective tools for creating and managing email campaigns in WordPress. A simplistic achievement that can let you craft and share newsletters, monitor campaigns, and work with lists. The service is free for the first 2000 subscribers. Payment plans are available for additional features and for those who want to manage more subscribers.
Form: WPforms
WPForms, as the name suggests, is a form builder plugin for WordPress. Free version. Premium plans are available.
Protect Spam Comments: Akismet
WooCommerce is a leading store-building tool for WordPress users among all the eCommerce platforms. It enables you to build and operate internet shops for selling goods and services, including tangible and intangible ones. The terms of the software are the free version with some basic functionalities. For enhanced functionalities and third-party access, premium extensions are offered.
Affiliate Marketing: Thirsty Affiliates

Thirsty Affiliates is a professional link manager for WordPress. Affiliate links can be quickly set up and hidden for better tracking and branding purposes. This can help you earn commissions from promoting other people’s products or services—a free version with basic features. Integrated and extended features are available to users subscribed to the premium version of the app.
Chapter Sixteen
Mastering WordPress
You have to learn WordPress so much that you can manage it easily.
You can publish a post, create a page, install a plugin, install a theme, make simple designs with Elemetor, make some changes, and delete them.
I have made a dedicated video for mastering WordPress.
Watch the video right now.
And over time I will publish awesome posts related to WordPress to keep you updated, so make sure you have subscribed to my newsletter.
Also, you need to know these Top 5 Google Updates to get rid of its penalties.
Chapter of FAQs
FAQs Related To How To Start A Blog Or Website
While helping businesses around
the world, I faced thousands of
questions on how to start a blog
or website.
Here’re some common questions and
their answers you need to know.
So let’s check it out.

What Is The Best Blog Niche?
Here are some of the best blogging niches.
- Health and fitness
- Technology
- Lofestyle
- Travel
- Food and Cooking
- Personal Finance
- Fashion
- Business and Markeitng
- DIY Blog
- Crafts Blog
- Gaming Blog
- Educational Blog
Is Coding Necessary for Bloggging?
Absolutely not. I have shown you how to start a blog or website without any coding from beginning to end
What Is The First Step To Start A Blog?
The first step to starting a blog is choosing a niche. Select a topic that you are passionate about and that has an big audience.
How Do I Choose A Blogging Platform?
Choose a blogging platform based on your needs. WordPress is popular for its flexibility, while Blogger is user-friendly for beginners. But it is not possible to generate income with it.
How Often Should I Post On My Blog?
Consistency is key. Aim to post at least once a week. Regular updates keep your audience engaged and improve SEO.
also keep in mind that only the great content gets results.
Do I Need Technical Skills To Start A Blog?
No, you don’t need technical skills. Many platforms offer user-friendly interfaces and guides. You can learn as you go.
Is Blogging Risky?
Blogging can have risks such as security threats, content theft, legal issues, and reputation management challenges. However, these risks can be mitigated with strong security practices, legal awareness, diverse monetization strategies, and careful management of your online presence.
Is Blogging Really Free?
Blogging can be free or come with costs, depending on how you set it up.
Free Options: Platforms like WordPress.com and Blogger offer free plans with basic features, but they may include ads and have limited customization.
Paid Options: Using self-hosted WordPress.org requires purchasing a domain and hosting, and possibly premium themes or plugins. These costs can add up, but they offer more control and flexibility.In summary, you can start a blog for free, but additional features and professional customization often come with costs.
How To Start A Blog For Free?
To start a blog for free:
- Choose a free platform like WordPress.com or Blogger.
- Sign up and get a free subdomain.
- Pick a free theme and customize it.
- Create and publish content.
You can blog for free, but upgrades must be needed for more features and to generate income.
What Are The Best WordPress Themes For Bloggers?
Choosing the right theme is crucial because it sets the tone for your blog. I’ve tried and tested many, and I can recommend some of the best themes that are responsive, SEO-friendly, and easy to customize.
- Astra
- GeneratePress
- OceanWP
- Divi
How Much Does It Cost To Start A Blog On WordPress?
Starting a WordPress blog typically involves:
- Domain registration: $10–$20 per year.
- Hosting: $3–$10 per month.
- Themes and plugins are free to premium options, with premium themes ranging from $30 to $100.
The total initial investment is generally under $100 for the first year.
Can I Start A Blog On WordPress Without A Domain?
Yes, you can start a blog on WordPress.com with a subdomain (e.g., yoursite.wordpress.com).
For a more professional appearance and full control, it’s best to purchase your domain.
What Plugins Should I Use For My WordPress Blog?
Essential Plugins Include:
- Yoast SEO: For optimizing your content for search engines.
- Akismet: To protect against spam comments.
- WPForms: For creating contact forms.
- Jetpack: For security, performance, and site management.
- Elementor: The best drag-and-drop page builder.
What Are The Best SEO Practices For A WordPress Blog?
- Use keyword-rich titles and descriptions.
- Optimize images with alt text.
- Implement internal linking to related content.
- Utilize SEO plugins like Yoast SEO.
- Ensure your blog is mobile-friendly and has fast loading times.
How Do I Secure My WordPress Blog From Hackers?
- Install security plugins like Wordfence or Sucuri.
- Keep WordPress, themes, and plugins updated.
- Use strong passwords and change them regularly.
- Enable two-factor authentication for an extra layer of security.
What’s The Difference Between A Page And A Post In WordPress?
- Posts: time-stamped entries that appear in chronological order. Ideal for blog content.
- Pages: static and timeless content, like About or Contact pages.
How Often Should I Update My WordPress Blog?
- Regular posts: At least once a week to keep your audience engaged.
- Monthly updates: Review and update your blog’s design, plugins, and content.
- Daily checks: Ensure your site is functioning properly and there are no security issues.
Can I Start A Multilingual Blog On WordPress?
Yes, use plugins like WPML or Polylang to create and manage content in multiple languages. Configure the plugin settings to add the languages you want and translate your content accordingly.
How Do I Add An Email Subscription Form To My WordPress Blog?
- Install a subscription plugin like Mailchimp for WordPress.
- Create a subscription form and customize it.
- Add the form to your blog’s sidebar, footer, or any other location using widgets or shortcodes.
What’s The Best Way To Organize Content On My WordPress Blog?
- Categories: Use broad topics to organize your posts.
- Tags: Add specific keywords related to your content.
- Menus: Create navigation menus to guide visitors to key sections.
How Do I Add A Custom Logo To My WordPress Blog?
- Go to Appearance > Customize.
- Select “Site Identity” and upload your logo.
- Adjust the size if necessary, and save your changes.
Can I Blog in Multiple Languages on WordPress?
- Categories: Use broad topics to organize your posts.
- Tags: Add specific keywords related to your content.
- Menus: Create navigation menus to guide visitors to key sections.
How Do I Integrate Social Media With My WordPress Blog?
- Install a social sharing plugin like Social Warfare or Sassy Social Share.
- Add social media buttons and links to your profiles using widgets.
What Is A Child Theme In WordPress, And Do I Need One?
A child theme allows you to customize your blog without altering the parent theme’s code.
It’s useful for extensive customizations and ensures your changes aren’t lost during updates.
What Are The Most Important Settings To Configure After Installing WordPress?
- Permalinks: Set to “Post name” for SEO-friendly URLs.
- Reading settings: Choose between displaying the latest posts or a static page.
- Discussion settings: Configure comment options to reduce spam.
How Do I Change The URL Structure In WordPress?
- Step 1: Navigate to Settings > Permalinks in your dashboard.
- Step 2: Select the “Post name” option for clean and SEO-friendly URLs.
- Step 3: Save your changes to update the URL structure across your site.
How Do I Add Custom CSS To My WordPress Blog?
- Step 1: Go to Appearance > Customize in your dashboard.
- Step 2: Open the “Additional CSS” section.
- Step 3: Add your custom CSS code and preview changes.
- Step 4: Publish when satisfied.
How Do I Create An Author Bio On My WordPress Blog?
- Step 1: Go to Users > Your Profile.
- Step 2: Fill in the “Biographical Info” section with details about yourself.
- Step 3: Use a plugin like Simple Author Box if you want to customize the display of your bio.
An author bio helps build a connection with readers and adds a personal touch to your posts.
How Do I Manage Comments On My WordPress Blog?
- Step 1: Go to Comments in your dashboard to view and moderate comments.
- Step 2: Approve, reply to, or delete comments as needed.
- Step 3: Adjust settings under Settings > Discussion to control comment rules and moderation.
How Do I Optimize My WordPress Blog For Speed?
- Step 1: Install caching plugins like W3 Total Cache or WP Super Cache.
- Step 2: Optimize images using plugins like Smush or ShortPixel.
- Step 3: minimize plugins and use a lightweight theme.
- Step 4: Choose a good hosting provider that offers fast server response times.
A fast-loading blog improves user experience and SEO.
How Do I Add A Search Function To My WordPress Blog?
- Step 1: Use a search widget by going to Appearance > Widgets and adding the “Search” widget to your sidebar or footer.
- Step 2: Alternatively, use a plugin like Relevanssi for enhanced search functionality.
Adding a search function helps users find content easily.
How Do I Set Up E-Commerce On My WordPress Blog?
- Step 1: Install WooCommerce, a popular e-commerce plugin.
- Step 2: Configure your store settings, including payment methods and shipping options.
- Step 3: Add products and set up product pages.
How Do I Create A Blog Post Schedule?
- Step 1: Plan your content and create a content calendar.
- Step 2: Use editorial plugins like Editorial Calendar to schedule and manage posts.
- Step 3: Stick to your schedule to maintain consistency and engage your audience.
How Do I Update My WordPress Theme Or Plugins?
- Step 1: Go to Dashboard > Updates to check for available updates.
- Step 2: Update themes and plugins by clicking “Update Now.”
- Step 3: Test your site after updates to ensure compatibility.
Regular updates keep your blog secure and functioning optimally.
How Do I Manage User Roles And Permissions In WordPress?
- Step 1: Go to Users > All Users to view and manage user roles.
- Step 2: Assign roles like Administrator, Editor, Author, Contributor, or Subscriber based on user responsibilities.
- Step 3: Adjust permissions to control what each user can access or modify.
Proper user management ensures smooth collaboration and security.
Now It's Your Turn
I hope this guide showed you how to start a blog or website step by step.
Now I’d like to hear from you.
Did I make any mistakes?
Did I miss anything that you think should have been included?
What’s the first action you are going to take?
Are you going to start your blog website right now? Or maybe you are going to purchase hosting.
Did you understand the process of setting up Google Search Console and Google Analytics?
Or maybe you have a question about something you read.
Either way, let me know by leaving a comment below right now.


1 thought on “How to Start a Blog or Website: The Definitive Guide (2024)”
Here’s the source of the highest-paid blogger.
you all can check it out right away.
https://www.founderjar.com/highest-paid-bloggers